


Sweet Pea is 4 years old.

From: When I saw this “Do-It-Yourself Glitter” recipe all over pinterest (originally from this Sprinkles and Sequins tumbler page) I couldn’t wait to try it. I thought, “This looks awesome! Cleaning up salt will be so much easier than real glitter and I won’t have to worry about tiny pieces of metallic flakes everywhere.” I am not a huge fan of glitter because it sticks to everything and I’m always a little worried that Sweet Pea will get it in her eyes, so this looked perfect.
Material:
- A few colors of liquid watercolors or food coloring.
- Salt.
- Small bowls for each color of “glitter”.
- Baking Tray.
- Fork.
- Glue.
- Paper.

Procedure:
- Preheat oven to 350 degrees.
- Pour about 1/4 cups of salt into each bowl.
- Add a few drops of one color of liquid watercolor to the salt in the first bowl and stir until well mixed. Add more liquid watercolor until the salt is the desired shade.

- Repeat with remaining colors.
- Spread the salt on a jelly roll pan and bake at 350 for about 10 minutes.
- Remove from oven, let cool and Voila! You have created… colored salt!
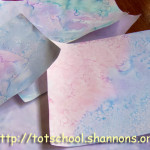
- (Does the stuff in the picture below look just a tiny bit “glittery” to you? Well, don’t get excited, because that is just a trick of the lighting. Let me assure you that in real life, there is nothing glittery or even slightly shiny about it.)

- Let your tot squeeze glue on paper and sprinkle the colored salt over it.

- Show your tot how to bend the paper and pour off the excess.

Observations: This wasn’t actually a failure because Sweet Pea did not share in my disappointment for this project. She was thrilled to sprinkle colored salt all over paper.

So, while the colored salt does not even remotely look like glitter, Sweet Pea was very happy with it and I liked it much better than using sand . It was fairly easy to clean up. Also, this colored salt would work perfectly in a tray for letter writing. So, I would recommend it for those purposes, but defiantly not for replacing glitter in your household.
P.S. Once you have the salt and liquid watercolors out, you might as well try this very awesome painting on salt project.
Notes from the Trenches: You mean aside from the fact that this did not actually turn out to be “glitter”? 🙂
Well, the salt does not adhere to the glue very well so this artwork is not something you’d want to tape to the front of the refrigerator.
Rating: 2 Stars * (Fun, Frugal)
——
♥ Linky Love ♥: I always find something interesting and useful to read at Leo Babauta’s Zen Habits.
——


 "Pin It")

 "Pin It")


Hey if the lil one had fun then it’s a hit!!
ps I have this salt into glitter idea pinned on the to do list also…at least now I know to adjust my expectations ;/
This could be a very inexpensive alternative for sand art! The colors looks vibrant.
Terrific post! I use the colored salt for sand art projects as was mentioned. I love the the colors on salt.
We had the same result. It ended up being delicious on cupcakes (we substituted sugar). If you’re looking for a shinier version for crafts, check out our tutorial. You can make the glitter finer or a bit bigger if you have little hands around and don’t want a huge glittery mess 🙂
If you use less color you get more sparkle. That means you have less color though. If you use too much color you lose all the glitter.
That is an interesting idea that I hadn’t read in any of the other instructions. Thanks for sharing!