From: I have been looking forward to getting a lab kit for Sweet Pea so I was very excited when I found a Primary Science Set that was suitable for preschoolers. The kit included 10 activity cards and this “Dancing Raisins” activity was one of them. Note that this activity can easily be done without a science set just by using common items from around your kitchen.
Material:
5 Raisins
Club soda or other clear soda. (I suspect using Champagne could make clean up time a lot more fun for the adult. )
Beaker or other clear container.
Paper and pencil (optional).
Procedure:
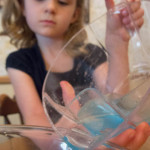
Help your tot fill the beaker with soda water and set the raisins on a plate.
Allow your tot to drop the raisins into the beaker and watch what happens.
Keeping in mind that observation is an important part of the scientific method, ask your tot to describe what she sees. Optionally, use the paper and pencil to record your tot’s observations.
If your tot is interested, discuss why the raisins are “dancing”.
Discussion:
So just why are the raisins “dancing”? Carbon dioxide is forced into the soda to make it “carbonated”. The carbon dioxide can easily come back out of the soda and it does so as little bubbles on the raisins. The raisins are more dense than the soda so they immediately sink when dropped into it. However, when enough bubbles of carbon dioxide cling to a raisin, it is lifted to the surface of the soda. As soon as the bubbles reach the surface, the carbon dioxide is released into the air and the raisin (which is no longer held up by the bubbles) sinks back to the bottom. Eventually too much of the carbon dioxide will escape from the soda and there will not be enough left to form on the raisins and raise them to the surface.
Below is a video of the dancing raisins. (If you aren’t able to see it, try reloading the page.)
Observations:
We had a little trouble with this at first (as described below in the Notes from the Trenches), but once we got going, Sweet Pea was thrilled with this activity. She kept saying, “I love science!” which was exactly the reaction I was hoping for.
This was a wonderfully fun activity for us and I recommend it for preschoolers and up.
I also want give you a quick review of the Primary Science Set that I bought for Sweet Pea. The equipment is made from sturdy and high quality plastic and the pieces are sized correctly for a preschooler’s little hands. In general, I was happy with the set with a few of minor complaints. The first is that the tweezers are impossible to use with the beaker. Sweet Pea tried several times to remove the raisins from the beaker with the tweezers, but they were just too short. When she pushed them into the beaker, she no longer had enough leverage to close them. Secondly, the activity cards never suggest an activity that uses the flask, which was unfortunate because when I asked Sweet Pea what was the first activity she wanted to do, she said, “Something that uses the flask!” Lastly, and this might be overly critical, but it bothered me that all the activities use imperial measurements. The beaker is marked with 1 cup and 1/2 cup measurement lines. Science is almost always done using the metric system and it just seems silly not to introduce children to it immediately.
Notes from the Trenches:
My husband got a Soda Siphon for Christmas but when we tried doing this activity with the soda water it created, the raisins didn’t dance. Apparently there just wasn’t enough carbonation in the water and the raisins just sat on the bottom of the beaker.
I quickly located a can of store bought clear soda in our fridge and we were able to use it for the rest of our activity. However, this little hic-up made me think that it would be fun to turn this activity into a real experiment by using different types of soda (Tonic water, Club Soda, Sprite, 7-up, etc) and counting the number of times the raisins float or sink in a minute.
From: I’m so glad that we have started doing a yearly interview with Sweet Pea. It is always so much fun to look back at all her old answers. I originally saw this great idea at Teach Mama.
Material:
Pen or Pencil
List of Interview Questions.
Procedure:
Print out the interview questions or just jot your own questions down on a sheet of paper.
Ask your tot the questions and write down her answers.
If your tot is old enough, request that she write her name and draw a picture of herself.
Store the interviews somewhere safe so you’ll be able to find them next year. (I love Gretchen Rubin’s idea of family file boxes to store papers like these! I have one for each of us, plus a “family” box.)
Observations: This is a one of my favorite activities. I love seeing how Sweet Pea’s answers evolve as she gets older. I highly recommend it for all ages. Here is our interview for 2012. Everything in blue is a direct quote.
QUESTIONS ABOUT YOU What is your name? [Sweet Pea]
If you could change your name, what new name would you choose? Elizabeth. [This is the name of one of her preschool friends.]
How old are you? 4.
When is your birthday? April 25th.
What is your favorite color? Pink and Blue.
What is your favorite song? Rudolph the Red-Nosed Reindeer.
What is your favorite food? Pasta.
What food do you dislike the most? Bananas. [She used to love bananas, until she learned that I didn’t like them.]
What is your favorite place to eat? Papa Kino’s. [This is a pizza place.]
Who is your best friend? Elizabeth and Fiona.
What is your favorite book? Bear Stays Up. [Bear Stays Up for Christmas is one of the books from the excellent Bear series by Karma Wilson.]
What is your favorite toy? Thomas the Train.
What is your favorite movie? Tinkerbell and Dora
How do you like to spend your time? Paint on the Easel.
QUESTIONS ABOUT YOUR FAMILY What is your Mommy’s name? Shannon.
How old is Mommy? 26. [Ha!]
What does Mommy do? She works on the computer and goes to the grocery store.
What is your favorite thing to do with Mommy? An activity.
What is your Daddy’s name? Ross.
How old is Daddy? He’s not a teenager… so 27.
What does Daddy do during the day? Fixes computers and talks to his clients.
What is your favorite thing to do with Daddy? Bike.
QUESTIONS ABOUT THE FUTURE
What is your favorite thing that happened last year? Getting a bike.
What are you looking forward to doing this year? Ride my bike enough times to learn to balance.
What did you learn how to do this year? Braid.
Where would you like to go on vacation this year? Disney trip that lasts only 1 day. [I could not get her to elaborate on why she only wanted to go for 1 day.]
What will your job be when you grow up? I’m going to be a mom.
Where do you want to live when you grow up? Europe. “Where in Europe?” France.
Do you want to get married someday? Yes.
Who would you like to marry? George. [Another preschool friend.]
Notes from the Trenches: What are you waiting for? Make up some questions and start asking! 🙂 You won’t be sorry.
From: This easy activity was from The Activity Mom. (Her site has a whole bunch of fantastic ideas and you should definitely check it out if you haven’t yet.)
Note: We used simple Christmas words for this activity, but you could also draw shapes for younger tots, use upper and lower case letters, numbers or even match foreign language and English words for older kids.
Prerequisite: If you have never played a matching game with your tot, you should try a beginner style game of matching before you add the “memory” component that is required for this activity.
Material:
30 Hershey’s Kisses.
30 Round (.75 inch) Labels. (We found ours at Target in the office supply section. The circle stickers work perfectly, but in a pinch you could use pieces of masking tape).
Fine-Tipped Sharpie.
Procedure:
Think up 15 words (letters, numbers, shapes, etc) that you would like your tot to learn.
Write or draw the same item on 2 different stickers.
Help your tot stick all of the labels to the bottom of each Hershey’s Kiss. Read the word (or letter, number, shape, etc) out loud as your tot sticks it onto the Kiss.
Set the Hershey’s Kisses upright on a table so the bottoms are hidden.
Take turns flipping over 2 Kisses at a time and reading the words on the bottom.
Whoever makes a match “wins” the pair of Kisses and gets to go again.
Play until all of the Kisses have been won.
Observations:
Sweet Pea absolutely loved this game.
Sweet Pea is just starting to recognize some easy words, so I was worried that this might be a bit too difficult for her, but she was so motivated to win her next pair of Hershey’s Kisses that I don’t think she even noticed she was reading.
This activity would suit a wide range of ages depending on what is written on the labels so I would highly recommend this activity for all tots and children.
Notes from the Trenches: After we were done, we put all the kisses in a candy bowl to be eaten by the whole family, but I can imagine some tots may have difficulty parting with their “winnings”.
A small (non-metal) bowl for the vinegar and salt.
A bowl of water.
Several grubby pennies.
Rags for scrubbing the pennies.
Towels for containing the mess.
Procedure:
Mix the salt and vinegar in the glass bowl.
Put a towel in front of your tot and put a tarnished penny on it.
Show your tot how to dip the edge of a rag in the salt and vinegar mixture.
Rub the penny with the wet rag on both sides for 15 or 20 seconds until it is shiny.
Drop the penny in the water to rinse it and then dry it off.
Allow your tot to clean the rest of the pennies.
Observations: Sweet Pea is borderline obsessed with cleaning things, so this was a huge hit. This activity provides instant gratification because the pennies start to shine up immediately when they come in contact with the vinegar and salt solution
At first, Sweet Pea stuck with cleaning one penny at a time, but we soon moved to dunking several at once into the cleaning liquid.
This activity was a lot of fun for both of us and I would recommend it for kids of all ages.
An Accidental Science Lesson
When we started this activity, I didn’t include the salt because I assumed it was just there to provide grit for scrubbing. I was very surprised when the vinegar alone didn’t shine up the pennies at all! However, as soon as I added salt to the vinegar, the “dirt” magically disappeared, so I figured there must be a chemical reaction occurring. Google to the rescue! I found the following explanation at chemistry.about.com along with 2 related experiments.
The “dirt” or tarnish on a penny is actually copper oxide which forms when the copper on the penny reacts with oxygen in the air. When you mix the vinegar and salt it creates an acid which is able to remove the copper oxide from the outside of the pennies. Afterwards some copper ions get left behind in the liquid. You can then recover the copper by “electroplating” a nail.
I found 2 nails (one galvanized and one non-galvanized). We put them both in the vinegar water and waited. After about 10 minutes, we removed both nails and saw that the non-galvanized nail had been copper-plated. How cool is that?
Notes from the Trenches: If you (or your child has a paper cut), dipping it in the vinegar will hurt like the dickens! Yowch!
From: I have had trouble finding anything about learning the teen numbers. Many activities seem to be about only the numbers 1-10, so I was excited when I saw this wonderful math idea at Chalk Talk because I knew I’d be able to extend it all the way up to the number 20. (If you have any good suggestions for “teen” number activities, please leave a comment below!)
Material:
Play-Doh.
20 craft sticks. (Younger tots might only need 5 or 10. It is best to only introduce a few new numbers at a time.)
Fine-tip felt pen.
Procedure:
Write one number (1 through 20) at the top of each of the craft sticks on both the back and the front.
Mix the craft sticks into a pile.
Help your tot build a long Play-doh snake and press it down to the table.
Tell your tot that you are building a number line. Search through the pile for the craft stick that has the number “1” on it and stick it upright on the far left side of the Play-Doh snake.
Suggest that your tot find the number “2” in the pile and stick it next to the number one.
Allow your tot to continue placing the craft sticks along the number line.
Observations: Sweet Pea has been struggling to learn her teen numbers so this activity was a bit of a challenge for her.
It was a good challenge though and she stuck with it. I love activities like this one that are so engaging for her and present old material in a new way. She really enjoyed the physical aspect of pushing the craft sticks into the Play-Doh and talked the entire time about how she was making a number “fence”.
After she got all of the numbers lined up, Sweet Pea decided that she wanted to make street signs out of them, and of course I let her. She drew a stop sign and a yield sign on paper, cut them out and glued them to the sticks and then drove a toy car around them.
This was a was a great little activity and we’ll probably do it again. It was quick to prepare and I highly recommended it if your tot is still learning numbers.
Notes from the Trenches: Next time we do this, I am going to make a control sheet that shows all of the numbers in correct order so she can check herself instead of asking me which number should be next.
The first time I only wrote the numbers on one side of the craft stick and it was difficult for Sweet Pea to find the one she wanted.
I have had several people ask about Christmas gift ideas, so I thought I would create a post to share with all of you some of our “best hits”.
Board Games
Haba – My First Orchard
My husband and I love board games. Orchard was one of Sweet Pea’s first games. It is better than Candyland, but is still easy enough to be played by preschoolers.
Gamewright Hisss Card Game
Another fun one is Hiss, which is very simple and involves matching up the correct colors to build a snake.
Pretend Play
Thomas And Friends Wooden Railway – Water Tower Figure 8 Set
The all time best toy we have ever given to Sweet Pea is a Thomas the Train Wooden Railway set. She still plays with it almost every day. We bought Sweet Pea this Figure 8 Set over 2 years ago and then slowly expanded our collection with gifts from relatives and via Craig’s List. I strongly prefer the “Wooden Railway” pieces over the other sets.
Thomas And Friends Wooden Railway – Wooden Playtable and Island Adventure Playboard
If you have a train set, I recommend also getting a sturdy train table. Originally I made the mistake of thinking that she could just play on the floor, but that didn’t work very well. The pieces ended up all over the place and Sweet Pea often would want to leave her track set up just when I was ready to pick up. We bought an old train table from Craig’s list, but this official “Thomas” one has great reviews. Note that you have to buy the table and the play board separately.
Little Adventures Cinderella Princess Dress Up Costume and a Fullness Slip for Little Dress Up Shop Dresses Sweet Pea received a Little Adventures Cinderella Dress (along with this half slip to add “pouf” to the dress) from Santa last year and still puts it on almost weekly. We have been very happy with it and it has held up much better than many of her other dress up clothes.
Melissa & Doug Doctor Role Play Costume Set
We also have a pretend doctor kit, which has been fantastic for Sweet Pea. I can’t locate the exact one we bought anymore, but the best part of it the white doctor coat. A lot of the kits just seem to have a box of plastic instruments, but Sweet Pea really likes to dress up in the coat. This Melissa and Doug version got good reviews, although it isn’t the one that we have.
Play Kitchen
Sweet Pea _loves_ her play kitchen. She’s had it since she turned 3 and still plays with it constantly. The problem with play kitchens is that they take up a lot of room. I saw this one that folds away, which might be nice. I also couldn’t find the exact playset that we have so I just linked to a highly rated one, but I think almost any pretend kitchen would do the job.
Melissa & Doug Shopping Cart and Pretend Food Basket
In addition to a play kitchen, Sweet Pea has a shopping cart and a basket of pretend food that she loves. She often goes shopping and then uses the pretend food to cook in her kitchen.
Art Supplies
Crayola 25-count Washable Glitter Glue
Glitter glue is probably Sweet Pea’s all time favorite crafting material. The Crayola glitter glue is much less messy than regular glitter, but is still sparkly and exciting.
AquaDoodle Mat Sweet Pea has spent hours drawing on an AquaDoodle Mat. It allows her to draw on a really big space and I love that there is no mess because the “ink” is just water. Ours was 2nd hand, but just FYI when I was searching for a link to these, I noticed that they were crazy expensive on amazon.com ($37.99!) as compared to Toys R Us ($22.99).
Technology
Wii Console with Mario Kart Wii Bundle – White Sweet Pea has been playing our Wii for years. It is a great “active” video game system for kids. Sweet Pea loves playing Mario Cart with the rest of the family and can even navigate and play WiiFit totally on her own. Now I wouldn’t buy this just for a preschooler, but it would make a great gift for the whole family.
Nintendo 3DS – Cosmo Black and Nintendogs + Cats: Golden Retriever and New Friends Sweet Pea loves playing Nintendogs. I carry my Nintendo DS around in my purse and pull it out for her whenever we have an unexpected delay. It is fantastic in waiting rooms and at slow restaurants. Our Nintendo DS is very old (it was mine before she was even born) so I linked to the updated Nintendo 3DS versions.
Vtech Kidizoom Plus Digital Camera
We bought this Vtech Kidzoom Digital Camera for Sweet Pea last Christmas and she has used it all year. She often runs and grabs it to take pictures. My only complaint is that the pictures are a little blurry, although before we bought this one, I did a lot of research and it seems that was a common complaint with all of the kid cameras.
Sports
Gerty Balls Nobbie Football
This is the best “easy to catch” ball I’ve ever found. It’s soft, squishy and easy to hold. Great for toddlers.
Strider PREbike Balance Running Bike
Sweet Pea got a Strider Running Bike from Santa when she was 2 and has used the heck out of it. She has used it for over 2 years and is just now getting too big for it (and she is very tall for her age). The reason I like it so much is because we take so many family walks and when Sweet Pea rides, she can keep up with us and doesn’t get too tired. I would highly recommend it for 2 or 3 year old tots, but I am fairly sure Sweet Pea will be too big for it by the time she turns 5 next spring.
From: I found this quick little activity from lilla a (site is in Swedish) via pinterest.
Material:
3 or 4 sheets of colorful paper.
Tape.
Scissors.
Procedure:
Cut a 1 inch strips all the way across one sheet of paper, but leave about 1 inch uncut at the top.
Tape the top (uncut portion) of the paper to the table.
Cut the other sheets of paper into 1 inch strips.
Show your tot how to weave one strip over and under through the cuts on the original paper.
Repeat with a different colored strip.
Continue until there is no room left for new strips to be added to the original paper.
Tape the other 3 edges so that half the tape is along the edge and 1/2 the tape is on the table.
Peel the woven page off of the table and fold the excess tape on all 4 edges over onto the back so none of the strips will slip out of the weaving.
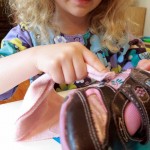
Observations: Sweet Pea worked very hard at this and was totally engaged. I pointed out that she could create a pattern of strips and she really enjoyed creating an A-B-C pattern of strips to weave into the paper.
This weaving activity was a perfect level of challenge for Sweet Pea. I helped her quite a bit at first, but she was able to work completely independently by the end. It required a lot of concentration and fine motor control, which was great for her, but I think it might be too difficult for younger tots.
This activity was very easy to set up and Sweet Pea completed the entire page in one sitting. She spent 20-30 minutes on it and I see us doing this again. I think it could easily be expanded into a Thanksgiving (or other holiday) placemat craft.
I highly recommend this activity for preschoolers (and up) with good fine motor control.
Notes from the Trenches: As she was weaving the edges strips kept moving under the last cut on the taped down sheet. Next time I would cut off about 1 inch from each side of the original (taped down) sheet so it is more of a rectangle so the edges of the strips would have more length and wouldn’t slip under so easily.
1/2 cup Self-rising flour (If you don’t have self-rising flour, you can substitute 1/2 cup all-purpose flour plus 2 tsp baking powder).
1/2 cup Salt. (You may want to try 4 tsp instead. See the Notes from the Trenches below for more info.)
About 3/4 cup water. (You will need just enough to make a smooth paste.)
1 medium bowl.
1 spoon.
3 or 4 small bowls (For each different color of paint).
Liquid water colors or food coloring.
Cardboard (cut from old cereal boxes, etc).
Paintbrushes (or use squeeze bottles as described at House a Forest).
Bowl of water for rinsing the paint brush.
Paper towels for drying the paint brush.
Smock or bib for your tot.
Procedure:
Combine the self-rising flour with the salt in the medium bowl and then stir in the water until you have a smooth paste.
Divide the mixture into the smaller bowls.
Add a different color of liquid water color to each of the small bowls and stir until you have achieved a uniform color.
Let your tot paint on the pieces of cardboard.
Make sure to show your tot how to rinse and dry the paint brush between colors. (Otherwise the added water will cause the paint to become too thin and it won’t puff up in the microwave).
After your tot has finished a painting, cook it in the microwave for about 15-30 seconds. Keep an eye on it. If your put the paint on especially thick, it will need to cook for longer before it totally dries.
Observations: Before I did this activity, I was under the impression that the paint would “puff” a lot as it cooked. However, I found that the paint goes on fairly thick so it was already mostly “puffed” before we cooked it. The first photo shows the paint wet, and the second photo shows what it looked like after it was microwaved. I don’t know why some of the flowers grew so much more (i.e. that red one with the green center) than others.
Sweet Pea really enjoyed this technique and created several pictures.
She was very proud of her rainbow. 🙂
Sweet Pea was totally engaged and was especially fascinated by the hard texture of the paint after it came out of the microwave.
This activity required a bit of prep, but was a lot of fun and I definitively recommend it for a wide variety of ages.
Notes from the Trenches: Our paintings turned out fine, but I thought our paint was very thick and gloppy. Some of the other recipes called for less salt and if I had to do it over again, I would use the recipe from Housing a Forest which called for only 2 tsp of salt per 1/4 cup of flour.
We used heavy paper instead of cardboard for this because I was lazy, but that was a mistake. The paint caused the paper to wrinkle and become so heavy and wet that it was difficult to carry to the microwave.
Cover the jelly roll pan in foil if you are using it to make clean up easier.
Place all of the milk cap letters or alphabet cards face down on the table.
Make sure your child washes her hands.
Spread the Jello powder on the tray.
Have your tot pick 2 letters and then choose the one she wants to practice writing.
Instruct your tot to use her finger to draw the chosen letter in the Jello powder.
When your tot notices that her finger is covered in Jello powder, suggest that she lick it to clean it off. 🙂
Teach your tot how to lift and shake the tray gently to erase the last letter.
Continue letting your tot choose letters and write them in the Jello mix.
If you used foil to cover the jelly roll tray, you can easily fold it up and throw everything away when it is time to clean up.
Observations: Teach Mama made the brilliant suggestion to allow your child to choose which letter she wants to write. This was such a great idea! Sweet Pea loved getting to pick the letter and I don’t think the activity would have been as enjoyable for her without including this “choice” aspect.
As we progressed, Sweet Pea began asking me to show her how to write lower case letters and even asked me to spell out simple words for her to write in the Jello mix.
It would be an understatement to say that she absolutely loved this!
This activity would work well for all ages. If your tot isn’t ready for letters, you could use shapes. On the other hand, if your tot already knows how to write all of the upper and lower case letters, then you could let her practice writing simple words.
I highly recommend this activity for all tots.
Notes from the Trenches: Sweet Pea’s fingers were stained red from the cherry Jello for at least a full day after this activity. She was also on a sugar high for hours.
From: I found these cute “Tattle Monsters” from Giggles Galore. Although those monsters were made by Mariah for her classroom, I thought a Sweet Pea would be able to make something similar with a little help. As a bonus, our monster also serves as a fun Halloween decoration.
Material:
Empty Kleenex box.
Paper tube from an empty roll of toilet paper.
2 pom-poms.
1 piece of paper.
2 colors of craft paint.
Small bowls to hold the paint.
Paint brush.
A foam circle stamp, the end of a short dowel rod, a bottle cap or something else that can be used to “stamp” a 1/2″ circle.
Scissors.
Sharpie.
Glue.
Procedure:
Cut the toilet paper tube in half.
Have your child select a paint color and paint the outside of the Kleenex box and the paper tube. Let the box and tube dry.
Have your tot paint the box and tube again with a second coat. Let the second coat dry.
Show your tot how dip the stamp into paint and then “dot” it on the Kleenex box to make polka-dots. Also let her decorate the paper tube and allow everything to dry again.
Using the Kleenex box as template, draw a rectangle on the piece of paper. Cut out the rectangle so it is slightly (1/2 inch) smaller than the Kleenex box.
Draw a zig-zag line across the rectangle with the sharpie and let your tot cut along it to create the jagged monster teeth.
Glue the teeth into the monster’s mouth.
Glue one pom-pom inside each paper tube.
Glue the paper tubes to the Kleenex box. I rotated the tubes so the eyes were against the sides instead of at the bottom of the tubes.
If you need a few minutes of free time, require your tot to stand and hold the pom-poms or paper tubes in place for 3 or 4 minutes while the glue dries. 😉
Observations: Sweet Pea really, really loved her monster box.
She had an especially good time painting the Kleenex box, and I am now trying to think up other random things I can let her paint.
This activity could be adapted for a wide variety of ages, but it is probably best for preschoolers and up.
Notes from the Trenches: I forgot about the tip from Giggles Galore to “stamp” the dots onto the monster and instead had Sweet Pea just paint them on. She had a really hard time of it and just painted swipes of orange all over the box. I was able to keep my inner perfectionist under control and didn’t yank the paintbrush out of her sweet little hands and just do it myself… But just barely. 🙂
Do you need some inspiration for activities to do with your own tots? You are in the right place!
You can search by age or activity type using the menus at the top of the page, use the tags on the left, or just check out some of my most popular posts, listed below.
Also, you are encouraged to pin any of my photos to pinterest so long as you include a link back to my blog.


 "Pin It")

 "Pin It")

