|
|

I call 5:30pm the “Witching Hour” in our house because I am usually up to my elbows in raw hamburger, my husband is texting me that he will be home late, the dog is scratching at the back door to be let out, and Sweet Pea is invariably whining about some article of lost doll clothing that she needs my help finding Right. This. Instant!
In an effort to cultivate a more pleasant household, I have started forcing allowing Sweet Pea to help me with the dinner time meal preparation. At first it was hard to come up with things for her to do and I just felt like I was going out of my way to keep her busy. But lately, I have noticed that she is actually helping me get dinner on the table faster. So if getting dinner ready is terrible time for your household too, consider allowing your tot to help you.
It may take several lessons from you before your tots are able to do a task independently, but it is well worth taking the time to teach them. Here are some things you may not have considered that they could do:
2. Get out the cooking equipment (measuring spoons, whisks, cutting boards etc) and set them on the counter.
3. Juice lemons and limes with a reamer.
4. Strain seeds out of citrus juice.
5. Scrub potatoes or veggies at the sink with a soft brush.
6. Peel cucumbers, parsnips and carrots. (Be sure to give your tot several explicit lessons on holding one end of the vegetable with one hand and peeling AWAY from himself with the other hand.)
7. Slice mushrooms, butter and soft cheeses with a table knife.
8. Cut the ends off of a green onion with a table knife and then peel off the outer layer to clean them.
9. Use a spoon to remove the seeds from a cucumber.
10. Wash lettuce or herbs and pull the leaves off of the stems (parsley, cilantro, thyme, etc).
11. Use a salad spinner to dry lettuce, greens and herbs.

12. Toss coleslaw or salad with dressing.

13. Whisk together liquid ingredients for marinades and dressings.

14. Whisk together dry ingredients like flour, baking powder and salt.
15. Crack eggs into a bowl. (And I speak from experience when I say that this is best done in the sink. lol.)
16. Mix together batters or stuffing with a small spatula or a chopstick. (Letting your tot use a large spoon is just another way of asking him to fling batter on the ceiling.)
17. Spoon thick batter into muffin tins. (If the batter is thin, you should just do it yourself because your tot will get more on the counter than in the muffin cups.)
18. Add sugar, salt or other spices.
19. Mix together dry herbs and spices for rubs.
20. Sort through beans and throw out small pebbles, clods of dirt or any misshapen beans.

So what are you waiting for? Get your tots into the kitchen and put them to work! 🙂
Have I missed anything? What does your tot do to help you with food preparation?
Notes from the Trenches:
Whenever I start cutting up an onion, Sweet Pea drops what she is doing and flees the kitchen because it makes her eyes sting.
And she still can’t manage to squeeze my garlic press.
Rating: 4 Stars * (Fun, Easy, Independent, Frugal)
——–
♥ Linky Love ♥: My favorite color is blue and I love Melissa from Pigtail Pals: Redifine Girly‘s crusade to convince the world that colors are for everyone.
——–

Sweet Pea is 4 years old.

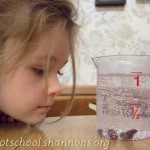
From: “Sink or Float” is a common activity in Montessori classrooms, but I also found a ton of examples on other blogs : No Time for Flash Cards, The Activity Mom, Skip To My Lou, and Living Montessori Now.
Material:
- A large clear jar or bowl filled with water. (We used a beaker from our Primary Science Set.)
- About 10 small objects.
- A notebook or piece of notebook paper.
- A pencil.

Procedure:
- Tell your tot that she is going to drop each of the small objects into the container of water.
- Explain that before she drops the objects in the water, she is going to make a prediction about whether she thinks they will sink or float.
- Help your child create a chart with 3 columns. 1) Item Name 2) The Prediction 3) The Result
- Write down the name of the first object and ask your tot, “Do you think this is going to sink or float when we drop it in the water?
- Record her answer in the prediction column.

- Optionally ask her why she thinks the object will sink or float.
- Allow her to drop the object in the water.
- Ask, “So did it sink or float?” and then record her answer on the chart.
- Repeat with the remaining objects.
Observations: Sweet Pea had a great time with this activity. She loved discovering if something was going to sink or float. She did not know why an object sank or floated. She thought that it had to do with the size of the object and I didn’t correct her, but just let her keep testing the objects to see what happened. For example she predicted that a raisin would float because it is small, but was amazed when she discovered that it floats instead.
I loved doing this activity with her and it will be interesting to repeat in the future to see how her reasoning develops.
Notes from the Trenches: If I’d been thinking, I would have saved the cotton ball (which floated and then sank) for later in the experiment, because it was a little confusing to use as our first object.
Rating: 4 Stars * (Fun, Easy, Independent, Frugal)
——–
♥ Linky Love ♥: I love Mary Ann Johanson ‘s geeky girl take on movies at her Flick Filosopher movie review site.
———

Sweet Pea is 4 years old.

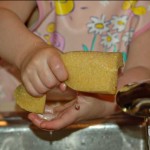
From: This beautiful corn syrup painting idea from eighteen25 has been on my to-do list for over a year.
Material:
- Corn syrup.
- 3-4 Small bowls.
- 3-4 colors of liquid watercolors or food coloring.
- Crayons.
- Paper.
- Paintbrush.
- Smock for your tot.
- Damp Sponge for clean up.

Procedure:
- Put 2-3 TBS of corn syrup in each bowl.
- Stir several drops of liquid watercolor into to each of the bowls.
- Invite your tot to draw something interesting on the paper with a crayon.
- Show your tot how to paint the corn syrup over his crayon drawing.
- After your tot is done, place his painting somewhere out-of-the-way to dry for at least 2 days.
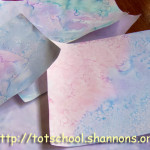
Observations: This activity was very fun for both of us, but VERY sticky. lol.

Sweet Pea loved this and our pictures turned out beautifully shiny and 3-dimensional.

This was really interesting and while it was “sticky”, the corn syrup was easy to clean up with a damp sponge. If you can handle a bit of a mess, I highly recommend it for preschoolers and up.
Notes from the Trenches: Drawing with crayon first is important because the corn syrup does not stick to the wax as well as the paper, so it runs off and pools in the empty spaces. Doesn’t it just looks so neat? I almost didn’t bother with the crayons, but am glad I did.

The paintings look stunning, but are very fragile. While the corn syrup paint does get “dry” after a few days, it will always retain a slight tackiness. The paintings start very shiny, but if you touch them, they will become dull from your fingerprints. Also if you bend the paper, the paint will crack and leave tiny lines all over the surface. Lastly, I worried that saving these might attract ants, so this is mostly a “process, not the product” type of art activity.

Rating: 4 Stars * (Fun, Easy, Independent, Frugal)
———
♥ Linky Love ♥: I am sort of a Nervous Nelly about the weather, especially during spring storm season, so I love this NOAA weather map for viewing watches and warnings. Just click on your state (USA only) for a zoomed in map and then you can click again to read the actual weather warnings.
———-
Sweet Pea is 4 years old.

From: When I saw this “Do-It-Yourself Glitter” recipe all over pinterest (originally from this Sprinkles and Sequins tumbler page) I couldn’t wait to try it. I thought, “This looks awesome! Cleaning up salt will be so much easier than real glitter and I won’t have to worry about tiny pieces of metallic flakes everywhere.” I am not a huge fan of glitter because it sticks to everything and I’m always a little worried that Sweet Pea will get it in her eyes, so this looked perfect.
Material:
- A few colors of liquid watercolors or food coloring.
- Salt.
- Small bowls for each color of “glitter”.
- Baking Tray.
- Fork.
- Glue.
- Paper.

Procedure:
- Preheat oven to 350 degrees.
- Pour about 1/4 cups of salt into each bowl.
- Add a few drops of one color of liquid watercolor to the salt in the first bowl and stir until well mixed. Add more liquid watercolor until the salt is the desired shade.
- Repeat with remaining colors.
- Spread the salt on a jelly roll pan and bake at 350 for about 10 minutes.
- Remove from oven, let cool and Voila! You have created… colored salt!
- (Does the stuff in the picture below look just a tiny bit “glittery” to you? Well, don’t get excited, because that is just a trick of the lighting. Let me assure you that in real life, there is nothing glittery or even slightly shiny about it.)
- Let your tot squeeze glue on paper and sprinkle the colored salt over it.
- Show your tot how to bend the paper and pour off the excess.
Observations: This wasn’t actually a failure because Sweet Pea did not share in my disappointment for this project. She was thrilled to sprinkle colored salt all over paper.

So, while the colored salt does not even remotely look like glitter, Sweet Pea was very happy with it and I liked it much better than using sand . It was fairly easy to clean up. Also, this colored salt would work perfectly in a tray for letter writing. So, I would recommend it for those purposes, but defiantly not for replacing glitter in your household.
P.S. Once you have the salt and liquid watercolors out, you might as well try this very awesome painting on salt project.
Notes from the Trenches: You mean aside from the fact that this did not actually turn out to be “glitter”? 🙂
Well, the salt does not adhere to the glue very well so this artwork is not something you’d want to tape to the front of the refrigerator.
Rating: 2 Stars * (Fun, Frugal)
——
♥ Linky Love ♥: I always find something interesting and useful to read at Leo Babauta’s Zen Habits.
——
Sweet Pea is 4 years old.

From: This healthy recipe from my Great Aunt Grace is great for little hands.
Material:

- 6 oz canned / pouch light tuna.
- 20-30 Mild Whole Peppadew Peppers (The original recipe actually calls for Tennessee cheese peppers, but those are impossible to locate in our part of the country. I have found the Pappadew peppers at an olive bar or by the canned olives at the grocery store.)
- 1/4 Cup Italian seasoned bread crumbs.
- 2-4 TBS Olive oil.
- Medium bowl.
- Airtight container to store the stuffed peppers.
- Aunt Grace’s Tuna Pepper Recipe. (Right click on link and select “Save Link As…” or “Save Target As…” to save the worksheet to your computer. This is a .pdf file and requires Foxit or Adobe Acrobat to view.)

Procedure:
- Dump the tuna into the bowl.

- Let your tot add 1/4 cup of bread crumbs and use her hands to mix them into the tuna.
- Drizzle with 1-2 TBS of olive oil and invite your tot to gently mix everything together. The mixture should be tacky and stick together when it is gently pressed. If it falls apart, add a bit more olive oil until it is moist enough.

- Show your tot how to take about 2 teaspoons of the tuna mixture and carefully push it into each pepper.

- Place the tuna peppers in a single layer into a sealable container and drizzle with 1-2 TBS of olive oil.
- Enjoy!
- The left over peppers can be kept in the sealed container in the fridge for 3-4 days.

Observations: Sweet Pea loves both making and eating tuna peppers. No matter what she is in the middle of, she comes running if I ask her if she wants to make them. I am pretty sure it is the messy mixing that has her hooked.

This recipe is tasty and lots of fun to make. If you like tuna, I would encourage you to give it a try.
Notes from the Trenches:
- I consider tuna a very healthy food, but don’t go crazy and serve these every day for lunch. The EPA states that children and pregnant woman should limit their intake of light tuna to 2 servings per week (or albacore to only 1 serving per week) because, like many fish, it can contain mercury.
- Sweet Pea is an adventurous eater and these are a tiny bit spicy. I am a big believer that kids should eat whatever their adults are eating so this isn’t a problem in our house. Sweet Pea loves them, but I can see some tots complaining that they are too spicy.
- Sometimes the peppers seem to have quite a few seeds left inside. If you find this is the case then first rinse the peppers under running water to remove any stray seeds.
- Sweet Pea got a little over-zealous with the mixing, and I’m sure this could be a problem for all children. I had to remind her to mix everything together gently.

Rating: 2 Stars * (Fun, Easy)
Carnivals: This post is linked up to It’s Playtime at Quirky Mama.
—————————–
♥ Linky Love ♥: Vi Hart’s blog is full of the most awesome videos about everyday math. For example, she uses “fruit by the foot” to play with mobius strips. If you have even just a teeny bit of math nerd in you, you will love her stuff. [NOTE: The blog seems dead, but you can still watch their stuff on youtube https://www.youtube.com/user/vihart]

Sweet Pea is 4 years old.

From: This domino math idea was from Erica’s fantastic Confessions of a Homeschooler blog.
Prerequisites: Your child must know how to count to at least 18 and be able to write the numbers from 0 to 18.
Material:
- Dominos.
- My domino addition worksheet. ( Right click on link and select “Save Link As…” or “Save Target As…” to save the worksheet to your computer. This is a .pdf file and requires Foxit or Adobe Acrobat to view.) You can also use Erica’s slightly simpler worksheet. A link to it is located about midway down the page on her post.
Procedure:
- Set out a selection of dominoes with 1-5 dots on each side.
- Show your tot how to place a domino on top of the gray rectangle on the left side of the sheet.
- Let your tot choose dominoes and place them on each of the remaining spaces.
- Explain to your tot that you are going to count the dots on the left side of the first domino. Use a pencil to point to each dot in turn as you count out loud, “Let’s count these dots. One, two, three, four, five, six. There are six dots on this side.”
- Write that number on the left side of the addition sign in the white rectangle.
- Hand the pencil to your tot and suggest that she count the dots on the right hand side of the line.
- Have your child write the right-side number of dots on the right side of the plus sign in the white rectangle.
- Next have your tot count all of the dots to find the total number of dots on the domino.
- Suggest that your child write the total number of dots in the answer square on the far right of the worksheet.
- Let your child try counting and adding the dots on the next domino on her own.
- Once your child understands the concept, you can introduce dominoes with more dots.
Observations: I was somewhat surprised by how successful this activity was. Sweet Pea loved it and did 4 worksheets! We went through our entire box of dominoes before she was ready to stop and I think she would have kept going if we would have had more of them.

Sweat Pea had some difficulty with the larger numbers, but after a little thought was able to count all of the dominoes on her own and later even requested we move on to “the harder dominoes with more dots”.

I think it was poking the pencil into the dots that made this activity so compelling for her. Sweet Pea loved pushing the tip of the pencil into the domino holes to count the dots.

I would highly recommend this activity for all children who are starting to learn about addition.
Notes from the Trenches: Teach your tot to respect pencils by keeping the point down and to only use them for writing. I don’t mean to sound overprotective, but I almost poked myself in the eye with a pencil when I was about 5. I still have a graphite scar only a few milometers away from the outside corner of my eye so every time Sweet Pea is holding a pencil it sets my nerves on edge.
Rating: 4 Stars * (Fun, Easy, Independent, Frugal)
—–
♥ Linky Love ♥: Have you joined pinterest, yet? If you need an invite, just email me (totschool AT shannons DOT org) and I’ll send you one.
——
Sweet Pea is 4 years old.

From: I saw this fun activity was on Rockabye Butterfly last year, but we had to wait a very long time for it to snow enough for us to try it. I’m happy we finally got a little bit of snow this year before winter was over!
Material:
- Liquid water colors or food coloring.
- Spray bottles. (I have never bought a spray bottle from Target that lasted more than a week. The ones from a hardware store work much better for us.)
Procedure:
- Fill the bottles with water and add several drops of coloring until the color of the water is very bright.

- Turn your child loose outside with the colored water.
- Optionally, prepare hot cocoa for your frozen child to consume when they are done painting.
Observations: Sweet Pea loves being outside so she was very happy with this activity.
It was a little difficult for Sweet Pea to manage the water bottles with gloves on, but with a bit of practice, she was able to do it.

She was not able to create anything quite as nice as some of the other snow paintings I have seen, but I think she will be able to next year, especially if we get more snow. As it was, she loved just spraying random patches of snow to color it.

I liked how this activity caused a lot of running around outside. It was a great project for burning off some energy on a winter’s day. We had a lot of fun and I would recommend it for any tot who has enough strength to use the spray bottles.

Notes from the Trenches: Last year, I made Sweet Pea some hot chocolate after she went out to play in the snow and apparently now it is a tradition. As soon as she came inside this time, she remembered last year and said, “I think I’m going to need some hot cocoa to warm me up now!”
Rating: 4 Stars * (Fun, Easy, Independent, Frugal)
—–
♥ Linky Love ♥: I recently was introduced to the very funny and true-to-life blog Parenting: Illustrated with Crappy Pictures. I suspect all parents with small children will appreciate the dry humor.
——
Sweet Pea is 4 years old.

From: I found these easy coffee filter snowflakes at Art for Little Hands.
Material:
- Coffee Filters. (You can use plain paper, but the coffee filters are a great size and shape for this activity.)
- Scissors. (Maped Koopy Scissors are our favorite.)
- Glitter Glue (optional).

Procedure:
- Show your tot how to fold a coffee filter in half.
] 
- Demonstrate folding the coffee filter in half a second time so the coffee filter is folded into quarters.

- If your tot has good fine motor skills, demonstrate one last fold so only 1/8 of the coffee filter circle is visible.
- Demonstrate using scissors to cut triangles and other shapes out of the sides of the folded coffee filter.
- Show your tot how to gently unfold the paper to reveal a snowflake.
- If you are using glitter glue, let your tot use a q-tip or small brush to apply it to the snowflakes.
Observations: This really held Sweet Pea’s interest and I was surprised by how many snowflakes we ended up making. We probably used 20 coffee filters.
Of course, all the fun is in unfolding the paper to discover your snowflake. Sometimes the snowflake turns out beautifully.

… but sometimes it isn’t quite right.

Sweet Pea has excellent scissors skills and even she had some trouble cutting the folded coffee filter. I would only recommend this for an older preschooler (or perhaps even kindergartner) and older.
Notes from the Trenches: I did not anticipate what a mess this activity would be. I was picking up little pieces of coffee filter off of the floor for the rest of the night.

Rating: 4 Stars * (Fun, Easy, Independent, Frugal)
Carnivals: This post is linked up to It’s Playtime at Quirky Mama.

Sweet Pea is 4 years old.

From: Sweet Pea has been (relentlessly) asking us how to spell certain words. My husband mentioned that one of his teachers had created a personal dictionary for each student and that we should try making one for Sweet Pea.
Material:
- Any notebook with at least 27 pages of paper.
- Pen.

Procedure:
- On the first page, write the alphabet along the right hand side of the page so that each letter is on its own line.
- Write the letter “A” on the top line of the first page.
- Turn the page and write “B” on the second line of the second page.
- It may help to slide the current page just slightly to the left, so you can easily see which line is directly below the current one.
- Continue to write each letter of the alphabet on each subsequent line of the next page until you get to “Z”.
- Show the personal dictionary to your child and explain that this is where you will write the words that he wants to know how to spell. Demonstrate by writing down a commonly requested word or phrase.
- Together with your child, select somewhere to keep the dictionary so he will always know where to find it.
- When your child asks you to spell a word, ask them to bring you the dictionary and write the word in it.
Observations: Sweet Pea is very happy with her new dictionary and I’m very happy that I don’t have to keep writing the same word over and over on random pieces of scrap paper.

This isn’t exactly an activity, but Sweet Pea does enjoy bring us her dictionary to write down words.

This is a fantastic idea and has worked out really well for us. I highly recommend it for for beginning readers /writers.
Rating: 3 Stars * (Easy, Independent, Frugal)
Sweet Pea was 3 years old.

From: I saw this fun winter art project on Valerie’s Frugal Family Fun blog.
Material:
- 3 colors of craft paint. (I preferred to skick with the wintery blues and purples, but you could let your tot choose.)
- Small bowls for the paint.
- Canvas paper (or card stock, but the canvas paper works better.)
- Masking Tape
- Paintbrush.
- Sharpie.

Procedure:
- Stick the masking tape to the canvas paper to create a snowflake shape. (I did mine freehand and even cut some of the tape in half lengthwise and liked our results. However Valerie has excellent instructions if you want to create a more symmetrical snowflake.)
- Pour a small amount of each color of paint into separate bowls.
- Allow your tot to paint directly over the masking tape, encouraging him to cover the entire sheet of paper.

- Repeat until your tot is tired of painting snowflakes.
- After your tot is done, let the painting dry overnight.
- Make sure that the paint is completely dry and then carefully remove the masking tape. If you chose to use card stock instead of canvas paper, be especially careful or the paper will peel off with the tape.

- To make the snowflake “pop”, trace the outline with a sharpie.
Observations: Sweet Pea loves painting and enjoyed this activity. She painted 2 snowflakes before she was ready to quit.

We did this last winter when Sweet Pea was 3 and I did have a little bit of trouble getting her to cover the entire sheet of paper with paint. I don’t think I would have the same problem now. However, I think this would be a great activity even for very young tots because it doesn’t really matter how they paint.

It is a bit messy, but if you like art projects, then I would recommend this activity for all ages.
Notes from the Trenches:
1) Pressing down firmly on the masking tape before painting will help keep the paint from bleeding under the canvas paper. You can even use a Popsicle stick to rub the tape to make sure it is stuck.
2) I don’t advise sticking the tape down firmly if you are using regular paper though, as I had a really difficult time peeling the tape up without causing damage.

Rating: 3 Stars * (Fun, Easy, Frugal)
Carnivals: This post is linked up to It’s Playtime at hands on : as we grow.
|
Need Ideas? Do you need some inspiration for activities to do with your own tots? You are in the right place!
You can search by age or activity type using the menus at the top of the page, use the tags on the left, or just check out some of my most popular posts, listed below.
Also, you are encouraged to pin any of my photos to pinterest so long as you include a link back to my blog.
-Shannon
|


 "Pin It")

 "Pin It")

