|
|

Sweet Pea is 45 months old.

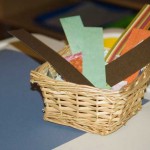
From: Do you want to make some cute homemade Valentines with your tot? We loved these adorable watercolor resist valentines from One Inch World (featured on Teach Preschool’s excellent Tumblr blog).
Material:
- Watercolor paint. (We used liquid water color, but a standard pallet of watercolors should work fine.)
- Several sheets of white card stock or watercolor paper.
- Paint brush.
- Pencil.
- White crayon.
- Scissors.
- Colored card stock or construction paper. (Optional – for matting purposes.)
- Ruler. (Optional – for matting purposes.)
- Glue. (Optional – for matting purposes.)

Procedure:
- Draw a cross on each piece of white paper to divide it into 4 sections. If you want to add a mat to the Valentines, these lines need to be exactly in the middle of the paper (If you are using 8 1/2 by 11 inch paper, that will be at 4 1/4 inches from the long edge and 5 1/2 inches from the short edge.)
- Use the white crayon to draw hearts in each of the sections. Press hard with the crayon and trace over the lines to make them thick.

- Let your tot paint with watercolors over each section to find the “hidden” hearts.

- Let the paintings dry.
- If you will be adding mats, cut each of the painted sections 1/2 inch from each side of your pencil lines to create slightly smaller paintings. Otherwise, just cut along the lines and you are done.
- For the mats, draw a cross on each piece of colored paper and cut along the lines into 4 rectangular sections and help your tot glue each of them onto a rectangle of colored paper.
Observations: This was really fun. Sweet Pea had a great time painting and revealing the secret hearts.

Sweet Pea was totally engaged in this, but we had 24 Valentines to make for her preschool class which was too many to hold her interest for one sitting. It took us a couple of sessions to finish them all.
An older tot could even draw the hearts themselves, but I loved how Sweet Pea was able to do so much of the art for this activity herself and the results were beautiful. I would definitely recommended this project.
Notes from the Trenches: Unfortunately, almost all of the crayons in our house are marketed as “washable” and the hearts I drew with those did not hold up very well to the water colors. Of all the things we tried, the white Crayola Twistables crayon worked best, but I did have to use a little elbow grease to make my lines thick enough. I wonder if a china marker or some sort of oil pastel would have been better.
We tried using a glue stick to attach the paintings to the colored backing, but the paintings were so crinkly that it didn’t work well. Sweet Pea had trouble getting the entire back of the painting coated with glue, so I would let her draw an X with the glue stick and then I used another glue stick to draw all the way around the edges. Even then I had to place the finished Valentines under a heavy book until the glue dried. I think regular school glue might work better.
Rating: 2 Stars * (Fun, Frugal)
Carnivals: This post is linked up to It’s Playtime at hands on : as we grow.

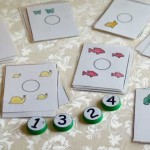
Sweet Pea is 45 months old.

From: I saw a box of cocktail stirrers at Target and thought they would work for the Montessori spindle box activity.
Material:
- 45 sturdy cocktail stirrers (We found ours at Target near the paper cups. I had to buy 2 boxes to get 45 stirrers.), Popsicle sticks or actual Montessori spindles.
- 10 stretchy rubber bands or hair elastics.
- The numerals 1-10 as Milk cap numbers, refrigerator magnets or just written on separate pieces of paper.

Procedure:
- Count out 45 spindles and place them on the table. Place the rest of the spindles out of sight. Put the 10 rubber bands and the milk cap numbers on the table.
- Ask your tot to find the number “1” milk cap number and place it directly in front herself. Then request that your tot to hand you 1 spindle. Say “1” out loud as she places the spindle in your hand.
- Demonstrate wrapping a rubber band around the spindle and place it under the number “1” milk cap number.
- Ask your tot to find the number “2” milk cap number and place it in front of herself. Ask for 2 spindles and count out loud as each spindle is placed in your hand.
- Hand both spindles back to your tot and invite her to wrap a rubber band around them, and then place them under the number “2” milk cap number.
- Repeat for the remaining numbers.
Observations: Sweet Pea was interested in this activity, although she did not enjoy it as much as some of our art projects.

Also, she would not use the rubber bands to make “bundles” of spindles for each number. She refused to even try and insisted on just placing the sets of spindles under each number. However, when she was done, she did want to see me put rubber bands on each bundle, so I obliged. I am wondering if the action of putting the bands on is too difficult for her age.

This activity would also work with only smaller numbers. Just make sure that you use the correct number of spindles. There is a control of error in having the exact right number of spindles, so if you only use the numbers 1 – 4, you would want to limit the available spindles to 10 (Since 1+2+3+4 = 10).
Despite our difficulty with the bands, I thought this activity went well and kept Sweet Pea engaged. I would recommend counting spindles for someone looking for an quick math activity, although I would reserve the banding aspect for an older tot.
Notes from the Trenches: The real Montessori spindle box activity uses a box with separate compartments from 0-9 to house the spindles. I thought the rubber bands would work just as well, but since Sweet Pea refused to use them, we had a hard time keeping the spindles contained. I will probably make or buy a 10 compartment box before I try this again.
Rating: 2 Stars * (Easy, Frugal)
Sweet Pea is 45 months old.

From: Long ago I saw this beautiful art project on Blissful Moments (a blog which is now private) and I fell in love with the results.
Material:
- Jelly roll pan or disposable baking tray.
- Another jelly roll pan or cookie sheet.
- Shaving cream.
- 3-4 different colors of liquid water color or food coloring.
- A paintbrush, un-sharpened pencil or something similar to swirl the colors.
- Watercolor paper, card stock or other very heavy paper.
- Pancake turner or cardboard to scrape away the shaving cream.
- A towel to clean up messes.
- A smock or bib for your tot.

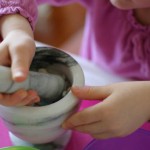
Procedure:
- Fill the tray with shaving cream.

- Sprinkle the shaving cream with drops of liquid water color.

- Let your tot use the end of the paintbrush to swirl the colors together.

- Lay a piece of heavy paper over the swirled colors and press it down so that the underside is completely coated.

- Remove the paper from the tray and lay it colored side up on jelly roll pan.
- Allow your tot to use the pancake turner to scrape away the shaving cream.

- Finish scraping off any shaving cream that your tot missed and allow the paper to dry.

Observations: This activity was one of the biggest hits we have had in a while. Sweet Pea loved it. I loved it and the marbled paper turned out gorgeous.

The only problem was when we ran out of watercolor paper and I told Sweet Pea that we were done. She was extremely unhappy and for the rest of the day kept asking, “When can we do the shaving cream again?”
This activity requires quite a bit of parental involvement, but is lots of fun and produces a very nice result. It is highly recommend for anyone who enjoys art projects.
Notes from the Trenches: This project is messy, but the liquid water colors (which are labeled as “washable”) came off our hands fairly easily. I doubt food coloring would be so easy to clean up.
The paper needs to be very heavy. I used regular paper for our first sheet and it ripped when we tried to scrap away the shaving cream.

Also, we never started over with fresh shaving cream. We just kept adding more liquid watercolors to the top of what was already in the tray. The background color on our sheets eventually became a dark purple, but it didn’t hurt the final product; However, I think it helped that I made sure that all our colors were near each other on the color wheel. If we had used 4 random colors, I think our background might have ended up a ugly brown instead of a rich purple.
Rating: 2 Stars * (Fun, Frugal)
Sweet Pea is 45 months old.

From: I hadn’t heard of bleeding art tissue paper until I read Valerie’s deceptively titled post “Low-Mess Mitten Painting” on her Frugal Family Fun blog. I couldn’t wait to try this new Low-Mess style of painting.
Material:
- Bleeding art tissue paper. (We found a pack next to the regular tissue paper at Micheal’s for about $5. Note that regular tissue paper will NOT work.)
- Scissors.
- Watercolor or other sturdy paper.
- Bowl of water.
- Paint brush.
- Sharpie (optional).
- Smock or bib for your tot.
- Plastic tablecloth to protect your work area.

Procedure:
- Cut the bleeding art tissue paper into desired shapes. I followed Valerie’s lead the first time and cut out mitten shapes.
- Wet your watercolor paper by running a damp sponge over it.
- Place the tissue paper shapes on the watercolor paper.

- Allow your tot paint over the tissue paper with water.

- Peel away the tissue paper.

- If desired, use a Sharpie to draw an outline around the shapes to make them pop.

Observations: This activity was a blast. I actually think I liked it better than Sweet Pea did. Her favorite part was peeling the tissue paper off to reveal the stained paper below.
After we painted the mittens, we just started cutting out squares of paper and painting those with water.

Both of us were very occupied with our own projects for quite some time.

Unfortunately there are some big problems with this activity, which I will outline below; However, we had so much fun that I would recommend it if you and your tot enjoy messy art projects.
Notes from the Trenches: Valerie is a liar. There is nothing low-mess about this activity. The color from the tissue paper ran everywhere as soon as the tissue got wet. It leaked off the sides of the paper and dripped on the floor. It got all over the table and our hands. Both Sweet Pea and my fingers were stained for 2 days after we did this. For less mess, give me Crayola craft paint any day.
Despite the fact that the dye from the tissue got everywhere, it didn’t actually “bleed” enough onto the watercolor paper. The first time we did this we didn’t wet the watercolor paper, and as you can see from the mitten picture below, there are several white spots where the watercolor paper did not pick up any color.

However, if you wet the watercolor paper too much, the tissue will bleed so much that your shapes will be dull and not well defined.

I thought there was a steep learning curve to getting the tissue to work correctly. None of our pictures turned out as well as the ones on the Frugal Family Fun post.
Rating: 1 Stars * (Fun. Lots and lots of fun!)
Sweet Pea is 45 months old.

From: I was inspired by pictures of Foam Shape Puzzles and a Mystery Pattern Blocks game in Erica’s Logical Thinking post at ABC and 123. I thought that the cheap foam shapes would be perfect for a patterning activity.
Material:
- Self-adhesive foam shapes. (or non-adhesive shapes and glue)
- 3 Pieces of paper.
- Scissors.
- Basket.

Procedure:
- Cut each piece of paper into 4 strips.
- Take several handfuls of shapes and separate them by color and/or shape.

- Lay foam shapes across one of the paper strips in a pattern. Make sure you have enough shapes to cover the entire strip of paper.
- Stick the first half of the foam shapes to the strip. Remove the remaining foam shapes to a basket.
- Repeat with the remaining foam shapes and paper strips. Use a variety of patterns (ABAB, AABAAB, ABCABC, etc) depending on your tot’s age.

- Present your tot with one of the pattern strips and the basket of foam shapes.
- Explain that you want your tot to complete the pattern. Say something like, “This pattern has an orange square, then a blue square, then orange, then blue. What do you think comes next?”
- When your tot gives the correct answer, invite her to search the basket for the correct shape and allow her to place it in the correct place on the strip.

- When your tot reaches the end of the strip, congratulate her on finishing and ask if she would like to choose the next pattern.
- Repeat until your tot is ready to quit or you run out of strips.
Observations: I had high hopes for this activity, and it started well, but Sweet Pea quickly grew tired of it. She did 2 strips with an ABAB pattern without help and then said she was done. She had more fun trying to wear the strips than creating them.

I thought maybe the ABAB patterns were just too easy for her, so I asked her if she wanted to try a harder one. I showed her the most complicated pattern I had created, but it seemed to be _too_ hard. She only finished it by asking me, “Which piece goes next?” a couple of times. After we were done, she announced that she wanted to do something else.

I wouldn’t call this a disaster, but it certainly didn’t hold her attention for more than a few minutes. I can’t figure out why this activity didn’t go well for us. Maybe I will try the more complicated strips again in a few weeks.
I would recommend this activity if you have a bunch of extra foam shapes around or if your tot is especially interested in patterning.
Notes from the Trenches: Creating the pattern strips was much harder than I thought it would be. The tub of shapes I bought seemed to be full of yellow squares and rectangles, but not much else. I had trouble finding enough different shapes and colors to start my pattern while reserving enough for her to complete it. Make sure you have all the shapes you need to do an entire strip before you actually start sticking the pieces down!
I tried to set this activity up so that it could be reused. I stuck half the foam shapes down and Sweet Pea was supposed to just place the rest of the foam pieces along the strip in the correct place. However, as soon as she realized that the first few shapes were stuck to the paper, she wanted to know how she could get her shapes to stick too. I told her that they were not sticky and she was just supposed to lay them on the paper. She contemplated the problem briefly and then said, “I need glue.” I gave up on trying to dissuade her and just showed her how to peel off the backing. At least that is good fine motor control, right?

Rating: 1 Stars * (Independent)
Carnivals: This post is linked to Delicious Ambiguity’s Tot Tuesday #40 and One Hook Wonder’s Montessori Monday. Visit these site to see some other great ideas for your tots.

Sweet Pea is 45 months old.

From: Amy posted this on Teach Mama last year and her family recently did it again. I interviewed Sweet Pea last March, but I like the idea of associating the interview with the start of the New Year, so we just did it again, too.
Material:
- Pen or pencil.
- List of interview questions. (Amy has created one or you can use mine.)
Procedure:
- Print out the interview questions or just jot some down on a sheet of paper.
- Let your tot know that you want to interview them.
- Ask questions for as long as your tot remains interested.
Observations: This is a super quick and easy activity and such a fun snapshot of your child’s interests. I highly recommend it for all ages. Here is our interview for 2011. Everything in blue is a direct quote.
What is your name? Miss [Sweet Pea].
How old are you? 3.
When is your birthday? In April.
Who is your mom? Shannon.
What does your mom do doing the day? Work. What sort of work? Well… I don’t know.
What does Daddy do during the day? Daddy goes to work. And what does he do at work? He works on his computer.
What is your favorite color? Blue… And pink!
What is your favorite song? Rudolph. And I love to watch Rudolph… because I just love him.
What do you want to do when you are a grown up? Well… take care of my own baby.
Where do you want to live when you grow up? Uh, I don’t know yet.
What is your favorite food? Pasta and macaroni and cheese.
What is your least favorite food? [Shrug.] I like to drink tea. (She means decaf hot tea with lots of milk.)
What is your favorite animal? A giraffe.
Who does our family love the most? Me!
What is your favorite ice cream flavor? Chocolaty.
Where do you like to eat? [Blank stare] What restaurant? McDonald’s.
What is your favorite book? Bear Feels Scared. (Bear Feels Scared by Karma Wilson is an excellent book for tots.)
What is your favorite toy? Thomas.
How do you like to spend your time? LEGOs. (LEGOs? Where did that come from? We don’t own any LEGOs.)
What is your favorite thing that happened last year? Getting presents.
What are you looking forward to doing this year? Opening gifts again. I want to open gifts next year.
Notes from the Trenches: Sweet Pea was much more interested in the interview this time. I was a little sorry I didn’t have more questions ready for her, but I think it was good we stopped before she got bored.
I am prone to delaying things until the perfect time. As I said before, I encourage you to print out the questions and ask them right away. Your tot will be another year older before you know it.
Rating: 3 Stars * (Fun, Easy, Frugal)
Sweet Pea is 44 months old.

From: I saw this on Carisa’s 1+1+1=1 blog. She originally got the printables from Musings of Me (which also has some other great Christmas worksheets). I loved the concept, but I don’t have a color printer and wanted the stars to be easier to cut out, so I made up my own sheets.
Material:

Procedure:
- Cut out the stars from the Numbered Star Worksheet.
- Put the Christmas Tree Counting Worksheet 1-4 on the table.
- Select the stars numbered 1, 2, 3, and 4. Place these stars them near the top of your work space and put the rest of the stars aside.
- Sit next to your tot and explain that you want to count the ornaments on each tree and then put the correctly numbered star on the top.
- Point to the first tree and invite your tot to count the ornaments. Next ask them to select the star shows the same number as there are ornaments on the tree.

- Allow your tot to glue the ornament onto the top of the tree. Offer advice on how much glue is appropriate to use for each star.

Observations: Sweet Pea has been very interested in counting lately, but this was an even bigger hit than I expected. I think that the combination of counting and gluing was irresistible for her. Although I had to give her significant help with counting the higher numbers, she wanted to do every tree all the way up to 12.

This was a good challenge for Sweet Pea. She was very proud of her Christmas tree worksheets when she was done and insisted on hanging them up by her bed so she would be able to see the Christmas trees when she woke up in the mornings.

I would highly recommend this activity for any tot that is interested in numbers or gluing.
Notes from the Trenches: Sweet Pea loved squeezing the glue bottle and had some trouble regulating how hard she squeezed it. As with the Packing Peanut Collage activity, we had to discuss what “just a little bit” meant several times.
It occurred to me after the fact that Sweet Pea would have loved to use glitter glue to color in the ornaments.
Rating: 3 Stars * (Fun, Easy, Frugal)
Sweet Pea is 44 months old.

From: I do a lot of my Christmas shopping online and recently have been inundated with boxes full of packing peanuts. Instead of just throwing them away, I let Sweet Pea make a collage with them.
Material:
- Paper.
- Styrofoam packing peanuts.
- Washable white glue. (We like the Crayola school glue.)
- Bowl to contain the peanuts.

Procedure:
- Put the packing peanuts in the bowl.
- Put the paper, bowl of packing peanuts and glue in front of your tot.
- Demonstrate how to hold the glue bottle upside down and squeeze a small amount of glue onto the paper.
- Pick up a packing peanut and show your tot how to stick it to the fresh glue.
- Let your tot try.

Observations: Sweet Pea had never used a glue bottle before, so I thought that this activity would keep her attention, but I was wrong. She sort of enjoyed it, but only completed one sheet of paper before she was done.
She did like putting on and taking off the lid for the glue. 🙂

Next time, I would use a marker to draw a picture and have Sweet Pea fill it in with the packing peanuts. For example, if we get white packing peanuts, I am planning on drawing a snowman and letting her fill it in. Sweet Pea loves snowmen, so I think this would be far more interesting for her.

Every tot is different, so you might want to give this a try if you have a bunch of packing peanuts around. A younger tot might be satisfied with the just gluing the peanuts onto the paper. However, the novelty would probably wear off quickly for an older tot if this isn’t part of a more structured craft.
Notes from the Trenches: Packing peanuts are oddly and annoyingly messy. They have an electrostatic charge and are almost impossible to pick up, so you probably don’t want to just hand an entire box of them to your tot.
Sweet Pea had some trouble controlling herself with the glue bottle. She liked watching it come out and I had to remind her “that’s enough” a couple of times.
Rating: 3 Stars * (Easy, Independent, Frugal)

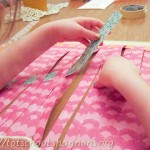
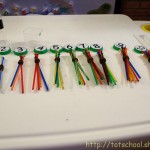
Sweet Pea is 43 months old.

From: I am sure I’m not the first one to do this, but I don’t remember where I have seen it before. It is an oldie, but goodie.
Material:
- 4-5 Drinking straws. (We used clear ones because we had them on hand, but I think colored ones would work better.)
- Plastic tipped beading laces. (We found these at Micheal’s, but you could also use an old shoelace.)
- Scissors.
- Bowl.
- Tray (Optional).
- Buttons (Optional).

Procedure:
- Cut the straws into approximately 1 inch pieces and place them in the bowl.
- Tie a knot near one end on each of the laces so the straw pieces won’t slip off as your tot strings them.

- Show your tot how to push the front of the lace through the center of a straw piece.

Observations: Sweet Pea completed 2 of the laces before she started to loose interest.

When she grew bored of stringing just the straws, I added some buttons to the mix. Sweet Pea enjoyed the colorful buttons much more than the plain straws and begin talking to herself about how she was making “necklaces” for people.

This was a super fast activity to set up and I would recommend it for a variety of ages. It is a great fine motor control activity for younger tots and you could incorporate patterning work with an older tot.

Notes from the Trenches: The use of laces, straw pieces and buttons all require supervision.
I tried to let Sweet Pea cut the straws on her own, but her kid-safe scissors weren’t sharp enough and the straws just bent between the blades. An older child might be able to do her own cutting though.

Rating: 4 Stars * (Fun, Easy, Independent, Frugal – if you just use shoe laces & straws)
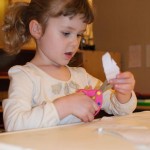
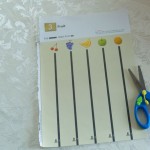
Sweet Pea is 43 months old.

From: I observed Sweet Pea doing this activity in her preschool class.
Prerequisite: If your tot hasn’t worked with scissors before, I suggest you try the Introduction to Scissors – Cutting Play-doh activity first.
Material:
- Scissors (Our favorite pair are the Koopy Kid Scissors from Moped.)
Procedure:
- Print out the Feather Cutting worksheet and cut it in half. You may want to print on colored paper to make this activity more interesting.
- Help your tot hold the scissors properly if necessary and give him one of the feathers.
- Invite your tot to cut out the feather along the thick outline.

- After your tot has cut out the feather, encourage him to cut along the narrower lines to make the feather look more realistic.
- Repeat with as many feathers as your tot is interested in cutting.
- For Thanksgiving, you could use these feathers to create a turkey.
Observations: When I observed Sweet Pea’s class, she and her classmates all loved this activity and I thought it would be a great activity for home too.

Once Sweet Pea had finished cutting out the first two feathers, I tried to give her another one to do, but she refused. She insisted that she could only cut two per day. Sweet Pea’s preschool teacher limited the students to two feathers per day and as a result Sweet Pea limited herself at home also.
This is an easy activity that I recommend for an older tot.
Notes from the Trenches: The feather cutting activity may be too tricky for a younger tot who has not used scissors much before.
Please strictly supervise your tot while they are using scissors.
Rating: 4 Stars * (Fun, Easy, Independent, Frugal)
|
Need Ideas? Do you need some inspiration for activities to do with your own tots? You are in the right place!
You can search by age or activity type using the menus at the top of the page, use the tags on the left, or just check out some of my most popular posts, listed below.
Also, you are encouraged to pin any of my photos to pinterest so long as you include a link back to my blog.
-Shannon
|


 "Pin It")

 "Pin It")

