|
|

Sweet Pea is 43 months old.

From: Simple. Messy. Fun!, Sycamore Stirrings and Our Crafts -N- Things all had variations on this activity.
Material:
- Washable markers.
- 5 – 10 coffee filters.
- Spray bottle.
- Jellyroll pan, a plastic tablecloth or some other way to cover the work area.
- Towel.
- Smock or bib (optional).

Procedure:
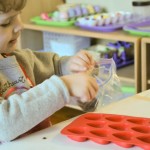
- Let your tot color on the coffee filters with the markers. Encourage your tot to use more than one color on each filter if possible.

- Place a colored coffee filter in the jellyroll pan.
- Aim at the coffee filter and demonstrate squeezing the spray bottle to create a spray of water.
- Hand the spray bottle to your tot and let her spray it until most of the marker ink has spread across the coffee filter.

- Move the wet coffee filter to a towel and let it dry for several hours.
- Repeat with the remaining coffee filters.
- After the coffee filters have dried, you can get creative and use them to make a variety of different crafts, such as butterflies, leaves or flowers.
To make an easy flower:
- Fold each filter into eighths.

- Twist the bottom of the filter.

- Tape several of the twisted filters together.


Observations: Sweet Pea was crazed about this project and has asked to do it many, many times since I introduced it to her. She loves coloring the coffee filters and will spend a long time making a stack of filters to spray.

Sweet Pea’s favorite part is actually getting to use the spray bottle and watching her marks transform on the coffee filter.

This activity is highly recommended. Using the spray bottle is great fine motor control practice, although a younger tot might have difficulty squeezing the handle.
Notes from the Trenches: Wet marker ink will run everywhere. Obviously this activity is messy.
Make sure you are explicit when explaining where your tot should point the nozzle of the spray bottle.

Rating: 4 Stars * (Fun, Easy, Independent, Frugal)

Sweet Pea is 43 months old.

From: I found this really quick activity at Sunbeams and Sanity, who found it on Montessori for Everyone.
Material:
- Scissors.
- Pen.
- Tray (optional).
- A laminator or press and seal lamination pockets (optional).

Procedure:
- Cut out all of the cards and laminate if desired.
- Write a small “c” on the back of all of the curved cards and a small “s” on the back of all of the straight cards.
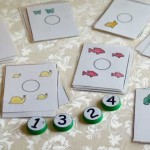
- Reserve the “Curved” and “Straight” labels and and mix up the rest of the cards.
- Sit next to your tot and explain that you are going sort the cards based on if they show a straight or a curved line.
- Put the label that says “Curved” at the top left side of the table. Place the “Straight” label at the top right side. Put the rest of the cards in a pile next to you.
- Pick up a card that shows a straight line. Say, “This is a straight line. A straight line takes the shortest path between two points.” Quickly move your finger along the line and then place it under the word “Straight”.
- Next pick up a card that contains a curved line. Slowly draw your finger along the path as you say, “This is a curved line. A curved line does not take the shortest path between two points.”
- Next had your tot a random card and ask if it shows a straight or curved line. If your tot is are correct, praise her, point to the correct label and ask her to move the card there. If your tot is incorrect, just set the card back in the pile and repeat the lesson above with two new cards.
- Once your tot has the hang of it, invite her to finish sorting all of the cards on her own.

- When your tot has finished sorting the cards, show her how to turn them over and check to make sure that all the cards under the “Straight” label have an “s” on the back and all of the ones under the “Curved” label have a “c”.
Observations: I was surprised by how much Sweet Pea enjoyed this activity.

It was so quick to set up and she worked until she had sorted every card in the pile. She deliberated about each card, but the only one she got wrong was the right angle.

Even though this seems really simple, it really appeals to Sweet Pea. She has repeated this work a couple of times since I first showed it to her. I would recommend this activity for other tots.
Notes from the Trenches: This activity went very well. I can’t think of anything that I would change about it.
Rating: 4 Stars * (Fun, Easy, Independent, Frugal)
Carnivals: This post is linked to One Hook Wonder’s Montessori Monday. Visit her site to see some other great Montessori ideas.
Sweet Pea is 43 months old.

From: When we made sugar chalk drawings, I had the idea that the same technique would work perfectly for spider webs and have been eagerly waiting for Halloween to give it a try.
Material:
- 1/3 cup Sugar.
- 1 cup Water.
- Bowl.
- Whisk.
- 1 or 2 pieces of chalk.
- Several pieces of purple or black paper.

Procedure:
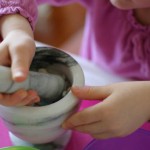
- Whisk 1/3 cup of sugar into 1 cup of water until all of the sugar has dissolved. Let your tot help if he knows how to use a whisk.

- Put the chalk into the sugar water and let it soak for several hours. (Overnight works best, but 3 days is too long.)
- Remove the chalk from the sugar water and shake off any excess liquid.
- Draw 4 large lines that cross in the center of the paper. Create the same pattern on all the remaining sheets of paper.

- Sit next to your tot and slowly demonstrate how to draw a spiral that starts in the center of the paper and continues all the way to the edge of the paper.

- Give your tot a piece of paper with intersecting lines on it and help him draw a large spiral on it.
Observations: Sweet Pea had lots of fun with this and so did I. She struggled with the spiral at first. I love how her tongue is sticking out in the picture below. She always does that when she is concentrating extra hard. 🙂 After a couple of practice pieces though, she got onto it and was able to draw the spiral without my help.

I would recommend this activity for an older tot, but I think a younger tot would have too much trouble trying to draw a spiral.
This was so much fun! I love the way our spooky spider webs turned out.
 
Notes from the Trenches: When you first draw with the chalk, the lines may be almost invisible, but they should quickly turn bright white as they dry. If, as you are drawing, the lines start becoming thin and scratchy – as if you were just drawing with regular chalk, you probably need to put the chalk back in the solution to soak for longer.
An older child would be able to draw the intersecting lines by himself, but Sweet Pea couldn’t manage it yet. Also, an older child would be able to stop at each line to make a more accurate spider web shape instead of just spiraling around the paper.
When we did sugar chalk drawing the first time, Sweet Pea loved dipping the chalk back in the sugar solution each time and since she had done it that way before, she was unwilling to try the activity without being allowed to dip her chalk in the sugar water. However, there are 3 reasons not let your tot have the bowl of sugar water. First, it will make a huge sticky mess when he spills it. Second, he will continually lick his hands throughout the entire activity and lastly, the chalk doesn’t draw as well when it is very wet from repeatedly being dipped into the solution.
Rating: 3 Stars * (Fun, Easy, Frugal)

Sweet Pea is 42 months old.

From: Here is an easy activity from Pink and Green Mama and A Bit of This and A Bit of That.
Material:
- Styrofoam block. (We got ours from Micheal’s.)
- Golf tees.
- Marbles. (For some reason, I had difficulty finding marbles. I ended up buying them from the really fun Moon Marble Company.)
- Washable marker (optional).

Procedure:
- Show your tot how to use the marker to make a dot on the Styrofoam block.
- Allow him or her to make about 10 dots on the Styrofoam.

- Demonstrate picking up a golf tee, carefully lining it up with one of the dots and then pushing it into the Styrofoam.
- Let your tot push the rest of the tees into the Styrofoam.

- Once all of the golf tees are arranged, show your tot how to pick up a marble and very slowly balance it on one of the golf tees.
- Encourage your tot to put a marble on each of the rest of the tees.

Observations: This activity was the perfect challenge for Sweet Pea. I didn’t realize it, but the activity gets harder and harder as the golf tees get filled with marbles. Toward the end, every time she would put a marble on a tee, she would knock one (or five) other ones off of their tees.

This activity was excellent. It was easy to set up and really held Sweet Pea’s interest. Despite knocking over the marbles many times, she worked diligently until she got all of them balanced on the golf tees. I highly recommend this activity for older tots.
I can see how this could also be turned into a good game. Each player starts with 5 marbles and then players take turns trying to balance a marble. Any marble that gets knocked off of a tee is returned to the player who knocked it off and the player who runs out of marbles first wins.
This activity could be made even more challenging by requiring your tot to use tongs to place the marbles. It could also be turned into a quick sorting activity with some extra pieces of Styrofoam.
Notes from the Trenches: Sweet Pea had a hard time pushing the golf tees into the Styrofoam. I had to redo a couple of them so that they were straight enough to hold a marble. For a tot that is any younger, I would recommend just setting up the golf tees ahead of time.

Obviously the marbles are a choking hazard and the golf tees are sharp.
Rating: 3 Stars * (Fun, Easy, Independent)
Carnivals: This post is linked to One Hook Wonder’s Montessori Monday. Visit her site to see some other great Montessori ideas.

Sweet Pea is 43 months old.

From: I found this homemade finger-paint recipe at Not Just Cute.
Material:
- Printer friendly version of this fingerpaint recipe. (This is a .pdf file and requires Foxit or Adobe Acrobat for viewing.)
- Stove.
- Saucepan.
- 3 TBS sugar.
- 1/2 Cup cornstarch.
- 2 Cups cold water.
- Containers for holding the finished finger-paint.
- Liquid watercolor or food coloring.
- Liquid dish soap.
- Whisk.
- Jelly roll tray or cookie sheet. (Optional, but excellent at containing the mess).
- Finger-paint paper. (Proper finger paint paper is heavy and slick so that the paint slides across it smoothly without wrinkling the paper. However you can use any type of paper or could even let your tot paint straight on the tray. I have also heard that freezer paper is a good cheap alternative for finger-paint paper.)

Procedure:
- Combine the sugar and cornstarch in the saucepan.
- Pour the water over the sugar and cornstarch and mix thoroughly.
- Cook over medium-low for about 5 minutes, stirring constantly, until thickened.

- Remove from heat and a few drops of liquid dish soap and gently combine.
- Let the mixture cool and then divide between containers.
- Add a few drops of food coloring to each container.

- Stir and add more coloring as needed to reach the desired hue.
- Put the paper in the jelly roll pan.
- Set the materials in front of your tot and let them paint.

Observations: The finger-paint was much too thick at first. It was clumpy and so sticky that the paper was lifting off of the tray when Sweet Pea tried to spread it across the page.

After thinning out the paint with some water, we achieved a somewhat better texture, but I think I may have added to much water and made it too runny.

Of course Sweet Pea loved this activity. It was messy, hands-on and colorful. I loved it far less than Sweet Pea, but I think finger-painting is one of those things that all tots should do so I would recommend it for a day when you are feeling adventurous.
Notes from the Trenches: Sweet Pea was napping while I made up our finger-paints, but if you want to include your tot more in the process, Not Just Cute has the really great idea of allowing your tot to mix coloring into the finger paint using a zip-lock baggie.
I am not sure if I would make my own finger-paints again. I know it is more frugal, but Crayola finger-paints are easier, have a better texture and keep much longer than this homemade version.
Keep in mind that finger-painting is all about the sensory experience and not really about creating art. When we were done, I just wadded up all the used finger-paint paper and threw it in the trash.
Rating: 3 Stars * (Fun, Independent, Frugal)

Sweet Pea is 41 months old.

From: I saw this quick Pegging Pom-Poms activity on All Join In.
Material:
- Clothespins.
- Ice cube tray.
- Pom-Poms or cotton balls. (You will need as many pom-poms as there are spaces in your ice cube tray.)
- Bowl or basket for the pom-poms.

Procedure:
- Put the pom-poms in a basket.
- Sit near your tot and place the ice cube tray and clothespin in front of you.
- Show your tot how to squeeze the clothespin and grab a pom-pom with it.
- Lift the pom-pom out of the basket and move it to the ice cube tray.
- Demonstrate releasing the pom-pom into an empty space in the ice cube tray.
- Hand the clothespin over to your tot and let them try on their own.

- Encourage your tot to fill in each of the empty spaces with pom-poms.
- When all of the spaces are filled, invite your tot to use the clothespin to move each of the pom-poms back to the basket.
Observations: Sweet Pea had some trouble with this, and never really got 100% comfortable using the clothespin. It took a lot of concentration and she often used her other hand to” feed” each of the pom-poms into the clothespin.

This was super easy to set up and Sweet Pea worked diligently to fill in each empty space on the ice cube tray with pom-poms and then returned all of them back to the basket. She seemed to like this activity, but I don’t think she thought it was as fun as something like Sidewalk Water Painting. She has not chosen this work again since I first showed it to her. However, it is so easy to set up that I would recommend it as a tot tray for an older tot.

Notes from the Trenches: This is a good activity for an older tot, but younger tots may not have enough finger strength to manipulate the clothespins correctly. When Sweet Pea was about 24 months we tried a clothes pin activity that ended up being much too difficult for her and I was sorry I had introduced it too early.
Rating: 3 Stars * (Easy, Independent, Frugal)
Sweet Pea is 40 months old.

From: I was inspired by these homemade lacing cards on Sorta Crunchy.
Material:
- Craft Foam. (We bought ours at Micheal’s.)
- Scissors.
- Plastic tipped beading laces. (We found these at Micheal’s, but you might be able to use an old shoelace.)
- Double stick tape or loops of regular tape.
- Animal outline templates. (These are .pdf files and require Foxit or Adobe Acrobat to view them.)
Procedure:
- Print the templates.
- Tape one template to a piece of foam.
- Using the template as a guide, cut the foam into the shape of an animal.

- Discard the paper template (or let your tot color it).
- Use a hole punch to make holes along the outside of the foam animal.

- Repeat with the remaining templates and pieces of foam.

- Tie a knot at one end of each of the laces.
- Sit next to your tot and show him how to push the lace in one hole and then pull it through until the knot stops it.
- Demonstrate pushing the lace back up through another hole and pulling it all the way through.
- Once your tot understands, let them try alone.
Observations: Sweet Pea liked this and kept talking about how she was “sewing”. It seems to be exactly the right level of difficulty for her fine motor control.

I thought she would understand how to lace the holes in order around the edge of the animal, but this was not the case. I didn’t correct her and just let her lace the holes in whichever order she wanted.

We had a minor problem when she didn’t want me to “unlace” the animals. She considered the finished animals to be pieces of art and after she was done “sewing” one of them, she told me she was going to give it to her grandma as a gift. If I had it to do over again, I probably would have mentioned that we were going to unlace them after we were finished so she could use them over and over again.
The lacing animals were reasonably easy to create and kept Sweet Pea engaged. I would recommend this activity for other tots.
Notes from the Trenches: The laces are very long and could be a strangulation hazard.
The cat’s tail is too narrow to be hole punched. Ours ended up tearing.
I highly encourage you to seek out actual beading laces with aglets or your tot won’t be able to push the limp string through the holes. (Although mostly I just wanted to write that because it has been a life-long goal of mine to use the word “aglet” in a sentence. Dream big, Shannon. Dream big. )
Rating: 3 Stars * (Fun, Easy, Independent)
Carnivals: This post is linked to Delicious Ambiguity’s Tot Tuesday #27. It is also listed on One Hook Wonder’s weekly Montessori Monday and Mommy Moment’s Montessori Moment. Visit these site for some other other great Montessori ideas.
Sweet Pea is 40 months old.

From: I found this at The Picky Apple and another version (featured on the fabulous Crafty Crow website) at Paint Cut Paste .
Material:
- 3 or 4 packets of Kool-Aid in different colors.
- Small bowls.
- Paint brush.
- Paper.
- Kid’s craft paint in colors that correspond to the Kool-Aid.
- Paper plate.

Procedure:
- Pour a small amount of craft paint into each of the bowls and place the bowls on a paper plate.
- Mix half a packet of Kool-Aid into the appropriate color of craft paint.
- Watch in horror as a scary foam rises out of the bowl of its own accord.

- Wait for the foam to stop expanding and stir the resulting mixture. It will be rather grainy.
- Repeat with the remaining Kool-Aid packets and paint colors.

- Put a smock on your tot and set him up with paper, a paint brush and the Kool-Aid paint mixture.
- Show your tot how to scoop some of the gunk out of the bowl and onto the paper. It will be very thick and grainy, but should become more smooth as you brush it across the paper.

- Allow your tot to paint. (I encourage you to paint too. It was lots of fun!)
- Set your paintings aside for about a day until they are completely dry.
- Invite your tot to smell the artwork!

Observations: Sweet Pea and I both loved this activity. At first, I was very concerned by chunky the consistency of our “paint”, but Sweet Pea enjoyed working with the odd texture.

We both painted for quite a while. On one piece of paper, Sweet Pea wanted to cover every bit of white with paint, which made this activity last even longer.

I thought the paint colors were beautiful and after we were done, I hung some of our paintings up on the wall. For days, every time Sweet Pea walked by, she would stop to smell them.
We both had so much fun. I would highly recommend this activity for any tots (or parents) who enjoy painting.

Notes from the Trenches: Kool-Aid can stain. Make sure that you are working over a protected surface (like a paper plate) when you mix the paint and Kool-Aid. My mixture did not actually leak over the edges of the bowl, but it easily could have.
Rating: 3 Stars * (Fun, Easy, Independent)
Carnivals: This post is linked at Delicious Ambiguity’s Tot Tuesday #26.
Sweet Pea is 39 months old.

From: I found this excellent activity at The Adventures of Bear.
Material:
- Wax paper.
- Permanent marker.
- Eye dropper (We found ours at Micheals, but you could also use an old Children’s Tylenol bottle dropper.)
- Small bowl.
- Liquid water color or food coloring.
- A piece of blank paper.
- Smock (Optional.)
- Jelly roll pan (Optional, but good for containing spills.)

Procedure:
- Fill the small bowl with water and add a few drops of food coloring or liquid water color.
- Tear off a rectangle of wax paper and use the sharpie to draw several small circles (about the size of a pencil eraser) on it.

- Place the blank paper in the jelly roll pan and lay the wax paper on top of it. (The white paper helps make the drops of water more visible.)

- Present the materials to your tot and demonstrate how to squeeze the bulb of the eye dropper to suck up the colored water.
- Show your tot how to gently squeeze the dropper to put one drop of water in each circle on the wax paper.
- Let your tot try.

- After all of the circles have been filled with water, invite your tot to use the dropper to suck the drops back up one at a time and transfer the water back into the bowl.
Observations: Sweet Pea adored this activity and had a much easier time using the dropper than before. She eagerly filled in every circle and then sucked all of the drops back up.

This activity was easy to set up and kept Sweet Pea completely engaged. I know that younger tots wouldn’t be able to manipulate the eye dropper, but it is highly recommended for older tots.
Notes from the Trenches: This activity has the potential to be very messy, but I think the jelly roll pan helped keep things under control.
Rating: 4 Stars * (Fun, Easy, Independent, Frugal)
Carnivals: This post is linked at One Hook Wonder’s weekly Montessori Monday and Mommy Moment’s Montessori Moment. Visit these site for some other other great Montessori ideas.
Sweet Pea is 39 months old.

From: I found this fast and fun idea at What Do We Do All Day?
Material:
- Large sheet of paper. (We used a big roll of butcher paper from Sam’s Club.)
- Washable markers.

Procedure:
- Make sure you are on a hard washable surface. Vinyl is good. Carpet is bad. 🙂
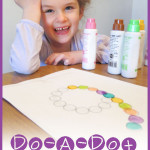
- Draw about 10 dots on the piece of paper either randomly or in the shape of something.
- Label the dots with the numbers 1-10 (or even higher).
- Give your tot a marker and ask him to find the number “1” on the piece of paper.
- Next have him find the number “2”.
- Instruct your tot to draw a line between the number “1” and the number “2”.
- Help your tot find the number “3” and draw a line to it.
- Continue helping your tot draw a line to the next higher number until all of the numbers have been connected.

Observations: Sweet Pea really enjoyed this, although she needed quite a bit of help with the order of the higher numbers.

This was quick to set up and I could easily create another one while Sweet Pea waited. We probably only spent about 15 minutes on it total, although I think I’ll bring it out again soon.
Notes from the Trenches: The blogger who originally suggested this idea did not like creating representational pictures (i.e. Elmo) with the dot-to-dot, and I started off by making them random, but to maintain Sweet Pea’s interest I quickly starting putting the dots into shapes. I found that Sweet Pea liked this activity much more when I made a connect-the-dots picture that she could recognize.

Rating: 3 Stars * (Fun, Easy, Frugal)
|
Need Ideas? Do you need some inspiration for activities to do with your own tots? You are in the right place!
You can search by age or activity type using the menus at the top of the page, use the tags on the left, or just check out some of my most popular posts, listed below.
Also, you are encouraged to pin any of my photos to pinterest so long as you include a link back to my blog.
-Shannon
|


 "Pin It")

 "Pin It")

