|
|

Sweet Pea is 39 months old.

From: I found this idea for cute fingerprint animals in Family Fun magazine and also on Teach Mama and paint cut paste.
Material:
- Washable ink pad.
- About 10 Note cards or pieces of sturdy paper.
- Damp towel for wiping ink off fingers, hands, arms and everywhere else.
- Fine point black marker.
- A pencil with an eraser.
- A book of fingerprint drawings for inspiration, such as Ed Emberley’s Complete Funprint Drawing Book, Klutz The Most Amazing Thumb Doodles Book in the History of the Civilized World or Klutz Draw Thumbprint Animals Book (optional).
- Glitter glue and confetti for embellishments (optional).
- Smock or bib for your tot. (optional).

Procedure:
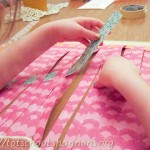
- Mark the location where you want your tot to make a fingerprint by very lightly drawing a small oval about 1/2 inch from the edge on each of the cards.

- Gather your materials and sit next to your tot.
- Take out a note card and point to the oval you have drawn. Demonstrate gently pressing your thumb to the top of the ink pad. Press your inked thumb onto of the oval and then lift it straight back up. Set your note card aside to dry.
- Take out a new note card and (if she will let you) hold your tot’s hand as you teach her how to press down on the pad to get her thumb inky. Next help her press down on top of the oval to make a print.
- Let her try on her own.

- Continue making fingerprints until you run out of cards. Use a damp towel to wipe the extra ink off your tot’s fingers between cards if necessary.
- Let all of the cards dry.
- If you can see the oval under the ink, gently use the eraser to remove it.
- Use a fine point black marker to create animals out of the fingerprints by drawing body parts on them. For example, add whiskers, ears and a tail for a mouse or draw a nose, legs and curly tail for a pig. An older child could do this themselves, but Sweet Pea loved watching me draw these.

- Although it is easy to make simple animals, Ed Emberley’s Complete Funprint Drawing Book has very clear instructions for slightly more complicated versions. Here is an example of how to draw a frog, which I mostly recreated from Ed Emberley’s book:
- Optionally let your tot add glitter glue and other embellishments to the animals.
Observations: This is one of Sweet Pea’s favorite activities. She always wants to make more thumbprint animals. At first, she had a really difficult time making a single fingerprint, but she has had lots of practice and has the hang of it now.

This is a very fun activity for an older tot and the finished note cards are great for writing quick notes to grandparents. If you make enough of them, you could give an entire blank set as a gift too.
Notes from the Trenches: This activity is very messy and your tot will probably get ink everywhere. You need washable ink. Do not attempt this with a regular ink pad.
I had a lot of trouble fighting down my perfectionism while we were making the fingerprints. Sweet Pea’s fingerprints were smudgy and sloppy and I wanted to hold her hand while she made the prints so they would come out exactly right. Actually, I was about to melt down and put everything away, but had the revelation that a perfect finished note card was not the point of the activity. I pulled myself together and was able to let Sweet Pea start making her prints however she wanted. The odd shaped fingerprints, with smudges and all, ended up working out just fine for a variety of different animals. To borrow a subtitle from a Mary Ann Kohl book, “It is the process, not the product.”
Rating: 1 Stars * (Fun)

Sweet Pea is 39 months old.

From: I found this great post full of ideas for buttons at The Activity Mom.
Material:
- A bag of plastic craft buttons. (We got ours from Micheal’s.)
- A thin tipped marker
- A piece of paper.

Procedure:
- Select several different shaped buttons.
- Use the marker to draw an outline around each button.

- Gather your tot, the selected buttons and the paper.
- Pick up a button and say, “I am going to find where this button belongs.”
- Slowly move it over each of the outlines until you come to the one that fits.
- Place the button inside the outline as you say, “Here it is! This outline matches this button.”
- Leave the button in its correct spot.
- Help your tot as needed to finish the rest of the buttons.

Observations: This started out well. Sweet Pea was sooo excited about the bag of buttons and kept asking, “What activity are we going to do?” the entire time I was drawing the outlines. However, almost as soon as I had shown her what to do, she was tired of it. It’s hard to say exactly what the problem was, but I think that maybe she was too old for it.
Sweet Pea’s expression in the picture below clearly showcases her feelings regarding this activity.

Oh well, I have lots more ideas for her that involve the bag of buttons, one of which, is just letting her do whatever the heck she wants with them.
I’m sure Sweet Pea wouldn’t recommend this activity, but it was fairly quick to set up so it might be worth a try.
Notes from the Trenches: I wish I would have drawn fewer outlines. Of course, I wanted to draw an outline for every single unique button shape that was in the bag and I think that might have overwhelmed Sweet Pea a little bit. Perhaps if I would have only drawn 6 button outlines, she would have been more compelled to finish it. Of course, then it would have only taken her 4 seconds to complete it any way.
Oh, and I’m sure the buttons are a huge choking hazard, so watch your tot closely.
Rating: 2 Stars * (Easy, Independent – after initial set-up)
Carnivals: This post is linked at One Hook Wonder’s weekly Montessori Monday and Mommy Moment’s Montessori Moment. Take a look at those sites for other great Montessori ideas.

Sweet Pea is 39 months old.

From: I was inspired by this penny drop game at Tired, Need Sleep.
Material:
- 10 Muffin tin liners, coffee filters or paper circles.
- 2 Crayons.
- 10 Pennies.

Procedure:
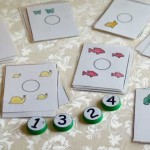
- Let your tot color half of the circles one color while you color the remaining ones a different color.

- Place all of the circles on the floor.
- Stand up straight and drop one penny on the floor. Aim for one of your color circles.
- Next, help your tot stand up straight and try to drop a penny on one of his or her color circles.
- Continue taking turns until you are out of pennies.
- Help your tot count how many pennies are in his or her color circles and how many are in your circles.

- The person whose circles contain the most pennies wins the round.
Observations: We played this game for a _long_ time before Sweet Pea wanted to do something else. It was a huge hit and she was squealing with delight every time one of us got a penny in a circle.

The game was surprisingly difficult. There was a lot of luck involved and we didn’t get as many pennies in the circles as I expected. Also, I think Sweet Pea had an advantage because she was lower to the ground. That’s my story and I’m sticking to it. 🙂
Notes from the Trenches: The pennies were bouncing and rolling all over the place until I put a rug under our muffin tin liners. You will either want to play this on carpet or use a rug or towel under the circles.
I had a terrible time explaining how to “stand up straight” to Sweet Pea. She would start upright, but looked like Quasimodo by the time she actually dropped the penny.
Rating: 3 Stars * (Fun, Easy, Frugal)
Sweet Pea is 38 months old.

From: A couple of months ago, we tried to make our own rubbing plates out of hot glue and cardboard, but they did not work very well. When I saw a set of Roylco ready-made rubbing plates at Hobby Lobby, I thought we would give them a try.
Material:
- Rubbing Plates. (In addition to flowers, Amazon sells leaves, dinosaurs and insects and I found even more sets on the Roylco site.)
- Crayons with the paper removed. (If you want to go all out, you might be able to find sturdy Crayon Blocks.)
- Several sheets of paper.
- Scissors.
- Chip clip or binder clip (or tape, but it doesn’t work as well).
Procedure:
- Use the scissors to cut the paper so it is the same size as the rubbing plates.
- Assemble the rest of your materials.
- Show your tot how to clip a piece of paper on top of a rubbing plate.

- Lay the paper and plate in front of you.
- Choose a crayon.
- Deliberately place your non-dominant hand on the side of the paper to hold it steady.
- Using your dominant hand, rub the edge of the crayon across the paper until the picture shows through.

- Let your tot try by themselves.
Observations: Sweet Pea has worked on these several times. She really enjoys watching the flower magically appear as she rubs the crayon across the paper.

Clipping the rubbing plates to the paper turned out to be a great fine motor control activity all by itself. She struggled to get the paper lined up evenly with the plate, but of course, never wants any help. 🙂

There are 16 different plates and our set even came with an identification sheet, so we are able to talk about the real names of the flowers when she makes each rubbing. Sweet Pea will often ask to use certain ones by name. She is especially fond of the lilies.
This activity requires quite a bit of dexterity, so I would only recommend it for older tots.
Notes from the Trenches: I originally used tape to hold a rubbing plate in place and then more tape to hold the paper on top of the plate. This worked fairly well for securing everything, but was inconvenient to change out every time Sweet Pea wanted to work on the next plate. Also, it was hard to get the tape off of the paper without ripping Sweet Pea’s work. If you use tape, this will be much less of an independent activity.

Rating: 3 Stars * (Fun, Easy, Independent)
Carnivals: This post is linked at One Hook Wonder’s weekly Montessori Monday and Mommy Moment’s Montessori Moment. Take a look at those sites for other great Montessori ideas.

Sweet Pea is 38 months old.

From: This is another very simple idea from Teach Mama.
Material:

Procedure:
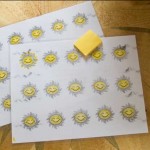
- Show your tot how to carefully line up the piece of paper into the business end of the hole punch.
- Demonstrate squeezing the handles together to punch the hole.
- Next give your tot the hole punch and help him or her grip the handle correctly and squeeze the punch.
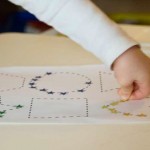
- Once your tot gets the hang of it, ask him or her to punch holes all the way around the edge of the paper.

Observations: Sweet Pea loved trying to use the hole punch, although she really struggled with it at first. I had to actually put my hand over hers and show her how to punch a hole several times before she was able to do it alone. As you can see in the picture below, she often had to use both hands to get the punch to close, but overall this was a nice challenge for her and kept her engaged.

Learning to use a hole punch is a great little exercise for an older tot, although I’m sure it would require too much strength and dexterity for a younger one.
We didn’t do anything with the little circles that came out of the punch, but I imagine that gluing them onto paper would be a good extension to this activity.
Notes from the Trenches: Some hole punches could probably pinch a small finger, but we didn’t have any trouble.
Rating: 4 Stars * (Fun, Easy, Independent, Frugal)
Carnivals: This post is linked at One Hook Wonder’s weekly Montessori Monday and Mommy Moment’s Montessori Moment. Take a look at those sites for other great Montessori ideas.
Sweet Pea is 38 months old.

From: This is a very fun and easy outdoor activity that I saw on the excellent Teach Mama blog.
Material:
- Pleasant weather.
- An old paintbrush.
- Bowl of water.
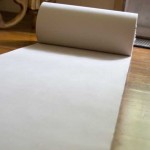
- Concrete, wood, rocks or any other object that can be “painted” with water.

Procedure:
- Bring your materials and your tot outside.
- Wet the paintbrush and show your tot how to paint on the concrete.
- Hand your tot the paintbrush and let him or her try.

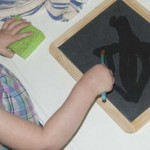
Observations: Sweet Pea was so happy with this activity. At first, she liked just making random marks on the ground, but soon was trying to paint shapes and flowers.

On several mornings, we’ve gone outside and done this activity. I get her set up and paint with her while I drink a cup of tea. This activity is free, easy, and she loves it, so I would highly recommend you give it a try with your tot.
I think Sweet Pea would paint all day, but I am a delicate flower and start wilting in the heat of summer. She is always very unhappy when I insist that we return indoors to air conditioning.
Notes from the Trenches: It is likely that your tot will destroy the paintbrush by grinding it into the concrete so don’t use a good paintbrush for this activity. We used some cheap ones that were left over from spent Paint with Water books.

Rating: 4 Stars * (Fun, Easy, Independent, Frugal)
Sweet Pea is 38 months old.

From: This really fast activity is from Life with My Giggly Girls, who originally got it from No Time For Flashcards.
Material:
- Stickers.
- Sheet of paper.
- Marker.

Procedure:
- Fold the paper into 3-10 sections, depending on your tot’s counting ability.

- Unfold the paper and draw a line along each of the folds to create several boxes.
- Start with the number 1 and continue writing consecutive numbers in each of the remaining boxes.

- Sit next to your tot with your numbered paper and the sheet of stickers.
- Point to the number 1 and say, “Do you know what number this is?” Praise your tot for the correct answer or gently suggest the right answer. Say, “Since this is the number 1, we are going to put 1 sticker in this box.” Have your tot put 1 sticker in the corresponding box.
- Next point to the number 2 and repeat the interaction, giving more or less help as needed. Continue until you are out of boxes or your tot runs out of steam.

Observations: This was super fast to put together and Sweet Pea enjoyed it. She could do the smaller numbers by herself, but needed a little help with the larger ones.

The only down side was that Sweet Pea finished it fairly quickly so it didn’t hold her attention for very long. When she had completed the entire sheet, she was so happy that she jumped off her stool and started dancing.

After which, doing another sticker number line paled in comparison to more dancing.
This activity was so easy to set up though, that I’m sure we will do it again soon. I would highly recommend it as a quick activity for other tots.
Notes from the Trenches: I also tried making a sheet with the numbers out of order, but Sweet Pea didn’t like that one at all. It might be a good idea for tots who need more of a challenge though.
Rating: 3 Stars * (Fun, Easy, Frugal)
Sweet Pea is 37 months old.

From: I saw this on Giving Up on a Clean House, Crunchy and Green, and Chasing Cheerios. Also, the Montessori Color Tablets, Box #3 exercise is a somewhat similar activity.
Material:
- Paint sample cards. Select 2 identical sheets for each color you want to use.
- Clothespins.
- Scissors.
- Glue. (I prefer these glue dots.)
- Strips of cardboard cut into the same shape as the paint sample cards (optional).
- Container to hold the clothespins.

Procedure:
- Separate the paint sample cards into 2 identical piles.
- Using only the first pile, cut small rectangles of each shade from the paint sample cards.
- Glue each rectangle onto a separate clothespin.
- If you want to make the second pile of paint sample cards sturdier, glue them onto the pieces of cardboard.
- Choose one paint strip and separate out the colored clothespins that match it.
- Present your tot with the selected paint strip and matching clothespins.
- Choose one of the clothespins and hold it next to color at the top of the paint strip.

- Model your thinking by saying, “Do these shades match?” and then (depending on if it matches or not, “No, the shades don’t match. I think this one is darker…” or “Yes, these match!”
- If the shades don’t match, move the clothespin down to the next darker color and ponder over whether they match or not. Invite your child to give you an opinion. Keep going until you reach the matching shade.
- When you reach the matching shade, say, “These shades match!” and deliberately show your tot how to press the ends of the clothespin to open it, slide it onto the card, and release the clothespin to make it close.
- Select a new clothespin and repeat the process.
- Hand the work over to your tot once they understand the activity.

Observations: Sweet Pea liked this at the time and it seemed almost the right level of challenge for her. However, she did not play with this for very long and has not chosen it as an activity again. Once she had done all of the clothespins one time, she was totally finished. I could not entice her to repeat it.

I love that the clothespins are good fine motor control and I know a lot of other people had luck with this activity, but it just didn’t work out very well for us. The more effort I put into an activity, the less likely she is to enjoy it. 🙂 At least this wasn’t too difficult to assemble. And maybe she just isn’t quite ready for it yet, so I will probably present it to her again in another month or so.
Notes from the Trenches: She did the 3 color strips and made only 1 error on the yellow card, but I didn’t have a good way to correct her without saying, “No. No. You did it wrong!”

I think I might draw symbols on the back of the clothespins and paint sample cards so Sweet Pea can match them up to check her work. I think it would be better if she could have flipped over the card to check for herself.
Rating: 2 Stars * (Independent, Frugal)
Carnivals: This post is linked at Mommy Moment’s Montessori Moment.
Sweet Pea is 37 months old.

From: I found this quick activity on Counting Coconuts.
Material:
- Clean plastic container with a tight fitting lid. (I used an old Gerber Puffs container.)
- Box cutter or knife.
- Poker chips or fake coins.
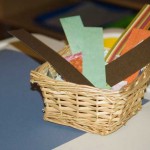
- Bowl or basket to hold the poker chips.

Procedure:
- Carefully cut a slit in the top of the plastic lid. Test to make sure that your poker chips will fit through the hole.

- Collect your materials and your tot.
- Show your tot how to push a poker chip through the slit in the lid.
- Let your tot try on their own.
Observations: I had assumed that Sweet Pea was a little too old for this activity, but it was really quick so I thought we would give it a try. I was surprised by how much she really seemed to enjoy it. Sweet Pea pushed all the chips in, removed the lid and dumped them out and then did it again at least 3 times.

Notes from the Trenches: The only thing that worried me was that the poker chip container said, “Not for children under the age of 5.” Usually the warnings are for children under the age of 3. I assume the poker chips might be a spectacular choking hazard or something so I made sure to watch Sweet Pea very closely while she was using them.
Rating: 4 Stars * (Fun, Easy, Independent, Frugal)
Carnivals: This post is linked at One Hook Wonder’s weekly Montessori Monday and Mommy Moment’s Montessori Moment. Take a look at those sites for other great Montessori ideas.

Sweet Pea is 37 months old.

From: My parents used to play this super quick and easy game with me.
Materials:
- At least 2 willing players.
Procedure:
- Ask your tot if they would like to learn how to play ” The Category Game”.
- When your tot agrees, say, “I am going to come up with a category and then we are going to take turns naming all of the items we can think of that belong in that category.”
- Next tell your tot, “For the first category we are going to each name a different type of food. I’ll go first.”
- Pretend to think about about a food item, “Let’s see…. hmm.. What is something we eat? How about an apple? An apple is a type of food! Now it is your turn. Can you think of a different type of food?”
- At first, you may have to help your tot to name the items. For example, you might need to point to something or say, “What did you eat for breakfast this morning?”
- Especially for younger tots, you may want to name more obscure foods on your own turn and leave the easier ones for your tot to think of.
- Continue taking turns naming foods, until your tot runs out of ideas and then start all over again with a new category.
Observations: Sweet Pea liked naming foods, but really had fun when we started naming engines from Sodor and Sesame Street characters. We have also named types of animals, flowers, My Little Ponies (Warning: Annoying Music), vehicles, people we know and, at Sweet Pea’s suggestion, “Things with windows” (which I am fairly certain was inspired by the fact that Thomas has windows). Usually the person who can’t think of another item is the one that gets to pick the new category, but you will probably need to help your tot at first. Obviously you know what things would catch your own tot’s interest and should suggest those categories.

Sweet Pea loves this game and often asks to play it now. We frequently play it at dinner, but it is a great little game to help keep your tot from melting down while you are waiting in line or driving in the car. I love how it sneaks in learning and encourages taking turns. I highly suggest you give this game a try with your tot.
Notes from the Trenches: Never say “Elmo” (or “Thomas” or whatever your tot’s favorite character is). I quickly learned that if I named an item that was especially dear to Sweet Pea, she would get upset and beg, “Can I say Elmo, too??” And of course, I then had to let her use it for her turn also. 🙂
Rating: 3 Stars * (Fun, Easy, Frugal)
|
Need Ideas? Do you need some inspiration for activities to do with your own tots? You are in the right place!
You can search by age or activity type using the menus at the top of the page, use the tags on the left, or just check out some of my most popular posts, listed below.
Also, you are encouraged to pin any of my photos to pinterest so long as you include a link back to my blog.
-Shannon
|


 "Pin It")

 "Pin It")

