|
|

Sweet Pea is 32 months old.

From: I read about this great idea for a Salt Shaker Scuplture at the very informative My Montessori Journey.
Material:
- Pony beads contained in a bowl or basket.
- 5 or 6 pipe cleaners.
- An empty spice jar or salt shaker.
- Tray (optional, but useful to contain the pony beads your tot is likely to spill over and over again).

Procedure:
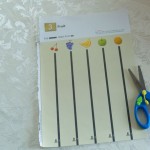
- Put the pipe cleaners through the holes in the top of the shaker jar lid.
- Present the spice jar and pony beads to your tot.
- Pick up a bead, put it on a pipe cleaner, and carefully push the bead all the way down to the shaker lid of the spice jar.
- Let your tot try.

Observations: This was a really fun activity forSweet Pea. She had to concentrate really hard to get the pony beads onto the pipe cleaners, so I think it was exactly the right challenge for her.
She decided to put the pony beads only on the correspondingly colored pipe cleaner. I didn’t tell her to do it this way, and couldn’t get her to deviate from her self-imposed restriction.

She tried to use tongs to put the beads on the pipe cleaners, but as you might imagine, this didn’t work very well. She has also had fun pushing the pipe cleaners into the basket and “fishing” for beads.
Notes from the Trenches:
The pony beads are a choking hazard and the pipe cleaners could poke an eye out.
Sweet Pea also liked pouring the beads between two baskets, which was sort of a mess.
Rating: 3 Stars * (Fun, Easy, Independent)
Congratulations to the winners of the Pegs & Peg Boards Giveaway. The winners were:
Comment # 14 – Sarah from The Ramblings and Adventures of a SAHM
and
Comment # 22 – Jodi from Granola Mom 4 God
Sarah and Jodi have until Saturday, January 16, 2010 at 11:59pm to email me (totschool @ shannons. org) with their addresses (or I will randomly select another winner). I loved reading everyone’s activity ideas and am looking forward to using some of them. Thanks for sharing!
-Shannon
Sweet Pea is 32 months old.

From: I can’t remember where I saw these first, but I ordered some from the Oriental Trading Company several months ago.
Material:

Observations: I tried to show these to Sweet Pea several months ago, but I couldn’t really get her interested until recently. I think that they must have just required too much manual dexterity for her before, because she has really taken to them now.

She has chosen to work with these several times on her own. She likes to sort the pegs by color, but lately her favorite activity is to try to stack them as high as possible. (The first picture is her excitement over stacking 4 of them all by herself. She was yelling, “I did it! I did it!” Dora the Explorer style.)

Notes from the Trenches: We didn’t have any problems with these, but I do sort of hate that they are yet-another-toy with a bazillion pieces for us to keep track of.
Rating: 3 Stars * (Fun, Easy, Independent)

This Giveaway is now CLOSED.

I ordered some pegs and peg boards from the Oriental Trading Company and received more than we will ever use. Instead of letting the extras sit in a box in our basement, I am giving away 2 of the sets. Each set contains 1 peg board and 30 randomly colored pegs.
To enter the contest, just leave a comment below that briefly describes one your tot’s favorite activities. It can be any activity, but I am always looking for new ideas, so I would prefer something I have not posted about yet. If a description of the activity is posted on your (or another) blog, please feel free to leave a link directly to that post, too.
Winners will be contacted on Thursday, January 14, 2010 and announced shortly thereafter. You must leave a valid email when you submit your comment so I can contact you in the event that you win the contest. I am using random.org to select the winning comment numbers. The deadline for entry is Wednesday January 13, 2010 at 11:59pm.
I haven’t run a giveaway before so I hope I’m not forgetting anything. 🙂
-Shannon
EDITED TO ADD: U.S. Residents only. I’m sorry, but I’m sure I can’t afford to mail these out of the country.

Sweet Pea is 32 months old.

From: I started doing this a while ago so that Sweet Pea could be involved in writing thank you notes for her gifts. After Christmas this year, we had several thank you notes to write.
Material:
- Blank note cards and envelopes. (Target sells some cheap ones near their card section. They are not the folded style, but just pieces of card-stock with matching envelopes. Obviously, you could just use regular paper and envelopes too.)
- Crayons.
- Stickers (optional).
- Pen.
- Stamps.

Procedure:
- Talk to your tot about a gift that he/she has recently received and tell him/her that it is important to write a note to thank the person who gave it. Explain that you want your child to create a picture for the person who gave the gift.
- Give your tot 1 note card, crayons and the stickers. Let them work on the note card until they are done. Encourage them to draw on only 1 side of the note card.

- When your tot is finished with the first note card, discuss the next gift with them and have them start on another card.
- On the reverse (blank) side of the first note card, write an actual thank you note to the gift giver. You will have to be quick to keep up with your tot, but you will probably be able to get the first note written while they are working on the next card. (Sometimes I let Sweet Pea decorate the back side of the envelope too. )
- Repeat for all of your tot’s new gifts.
- After all of the cards are written and the envelopes addressed, have your tot help you put them in the mailbox for the postman.
Observations: Sweet Pea enjoys talking about the gifts that she has received and really enjoys making pictures for the gift givers. She will even make fake “letters” on the cards and tell me that she has written the person’s name or the words “Thank You”. I hope her enthusiasm for writing thank you notes stays with her as she gets older. 🙂

This is a great little activity for us because we get to work on a project together, it’s a good lesson in courtesy, and I get to check something off of my to-do list.
Notes from the Trenches:
- Try to limit your child to drawing on only 1 side of the card, because it can be very difficult to write a real thank you note between all of the baby scribbles.
- Markers can be too dark and bleed through to the other side of the note card so I advise that you stick with crayons.
Rating: 3 Stars * (Fun, Easy, Frugal)
Sweet Pea is 31 months old.

Sweet Pea has been asking for a bike ever since she saw her Grandpa riding one last summer. When we asked her what she wanted for Christmas, she begged for a “blue bike! blue bike!”, so Santa (Thank You Aunt Jackie!) brought Sweet Pea a balance bike for Christmas. Since we had a Christmas Eve blizzard with almost a foot of snow, Sweet Pea had to be content with riding her bike around Mimi’s living room on Christmas morning. So far, Sweet Pea loves it, but I will post a more complete review when we are able to get outside to use it.
Happy Holidays!
Sweet Pea is 31 months old.

From: This was created in a frazzled moment of “I barely have time to feed us, much less do a Tot School activity, because I have way overextended myself this holiday season.” This is a quick activity for those times when you are rushing around the kitchen trying to get dinner on the table.
Material:
- Large Bowl
- Whisk
- Flour
- Water
Procedure:
- Make sure that you are located on linoleum or some other surface that is easy to clean.
- Put approximately 1 cup of water in the large bowl and add a couple tablespoons of flour to the water.
- Leave the flour out on the counter, but not within reach of your tot!
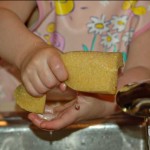
- Tell your tot that you need them to help you cook dinner by whisking together a roux. (Which I don’t consider a lie, because dinner would take much much longer if your tot wasn’t occupied.)
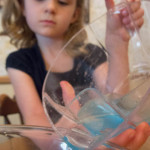
- Sit next to your tot and show them how to gently whisk the flour into the water.
- You should have a few minutes of blissful silence before your tot starts screaming for more flour. Use this opportunity to continue your actual cooking.
- Add another 2-3 tablespoons of flour or more water as needed.
- Your tot will probably be covered in flour paste by the time dinner is done, but at least you’ll have something to eat!
Observations: Sweet Pea had a grand time with this. She kept whisking until dinner was done and then complained when I told her it was time to clean up. She has asked me if she can help me ‘whisk’ something almost every night since.

Notes from the Trenches: The potential for a mess of epic proportions is huge.
Rating: 4 Stars * (Fun, Easy, Independent, Frugal)

Sweet Pea is 31 months old.

From: I had an old box of Crayola Model Magic which mentioned sticking objects to the material so this seemed like a good project for us. And I always have beans on hand. At first Sweet Pea just stuck the beans into flat pieces of the Model Magic, but then I had the idea to use a cookie cutter to help contain the beans while she applied them.

Material:
- Crayola Model Magic. (You could probably use regular air-dry clay too, but I haven’t tested that yet.)
- One or more types of beans or other small objects for sticking into the Model Magic.
- Small cups for containing the beans.
- Rolling Pin (optional).
- Cookie Cutters (optional).

Procedure:
- Collect your supplies
- Roll out a chunk of the Model Magic with a rolling pin or press it into a flat shape with your fingers.
- Press the cookie cutter into the flattened model magic. Leave the cookie cutter in place, but remove the excess dough from the outside edge.
- Tell your tot that you are going to fill the cookie cutter with beans and demonstrate carefully moving one bean from a cup to the inside of the cookie cutter. Press hard on the bean to make it stick into the Model Magic. Repeat if necessary and then let your tot have a turn.

- After the inside of the cookie cutter has been filled with beans, remove the cookie cutter and view your Model Magic bean mosaic.

Observations: Sweet Pea had lots of fun with this. It was the sort of project where we started with one idea (“Hmm.. Sweet Pea would probably like to play with this Model Magic that I bought 5 years ago for some other long-forgotten project.”) and then kept mutating into something else (bean mosaic, butterfly shape, bean-butterfly mosaic) .

I would recommend this activity for other tots, but I did think the model magic was a little on the expensive side for a one-shot project.

Yes, Sweet Pea often wears a tutu all day long. Why do you ask? 🙂
Notes from the Trenches:
1) The Model Magic was very hard to roll out with Sweet Pea’s cheap hollow plastic toy rolling pin. I had to bring out my heavy marble one to actually make it flat. However, my Model Magic was easily 5 years old, so I think a fresher supply might have been easier to work with.
2) About halfway through the project, Sweet Pea got a bit impatient. She dumped all of the seperate cups of beans into the cookie cutter and pressed down on them. I choose to see this as excellent problem solving on her part. Why spend 10 minutes on a project, when you can get it done in 10 seconds?

3) The package of Model Magic says that the entire pouch should be used at one time, as it does not keep well. Since I really hated to waste it, I rolled all of the excess out flat and used my cookie cutters to create various shapes. I am planning on letting Sweet Pea color these after they are totally dry.
4) Several beans fell off of the Model Magic when it was dried. I don’t know if this was because it was old or we didn’t press hard enough, but leads me to…
5) Obviously, beans and other small objects are a serious choking hazard. Please supervise your tot.
Rating: 3 Stars * (Fun, Easy, Independent)
Sweet Pea is 31 months old.

From: I bought a cheapo sticker & album set from the Dollar Store. When I gave it to Sweet Pea, she started sorting the stickers by color all on her own. I was pretty impressed that she had made up her own Tot School activity with it.
Material:
- A sheet of stickers & a reusable sticker album. These usually come in a set that contains 1 or 2 sheets of stickers and an album with several waxed pages so they stickers can be re-used. Oriental Trading Company has a Hello Kitty album and also a Shrek version. I have occasionally seen them for sale at Dollar Store and in the Target Dollar Spot.

Procedure:
- Look at the sticker sheet and decide how the stickers can be sorted (size, color, animal type, etc.).
- If your tot still has some difficulty with stickers, peel the backing off before giving them the sticker sheet.
- Sit next to your tot and show them a sheet of stickers. Flip through the pages of the sticker album so your tot can see that there are several blank pages.
- Tell your tot that you are going to sort the stickers as you put them into the album. Then say for example, “Lets put all the blue dolphins on the first page,” as you stick the blue dolphin to the first page.
- Select a sticker that will be sorted to a different page. For example, “Oh, now I’ll put this orange dolphin on the next page,” as you flip the page and put the sticker there.
- Now pick a sticker that belongs on either the first or second page. Say, “Here’s another blue one. That goes on the first page,” as you stick it next to the first blue one.
- When you think your tot has the idea, hand the sticker sheet to them and suggest that they choose a sticker and put it on a page.
- Let your tot continue peeling, sorting and sticking the rest of the stickers, helping them as necessary.

Observations: Considering that sorting hasn’t always held her interest, I thought this went over really well. Sweet Pea is crazy about stickers so that probably helped, but I was really happy with how long she was engaged with this activity.

If your tot likes stickers, this would probably be a good activity for him or her.
Notes from the Trenches: Sweet Pea would occasionally make some mistakes with the sorting, so the re-usable aspect of the pages was especially nice. Early on Sweet Pea unfortunately discovered that the backside of the cover was not waxed, so a sticker that she had mistakenly put there couldn’t be removed.
Rating: 3 Stars * (Fun, Easy, Independent)
Sweet Pea is 31 months old.

From: I found this idea on RockerMom’s Spinner’s End Nursery School.
Material:
- Pattern Matching Music Notes Worksheet (.pdf file requires Foxit or Adobe Acrobat). RockerMom also posted her own worksheet, but I made my own before I found hers.
- Mini Erasers in the shape of music notes. (I found mine at the dollar store, but you could also print out an extra worksheet and just cut them out of the paper.)
- Tray (optional, but helpful for containing stray erasers).

Procedure:
- Collect all your materials and sit next to your tot.
- Pick on of the pattern matching strips and put it in front of you. Set the others to the side.
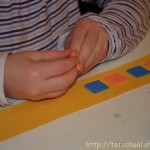
- Point to the first music symbol outline on the left of the pattern matching strip. Say something like, “This is a treble clef. I need to find an eraser that matches this outline.”
- Move your hand slowly over the erasers until you find the one want. Say, “Oh here it is! Here is the treble clef.” Pick it up and place it on top of the appropriate outline.
- Repeat for the next couple of outlines and gradually let your tot take over.

Observations: Despite being initially fascinated with the little erasers, Sweet Pea liked, but did not love this activity and only played with it for 5-10 minutes before moving on to something else. She has chosen to work on this a couple more times, but she never sticks with it for very long.

Sweet Pea also made several errors when she chose which erasers to put on the worksheets and I don’t know if I did the right thing by trying to get her to correct her mistakes. I may have discouraged her a little bit. It’s so hard to know what to say. In any case, I think it would have gone better if my worksheets were in color. I might color them in and try it again that way.
She would also get ahead of herself and pick up erasers that went farther down the line. She didn’t always go from left to right lik I would have preferred, but I didn’t say anything about that to her.

Notes from the Trenches: The mini-erasers could easily be a choking hazard.
Rating: 3 Stars * (Easy, Independent, Frugal – if you just print and cut out the musical symbols instead of using erasers.)
|
Need Ideas? Do you need some inspiration for activities to do with your own tots? You are in the right place!
You can search by age or activity type using the menus at the top of the page, use the tags on the left, or just check out some of my most popular posts, listed below.
Also, you are encouraged to pin any of my photos to pinterest so long as you include a link back to my blog.
-Shannon
|


 "Pin It")

 "Pin It")

