|
|

Sweet Pea is 34 months old.

From: A lot of our activities are really spontaneous like this one. I had my hand poised above a trash can, about to toss away some scrap paper from one of my own craft projects when Sweet Pea asked if she could look at them. She was admiring the colors and patterns on them when I realized that she would have a great time gluing them to a blank sheet of paper.
Material:
- Pretty colored and patterned scrap paper.
- Scissors.
- A box or basket for the scrap paper.
- Several sheets of regular sheet of white or colored paper.
- Glue Stick (or regular glue).

Procedure:
- Cut the paper scraps into smaller pieces if desired (under 3″ or 4″ worked best for us). Put all of the scraps into a small basket or bowl.
- Put a sheet of regular paper on your tot’s work area, along with the basket of scrap paper and the glue stick.
- Sit next to your tot and explain that they get to make a collage.
- Choose a scrap piece of paper out of the basket.
- Demonstrate how to use the glue to stick a piece of scrap paper to the regular paper. This demonstration may have to be more or less involved depending on how familiar your tot is with glue.
- Let your tot try.

Observations: This is so simple and Sweet Pea loves it! She has asked to do a collage several times since I introduced it.

One “game” we played, was taking turns gluing the pieces to the paper. She would select and glue a piece and then I would do the same thing. She had a lot of fun with this, although she usually wanted to pick out my piece too.

After Sweet Pea has finished making a collage, she always asks for tape so she can hang it on the wall. We have about 14 collages stuck up all over the house now.
Notes from the Trenches: Glue really needs to be supervised. I may have been a little distracted because I wasn’t paying attention and 2 minutes later Sweet Pea had started gluing the letter pieces into her alphabet puzzle. Whooops! I know, I know, I deserve the Mommy-of-the-year award. Although now that I think about it, I’m just going to call it really just good problem solving on her part. I can totally see her line of reasoning. “Now, I’ll never have to put this sucker together again!”
Rating: 4 Stars * (Fun, Easy, Independent, Frugal)
Shannon’s Note: This is a guest post from my friend Lori, who worked as a preschool teacher for 3 years and now enjoys staying home with her daughter.
E.G. is 18 months old.

Materials:
- 2 Sheets Glad Press’n Seal or Contact Paper
- Tempera Washable Paints
- Scissors (for the grown-up)
- Q-Tips (optional)

Procedure:
- Line up the different colored paints for your child
- Allow your child to choose 1-3 different colors
- Put a sheet of Glad Press’n Seal sticky side up on table
- Help your child pour the colored paint into the middle of the Glad Press’n Seal
- Put another sheet on Press’n Seal on top, sticky side down
- Help you child press on the edges of the Press’n Seal to seal the perimeter of the rectangle (Make sure to press it well so that no paint oozes out!)
- Trim the edges so that there are no sticky ends
- Put the “Clean Paint” in front of your child and also him/her to spread the paint around with his/her fingers, making designs and mixing the colors.
- You can then give your child Q-Tips to use as a writing implement to draw on the “Clean Paint”

Observations:
This activity was fun to put together. The making of the “Clean Paint” did require some help, but once it was together, E.G. has been able to play with them independently. When we first made them, E.G. just wanted to make lots of different colored “Clean Paints”. Later on, she has pulled out the “Clean Paint” to draw on several times. We have used the Q-Tips to draw different shapes, erase them and start all over. E.G. also, on her own, took her play spoons and used these to draw on the “Clean Paint”. I think we might use her trucks to drive on them and see what type of tire marks they make next.
E.G. really liked it when the two different colors of paint would meet and begin to mix.

She also liked using the Q-Tip to draw on them more than she liked using her finger.

Notes from the Trenches: You really want to make sure that the edges have totally sealed. You also want to give them a quick once over every time you pull them out to play with them. They last quite awhile, but will eventually get little holes that paint can ooze out of.
Rating: 4 Stars for Easy, Frugal, Fun and Independent. Even though this project requires supervision in the making, E.G. has played with them on her own several times after they were complete.

Sweet Pea is 34 months old. (Oh, I groan every time I have to increment this. How bittersweet.)

From: I found this idea on the very useful Confessions of a Homeschooler blog. We originally used the shape tracing template (.pdf file requires Foxit or Adobe Acrobat) from Coloring Castle.
Material:

Procedure:
- Print out the shape outline worksheet.
- Peel the backing off of the star labels if your tot still has difficulty with stickers.
- Sit next to your tot and explain that he or she will get to use the star stickers to make shapes. You may want to discuss the names of the shapes.
- Show your tot how to peel off a star label and stick it on one of the shape outlines on the worksheet, as you say, “I’m going to put this sticker on the outline of the Heart shape.”
- Let your tot peel off the next star label. You may need to point to the outline to direct him/her where to put the sticker.
- Let your tot keep peeling and sticking.

Observations: This activity was really quick and easy to set up and Sweet Pea had a great time with it. She didn’t work on it too long, but I think she will enjoy going back to it again later. I would recommend this activity for other tots.

I found it interesting that Sweet Pea did not finish any one shape before moving on to the next one. She would stick a few stars labels on one shape outline and then just add a few more too another random shape.

However, Sweet Pea did refuse to mix the colors of star labels that she used for each different shape, so I had to provide her with an additional sheets of star labels when she ran out of a chosen color (even though there were plenty of stars left in other colors).

Notes from the Trenches: The star labels can really get stuck on things (like the floor) and do not come off easily if they are not removed promptly.
Rating: 4 Stars * (Fun, Easy, Independent, Frugal – if you have any sort of small stickers or labels.)
Sweet Pea is 33 months old.

From: Color Tablets are another traditional Montessori activity. I found a simple version of this activity in the book Teach Me To Do It Myself by Maja Pitamic and another good description in Basic Montessori: Learning Activities for Under-Fives by David Gettman.
Material:
- 12 color tablets, which can be purchased (high quality color tablets from Nienhuis or cheaper tablets are from Amazon) or handmade (see Procedure section).
- A box to store the tablets (optional).
- A tray (optional).
- If you are hand making the tablets you will need:
- 22 Paint color sample sheets from your favorite home improvement store. Select 2 identical sheets from each of the following 11 colors: red, yellow, blue, green, orange, purple, pink, brown, white, gray and black.
- 22 Thin wooden craft rectangles about 1″ wide by 2″ long (I found mine at Micheal’s).
- Scissors.
- Pencil.
- Glue (I prefer Vario Adhesive Squares).
- Mod Podge (optional, but recommended for durability).
- Clear Acrylic Sealer (optional, but recommended for quality).
Procedure:
- To create homemade color tablets:
- Cut out the brightest sample from each each of your 22 paint color sample sheets. After you are done, you should have 11 pairs of color strips.
- Lay a wooden rectangle on top of one of the 22 color strips and trace its outline. Repeat for all of the remaining color strips.
 - Cut out each of the traced rectangles from the paint sample strips.
- Cut about 1/4″ off of the short edge of each rectangle.

- Glue the cut rectangle onto the center of the piece of wood so you can see wood peeking out on both sides of the color. (If you are using regular glue, make sure to let it dry completely before working with the Mod Podge!) Repeat with all of the remaining colored rectangles.
- Optionally, paint Mod Podge onto the top of all of each of the color tablets and let dry.
- Optionally, spray sealer on top of each of the Mod Podged pieces and let them dry.
- To present the color tablets to your tot:
- Start with the pairs of red, blue and yellow color tablets. Bring them to the table where you and your tot will be working.
- Lay one of the red, blue and yellow tablets in a vertical row on the left side of the table. Lay the remaining red, blue and yellow tablet in a horizontal row along the bottom of the table.
 - Sit next to your tot, facing the color tablets and say, “We are going to match up these colors.”
- Point to the first tablet in the horizontal row and say, “This one is blue. I want to find the matching blue one.”
- Move your finger over the vertical column until you get to the matching blue one. Say, “Here is the blue one,” as you pick it up and lay it directly above the blue tablet in the horizontal row.
- Let your tot do the next ones.
- Repeat the activity, adding in more colors as your tot gets the idea.

Observations: Sweet Pea was really attracted to these and did enjoy working with them, but she didn’t stay interested as long as she has with other activities. She already knew all of the colors and matching the tablets was too simple for her. However, I think this would be a really great activity for a younger tot or one who was struggling with colors.
Sweet Pea’s favorite part was stacking the color tablets in a little cardboard box I had provided for her to store them in.

Notes from the Trenches:
- Your paint sample rectangles will curl-up like crazy if you don’t glue them to the squares before using the Mod Podge. I had a terrible time getting them to lay flat until I started using the adhesive squares first.
- My tablets stuck together until I used the sealer. I have read in several places that if you don’t seal the Mod Podge, your projects may feel tacky and stick together.
Rating: 3 Stars * (Fun, Independent, Frugal – if you just cut the colored rectangles out of paint sample strips and don’t worry about actually making tablets.)
Links: This page is linked from Carisa’s Tool’s for Tots:

and from One Hook Wonder’s weekly Toddler Tuesday Carnival:

Sweet Pea is 32 months old.

From: Our good friends gave Sweet Pea this Melissa & Doug Shape, Model and Mold Clay Set for Christmas.
Observations: The set comes with 4 different colors of dough and several wooden tools for rolling, cutting and stamping it. Sweet Pea really loves everything about this kit and has played with it for hours.

The lids of the dough containers double as molds for creating animal shapes (puppy, bunny, frog, etc). Sweet Pea’s favorite activity is to create these little animals and then make up stories and play with them.
One of my only complaints is that Sweet Pea couldn’t really roll the dough out on her own so she needed quite a bit of help from me with that. I tried unsuccessfully to show her how to roll out the dough many times, but she just doesn’t have the strength for it. It makes me think that using a rolling pin might make a good practical life activity. Does anyone have a recipe for some super soft dough?

Notes from the Trenches: Sweet Pea really liked to take the little dough animals she created and run around the house with them. If you have ever mixed children and Play-Doh, you probably immediately recognized my rookie mistake. Unfortunately, the dough breaks up into tiny pieces that get ground into the carpet so we have had to implement a rule that dough is only allowed at Sweet Pea’s little table.
I don’t know if it is intentional or not, but the dough that comes with this set is fruit scented. Sweet Pea kept saying, “Smells like grape.” It seems like really bad planning to make something like this that smells so delicious. Just saying.

Rating: 3 Stars * (Fun, Easy, Independent – if you hide the rolling pin)

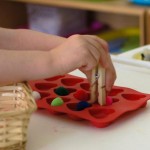
Sweet Pea is 32 months old.

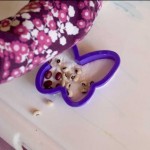
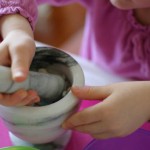
From: In honor of Valentine’s Day, I thought we’d do something with hearts. 🙂 This is a traditional Montessori activity that involves spooning objects from one location to another. I have read about something similar on many, many other blogs, so when I spotted these cute heart shaped trays at Target’s dollar spot, I thought they would be perfect for it.
Material:
- An ice cube tray or other compartmented container
- Marbles, floral gems, buttons, beads or beans, etc. (I found my heart shaped gems at the Target dollar spot too).
- Bowl to contain the gems.
- Spoon.
- Tray (optional).

Procedure:
- Set your items in front of your tot.

- Tell your tot that he or she is going to transfer the items from the bowl to the holes in the tray.
- Pick up the spoon and demonstrate using it to lift one item out of the bowl and carefully move it to the tray. Select an empty hole and tilt the spoon to allow the item to slide into it.
- Offer to let your tot have a turn.

Observations: This is another one of those activities that adults take for granted, but usually fascinates toddlers. It is so easy for us to move an object with a spoon that we forget what a feat of dexterity it really is.
Sweet Pea was really happy with this activity. She carefully spooned each gem into a heart on the tray and then spooned them all back out again. She did 2 trays worth and would have worked longer, but I had to get some laundry out of the dryer didn’t want to leave her alone with the little heart gems.
I had tried a spooning activity a while ago that just involved spooning beans from one bowl to another, but that did not hold her interest like this one did. I think there was something about putting 1 object in each space of the tray that captivated her. Also, the little heart shaped gems really appealed to her.
It is so cheap and easy to put together an activity like this. I would recommend it for other tots.

Notes from the Trenches: The only hic -up we had was after SweetPea finished the tray, she said she was done and tried to put everything away. I had to stop her and suggest thatshe try taking the gems back out before she would continue working.
Obviously there is serious choking hazard with the little gems.
Rating: 4 Stars * (Fun, Easy, Independent, Frugal)
Carnival: This post is linked at One Hook Wonder’s weekly Toddler Tuesday.

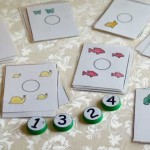
Sweet Pea is 33 months old.

From: These are cards I developed to be used with milk cap numbers. (I promise this is the last one of these number cap activities for a while!) If you want something with larger numbers (up to 10), try my animal counting worksheets (which can be cut into cards).
Material:

Procedure:
- Print out the worksheets and cut each of them into quarters to make 4 cards.
- Optionally color and laminate the cards.
- Divide the cards by animal type into 7 piles (or in any other arrangement so that each pile contains a cards with 1, 2, 3 and 4 animals).
- Lay out each of the cards from the first pile in front of your tot. Place the 1,2,3 and 4 milk cap numbers next to the cards.

- Point to a card and have your tot help you count the animals on the card.
- Have your tot help you select the correct milk cap number and place it in the circle in the middle of the appropriate card.
- Point to another card and have your tot help you count the animals on that card and select the matching milk cap number.
- Continue until you have used all of the milk cap numbers, gradually letting your tot take over the work.
- Repeat for the remaining piles.
Observations: Sweet Pea insisted on having “Monk Monk” (a toy monkey that was given to our dog by Santa last Christmas, but which was quickly appropriated by Sweet Pea) do this entire activity.

MonkMonk was able to count each of the animals.


MonkMonk then placed each of the numbers on the correct card.

It was a very succesful activity for MonkMonk and I would recommend it for all other re-purposed dog toys.
Notes from the Trenches: I think it might be a good idea to write the correct number on the back of the cards so that your child can check his or her work.
Also, you have to watch out or your stuffed monkey will carelessly knock everything off of the table.
Rating: 3 Stars * (Fun, Independent, Frugal if you just cut the milk cap numbers out of paper and forgo the Mod Podge.)
Sweet Pea is 33 months old.

From: After creating the milk cap numbers, this was the first activity I devised to go with them. We did not have a whole lot of luck with these worksheets, but I wanted to post them because I thought that they might be useful for other tots.
Material:

Observations: To be honest, this did not work at all. I think that if Sweet Pea was older and had a better grasp on numbers it would have been a good activity, but she just ended up revealing her numerical inadequacy.
I presented Sweet Pea with an individual strip of snowflakes and had her try to put the number cap letters on each strip in order. She understood pretty well up to the strip with 3 snowflakes.

And then things got a little out of order…


She had a really good time doing these, and as you can see, worked very hard on them. However, no amount of gentle suggestion could get her to put the numbers in their correct places.
I don’t like doing a lot of correction, so I let her continue working. I held my hands in fists in my lap to keep from grabbing the number caps out of her hands and putting them in the right order . I kept inwardly cringing and thinking, “I bet this is doing more harm than good.”
In retrospect, I can clearly see that she wasn’t ready for these at all. I put them away and will maybe bring them back out in a few months. I might also try writing the numbers inside each circle to make more of a matching exercise, since filling in a blank number line is obviously a bit of baby rocket science at this age.
Notes from the Trenches: This entire post really felt like a “Notes from the Trenches.”
Rating: 1 Stars * (Fun )
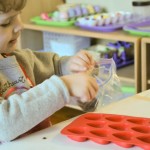
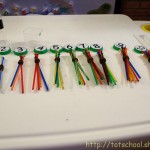
Sweet Pea is 32 months old.

From: Someone commented on my Milk Cap Letter page and asked for me to make a Milk Cap Number template. I made up the Milk Cap Numbers, but then struggled with how I would use them until I came up with the idea for the worksheets listed below.
Materials:

Procedure:
- Decoupage the numbers to the milk caps.
- Cut out the numbers you wish to use from the Milk Cap Numbers worksheet. Most of the worksheets only use the numbers 1,2,3 and 4.
- Paint a thin layer of Mod Podge on the top of one milk cap and set aside.
- Paint a thin layer of Mod Podge on the back of one of the numbers.
- Stick the number to the top of the milk cap and paint a thin layer of Mod Podge over the top.
- Repeat for the remaining numbers.
- Let the numbers dry overnight and then put them in a basket.

- Create the Animal Counting Worksheets.
- Print the worksheets.
- Use the colored pencils to color in the animals on the worksheets if desired.
- Optionally laminate the worksheets and round off the corners with scissors if they are sharp.
- Introduce the Numbers to your Tot
- Put one of the worksheets on the table and put the 1,2,3 and 4 Milk Cap Numbers next to it.
- Point to the block that contains 1 fish (or whatever animal it is) and say, “This section has 1 fish. I’m going to put the number 1 on the circle next to that 1 fish.” Then pick up the number 1 milk cap number and place it on the appropriate circle.
- Point to the the block that contains 2 dogs (or whatever animal) and say, “This one has 2 dogs. Can you find the number 2 milk cap number to put in the circle.” Give your tot a chance to find the correct number cap, helping if necessary.
- Repeat with the 3 animal block and the 4 animal block.
- Praise your tot for being able to match up all of the numbers.
- Bring out the next worksheet and suggest your tot try it, helping him or her as necessary.

Observations: These worksheets worked really well for us. Sweet Pea had a great time counting the different types of animals and I think it really helped her comprehension of numbers.
I am fascinated by toddler’s (lack of) understanding regarding counting. Sweet Pea seems to grasp the numbers 1,2 and 3. However if she is presented with more than 3 objects, she will start over again counting at 1. (For example, if there are 5 objects she might say, “1… 2… 3… 1… 2.” ) We joke about how she counts in base-3.

I tried to take that lack of understanding into account when I worked with her. Since there is only the option for the numbers 1,2,3 and 4 on each page, I limited the number of milk caps available to her to only the first 4 numbers also. This helped make the worksheets somewhat self-correcting. As stated above, Sweet Pea is a little fuzzy on the number 4, so at first I made sure that we went in order from 1 to 4. After we had worked on these a little bit though, she did seem to start catching on to the idea of 4 and I was able to mix it up a bit.

Notes from the Trenches: I only had 2 worksheets the first time I introduced this. Sweet Pea finished the first worksheet and asked for another one. I gave her the second one. She finished the second sheet and asked for yet another one. I thought I was being stealthy as I handed her the first one again. She said, “I did this already,” and refused to do it again and that was that. So it may be in your best interest to print all of the worksheets out at once. 🙂
Later I made more worksheets (which are all listed above now) but as I was making them, I realized that I really needed to create cards (instead of static worksheets) that will allow me to shuffle around the numbers. So I ended up making yet another set of worksheets which I will convert to .pdfs and post next time.
Rating: 2 Stars * (Fun, Independent after some instruction)
Sweet Pea is 32 months old.

From: I know that spreading something with a knife is a common Montessori activity, but I am not sure where I first read about it.
Material:
- Egg salad, cream cheese, jelly or any other food item that spreads easily.
- A small bowl to contain the spreadable item.
- Several crackers.
- A small plate for the crackers.
- Toddler safe knife or a plastic knife.
- Bib (optional, but strongly recommended).
- High chair or booster seat at the kitchen table (optional).
Procedure:
- Gather all of your materials. Put the egg salad in the small bowl. Put the crackers on the plate.
- Optionally, put the bib on your tot and put him or her in the high chair / booster seat.
- Now that you have a captive audience (Muh-ha-ha!), discuss your own house rules regarding safe knife use.
- Demonstrate holding the knife securely in your dominant hand.
- Using the knife, slowly scoop about a teaspoon of egg salad out of the bowl.
- Pick up a cracker in your other hand and carefully spread the egg salad onto the cracker.
- Eat the cracker or offer it to your tot.
- When it is your tot’s turn, help him/her grip the handle of the knife with his/her dominant hand.
- Instruct him/her to pick up a cracker in the other hand.
- Allow your tot to scoop the egg salad from the bowl and spread it onto the cracker.

Observations: Sweet Pea had a lot of fun with this. She loved spreading the egg salad on the crackers, but she had more trouble than I expected at first. It is hard to remember that something I do every day is so new for her and that she needs practice.

She especially enjoyed the eating part of it.

This was an excellent activity and I would definitely recommend it for other tots. We will definitely be doing it again in the future with other spreadable eatables.
Notes from the Trenches: This activity is both messy and dangerous, which I suppose is a bonus if you are a tot and a negative if you are a parent. I wonder if I should start taking away stars for those things?
Rating: 4 Stars * (Fun, Easy, Independent after some instruction, Frugal)
|
Need Ideas? Do you need some inspiration for activities to do with your own tots? You are in the right place!
You can search by age or activity type using the menus at the top of the page, use the tags on the left, or just check out some of my most popular posts, listed below.
Also, you are encouraged to pin any of my photos to pinterest so long as you include a link back to my blog.
-Shannon
|


 "Pin It")

 "Pin It")

