|
|

Sweet Pea is 36 months old.

From: I was browsing through the Montessori Services website when I came across a Grinding Activity Set. I though that Sweet Pea would love something like this and since it was right after Easter, I just happened to have a bunch of dyed, hard-boiled eggs in my fridge. When it was time to eat the eggs, I removed the shells, rinsed, dried and saved them for this activity.
Material:
- Washed, rinsed and dried egg shells. (Plain shells will work, but dyed ones are more interesting. You could also use spices.)
- Mortar & Pestle.
- 2 Bowls.
- Spoon.

Procedure:
- Place the egg shells in one of the bowls and leave the other one empty.
- Assemble everything on the table where your tot will be working and sit next to your tot.
- Tell your tot that he or she will be grinding the egg shells with the mortar and pestle.
- Use the spoon to carefully transfer some of the shells into the bowl of the mortar.
- Use the pestle to grind the egg shells. Comment on how the egg shells pieces are getting finer.
- When the egg shells in the mortar have been ground finely enough, use the spoon to transfer them into the empty bowl.
- Let your tot have a turn.

Observations: Sweet Pea took this work very seriously. She was very careful not to spill any shells when she spooned them into the mortar.

Sweet Pea kept saying, “Crush Elmo. Crush Elmo,” while she worked. I was really confused until I realized that I had drawn pictures of Elmo on the eggs in wax crayon before we had dyed them. I guess she was crushing Elmo.

After grinding, she was equally careful about transferring the egg shell dust into the other bowl.

Sweet Pea was really engaged with this and finished grinding the entire bowl of egg shells in one sitting and then asked for more egg shells! I had to tell her that I didn’t have any more shells, but would save some the next time we ate hard boiled eggs again.

This was a great activity for Sweet Pea and I would definitely recommend it for an older tot.
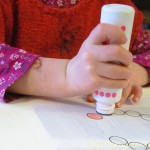
The next day we even extended the activity by gluing the ground egg shell dust onto paper, which made a quick and fun art project that Sweet Pea enjoyed immensely.
Notes from the Trenches: This is a little messy, but overall went very well.
Rating: 4 Stars * (Fun, Easy, Independent, Frugal if you have a mortar and pestle.)
Carnivals: This post is linked at One Hook Wonder’s weekly Montessori Monday and Mommy Moment‘s Montessori Moment.

Sweet Pea is 35 months old.

From: Erika from Confessions of a Homeschooler often posts an individual Do-A-Dot letter worksheet when her tot is learning a particular letter (P for example), but I had trouble searching her site to find all of the letters. I also searched the web, but was surprised that I couldn’t find a full set of these anywhere so I decided I would just create my own. Since I made these however, I’ve learned that Erika sells her entire preschool alphabet curriculum (which contains way more than just Do-A-Dot worksheets) for $10.
Material:
- Do-A-Dot markers. (They are also called dotter or bingo markers. We found ours at Micheal’s.)
-
  
-
- Smock or a Bib (optional, but highly recommended).

Procedure:
- Gather all your materials and sit next to your tot.
- Depending on your tot’s dexterity, you may need to unscrew the Dot-A-Dot markers for them.
- Show your tot how to press the marker straight down inside one of the circles on the worksheet to make a dot.
- Allow him or her to finish the rest of the worksheets on his or her own.

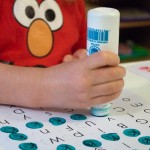
Observations: This activity was a huge hit. Sweet Pea absolutely loved dotting in the circles for each letter. She was easily able to unscrew the caps on her own, but some younger tots may need help.

At first it took some effort for her to get the marker lined up with each dot correctly, but she quickly improved.

Sweet Pea really deliberated about which color of marker to use for each letter. I had no idea it would matter to her so much, but she loved being able to choose from all the colors in the box and always used only one color for each letter.

Sweet Pea has a good understanding of letters, but obviously can’t write yet. I think she was really excited to be able to actually create the letters in another way. She was very proud of her work and wanted me to take a picture of each of the letters she completed. I may even get around to making a lower case set one of these days.

I would highly recommend this for other tots.
Notes from the Trenches:
If this activity is too advanced for your tot, these markers work great for free play too.
The biggest problem with Do-A-Dot markers is that they can be very messy. They just don’t clean up like good old washable Crayola markers. Note that the following picture was taken after we had washed Sweet Pea’s hands several times.

[Update Sept 9, 2012 – One of my commenters suggested that children are not learning how to form the letters in the correct way when they use these. For example, they start at the bottom left side of the page when making a B, instead of the upper left side. If this bothers you, I suggest drawing a star in the circle where you want your tot to start forming the letter.]
Rating: 3 Stars * (Fun, Easy, Independent)

Sweet Pea is 33 months old.

From: I found this really fun idea at Teaching 2 and 3 Year Olds. I had never seen something like this before and couldn’t wait to try it.
Material:
- Several slices of bread.
- Milk.
- Food Coloring (I highly recommend the gel type instead of the liquid drops that are shown in the picture.)
- 2-3 small bowls.
- Very clean paint brush.
- Fork or Spoon for stirring.
- Bib.
- Toaster (Optional).

Procedure:
- Pour milk into each of the bowls.
- Add a small amount of food coloring to the milk in each of the bowls to create a variety of different “milk paint” colors. Stir the dye into the milk until the paint in each bowl is one uniform color.
- Put a bib or smock on your tot and get him or her situated at the table.
- Put the bread, milk paint and brush in front of your tot.
- Let him or her paint on the bread with the “milk paint”. Flip the bread over for more fun.

- Toast the bread if desired and eat it. (We made a PB&J out of it.)

Observations: Sweet Pea’s was insane about this activity. I only let her paint 4 pieces because I didn’t want to waste the food, but she begged for more. I think she would have used an entire loaf of bread if I would have let her. Oh, and she also loved drinking the colored milk afterward.

The slices of bread turned out surprisingly pretty and Sweet Pea had so much fun painting them. I would highly recommend this activity for other tots.
Notes from the Trenches:
- The most important thing to note is that soft, semi-wet milky toast is really disgusting. Toasting helps some, but not much. I will spare you any sort of analogies to other non-food items, but Sweet Pea was sooo proud of the toast she had painted for me that I steeled my resolve and choked it down anyway. I really feel like I should get some sort of “Mothering Award” for eating the entire piece. Don’t tell your tot that you will be eating the rainbow toast or you too might find yourself cramming oozy wet bread down your gullet.
- Sweet Pea started begging me to make “Rainbow Toast” every morning until I sat her down for a little talk about the meaning of the phrase “only for special occasions”.
- I stained my butcher block with my (very old bottles of) food coloring because there were bits of dried food coloring stuck under the lids. When I opened them, the microscopic dye-dust fell off the lip of the bottles, and onto the counter. This dust was invisible until I swiped a dishrag across the counter and created my own little ‘rainbow’ all over the butcher block. I will never use liquid food coloring again. I threw away the box and will only use the gel stuff from now on. But even that will stain everything it touches.
Rating: 4 Stars * (Fun, Easy, Independent, Frugal)
Carnivals: This post is linked to Child Centered Art Party #13 at Art for Little Hands.
Sweet Pea is 35 months old.

From: I am not sure where I first saw this idea, but This Little Project posted about a letter matching egg game and Crunchy and Green also posted about it, along with some other good ideas for plastic eggs.
Material:
- 26 Plastic eggs.
- Permanent marker.
- 2 Baskets or bowls.
- Egg carton.
Procedure:
- On the top half of each egg write an uppercase letter of the alphabet. Write the corresponding lowercase letter of the alphabet on the bottom half.

- Separate the egg halves. Put all of the uppercase letters in one basket and all of the lowercase letters in the other.

- Sit next to your tot with the egg baskets and carton in front of you.
- Tell your tot that you are going to be matching upper and lower case letters to put the eggs back together.
- Pick up an egg half out of the uppercase basket. Say, “This is the upper case letter “B”. Now we have to find the lower case one.”
- Start carefully looking through the lowercase basket, talking out loud as you look for the lower case “b”. “Hmm.. is this it? No, that is an “i”. Maybe this one? Oh here it is! We found the lower case “b”!”
- Snap the pieces together and then place the whole egg in the carton.
- Ask your tot to pick a new letter out of the upper case basket.
- Help him or her find the matching lower case letter and put that egg together.
- Repeat with the remaining letters.

Observations: Sweet Pea had a great time playing with these, even though she had her own ideas about how we should use them.

She kept picking up an egg half and then asking me if it was a certain “wrong” letter. Then she would crack up laughing. For example, she picked up the egg half that had the letter “k” on it and asked, “Is this a “g”?” When I said, “No, that’s not a “k”, that’s a “g”, you silly girl!” she would dissolve into giggles. She was about 60% cute and 40% annoying. 🙂 Although interestingly, I think it was still fairly educational because she went out of her way to make sure she picked the “wrong” letters.

She did not have any interest in doing this work by herself. I usually like to work with her on an activity a little bit and then turn it over to her to do on her own, but she really wanted my help with every letter. I don’t know if this activity was maybe just at tad too hard for her or if she was just craving extra attention. I like the concept of this activity though and we will definitely try it again in a few weeks.
I think this would probably be a good activity for older tots.
Notes from the Trenches: The ink from the Sharpie started rubbing off of these eggs after we played with them for a bit. Does anyone know of a type of marker that will stay on them?
Rating: 3 Stars * (Fun, Easy, It would probably an independent activity for a lot of older tots, but it wasn’t for us this time.)

Sweet Pea is 35 months old.

From: This activity is based on the Montessori sound cylinders work. It is a great way to use some of those plastic eggs that are laying around after Easter and I’ve seen it in a ton of places (most recently on Giving Up On A Clean House and Activity Mom). We did this last year, although it didn’t go so well, but I was looking forward to trying it again this year with an older Sweet Pea.
Material:
- 10-12 Plastic Easter Eggs
- 5-6 Types of fillings for the eggs (beans, rice, salt, dry pasta, jelly beans, etc.)
- 2 baskets or bowls
- 1 egg carton

Procedure:
- Fill 2 eggs with the same material and repeat for each additional type of material. For example, fill 2 eggs with rice, 2 with beans, 2 with salt, etc.
- Place one egg from each of the pairs into separate baskets.

- Place one of the egg baskets on the left side of the table where your tot will be working. Place the other basket in front. Put the egg carton off to the side.
- Sit next to your tot at the table and tell them that you are going to be doing a listening activity.
- Take an egg out of the basket on the left. Hold it up to your ear and shake it. Hand it to your tot and let them listen to it.
- Next take an egg out of the basket in front of you. Shake the egg next to your ear and let your tot do the same. Ask, “Do these 2 eggs make the same sound?”
- If they make the same sound, place them together into the egg carton. If they do not sound similar, replace the egg from the front container and select another one. Listen to each egg from the front basket until you do find a match.
- Let your tot try on their own.
Observations: Despite making sure that Sweet Pea was well-fed and not cranky, this activity turned out to be eerily similar to the disaster that occurred last year.

We started out well enough. Sweet Pea loved shaking the eggs and listening to them, although she was not very accurate in deciding if the sounds matched or not.

However she was quickly overcome by an obsession to discover what was inside the eggs.
Sweet Pea: “Can I open these?”
Me: “No.”
Sweet Pea: “Can I open these?”
Me: “No.”
Sweet Pea: “Can I open these now?”
Me: “No, not yet.”
Sweet Pea: “Can I open these now?”
Me: “No, you can open them later.”
And cue the melt down:

I reassured her that she would eventually be able to open the eggs and that seemed to get her back under control, but the rest of the activity didn’t last very long.
As promised, after we were done, I finally told Sweet Pea she could open up the eggs.


Once we got the mess cleaned up, we had a really good time shaking the eggs and then trying to guess what was inside, then opening them up to see if we were right. She liked this game much better than trying to match the similar sounds.
So, I can’t really say that I would recommend this activity for other tots in this age group, although other people seem to have had better luck with it. However, I’m not one to give up so I’m sure we’ll try it again next year.. 🙂
Also, I have another plastic egg activity to post about next time, so don’t throw them out yet!
Notes From The Trenches:
Solder the egg halves together or keep a dustpan handy.
And if your tot is as obsessed as Sweet Pea about opening eggs, you might want to try this really nice version of sound boxes made from toilet paper rolls I saw on Zonnah’s Addictions instead.
Rating: 0 Stars *
Carnival: This post is linked at One Hook Wonder’s weekly Toddler Tuesday.
Sweet Pea is 35 months old.

From: Back around New Year’s, Amy posted about her yearly family interview on Teach Mama and then I recently saw something similar from Nicole at Tired Need Sleep.
Material:
- Pen or pencil.
- List of interview questions. (Amy has a down-loadable one here or you can use mine.)
Procedure:
- Print out the interview questions or just jot some down on a sheet of paper.
- Sit across from your tot and let them know that you want to ask them a few questions.
- Ask your tot questions for as long as they remain interested.

Observations: Here is our interview. Everything in blue is a direct quote.
What is your name? Elmo’s Mom.
How old are you? I am 2. What do words say?
When is your birthday? My birthday is in April. Can I help write?
Who is your mom? You. [Pointing at me.]
What does your mom do? [Blank stare] What is something I like to do?Shopping. [Uhm… I wouldn’t say I like it, but it is something we end up doing a lot!]
Who is your daddy? Elmo’s Grandpa.
What does Daddy do? Takes a shower. Goes to work. Eats breakfast with us on weekend. Is tomorrow weekend?
What is your favorite color? My favorite color is blue.
What is your favorite song? Rudolph.
What do you want to do when you are a grown up? Play with Thomas.
Where do you want to live when you grow up? In a house. I will live in a house with Thomas.
What is your favorite food? [Blank stare] What would you like mom to make you for lunch? Soup.
What is your least favorite food? I don’t know. I want soup. Can I have soup for lunch?
What is your favorite animal? A kitty.
What do mama and daddy do when you go to bed? Watch T.V.
Who does our family love the most? Baby!
What is your favorite TV show? Dora is my favorite show.
What is your favorite ice cream flavor? Chocolate! [Very excitedly.]
Where do you like to eat? In a restaurant. Which restaurant do you like to eat at? Is there more questions? [Trying to look at my paper.]
What is your favorite book? This one. [Points to the Clifford Easter book in front of her.] Are we finished now?
What is your favorite thing to do? An activity. [She means a Tot School activity, but she was really distracted by this point and I couldn’t get her to elaborate.]

I am happy I finally did this and I can’t wait to do it again in another year (or maybe 6 months). What a fun record this should turn out to be!
Notes from the Trenches: As you can tell, the questioning went on a little too long for Sweet Pea. There were more questions on the list, but she had totally lost interest so I couldn’t get to them. You might want to make sure you start with your favorite questions and then go back to fill in with the less interesting ones if your tot is still interested.
My advice is to just grab a piece of paper and pencil and start asking questions instead of waiting for the perfect situation. I meant to do this at New Years and then forgot about it, and now here it is 4 months later already. How time flies.
Rating: 3 Stars * (Fun, Easy, Frugal)
Sweet Pea is 35 months old.

From: A friend recommended the young-adult book The Lovely Bones. I figured that the young-adult categorization meant it was practically a children’s story so I began listening to the audio-book version of it. In the car. With Sweet Pea strapped into the back seat. 67 seconds later and I started slamming my finger repeatedly into the stop button I quickly asked Sweet Pea if she wanted to start singing a round of “Old McDonald Had a Farm” and silently hoped that she wouldn’t start asking me tricky questions like, “What’s a murderer, mama?” Instead she said, “Turn story back on.” I told her that we’d have to find a different story for her later. So the next time we went to the library we checked out the audio version of Little House on the Prairie.
Material:
- A child-appropriate audio book. (Our library has a shelf full of them.)
Procedure:
- Tell your child a little bit about the story you are going to listen to and then pop it in the CD player.
- Continue with your driving / sweeping / laundry folding…
- Occasionally stop the CD and discuss the story with your tot.
Observations: Sweet Pea has never been too keen on my channel surfing between Terry Gross and Dave Ramsey so I don’t know why I didn’t think of listening to an audio-book earlier. As soon as we get in the car now, Sweet Pea asks, “Can we listen to Mary and Laura?”

Sweet Pea is riveted and we have a good time talking about various parts of the story. I am surprised by how much I have been enjoying the Little House stories again. I remember loving them as a child, but they are great to listen to as an adult again too. I think some children’s books might be too simple and drive me crazy, but these seemed like a good compromise.
So this is not quite “tot school”, but I am really excited about being able to expose her to some classic children’s stories while running my errands. I would highly recommend this activity for other tots.
If any of you use audio-books with your tots, what are some of your favorites?
Notes from the Trenches:
To start with, I wouldn’t recommend letting your tot listen to The Lovely Bones nor probably anything by Stephen King.
Secondly, the Little House books are maybe a tad too mature for an almost 3-year-old. There have been a few places where I have had to fast forward so she doesn’t hear something inappropriate (a little too much exposition about who Santa Clause really is or how a teacher is going to use a ruler to beat a naughty little girl’s knuckles, for example) but they are great books. Oh, and they are a tad more paternalistic than I noticed as a child, but despite all that they are very good books. And the politically correct side of me cringes every time Ma Ingals mentions how much the Indians scare her, but overall they are good. Really.
Rating: 4 Stars * (Fun, Easy, Independent, Frugal)
Sweet Pea is 34 months old.

From: We have had great luck with Kumon’s “My First” series of books, so I decided to order Kumon’s My First Book of Cutting from Amazon.
Prerequisite: If your tot hasn’t worked with scissors before, I suggest you try the Introduction to Scissors – Cutting Play-doh activity first.
Material:
- Kumon’s My First Book of Cutting or you can print out “Cutting Practice” worksheets.
- Plastic safety scissors (MAPED Kooopy Kids Scissors are, by far, the best that I have found. We got ours from Target, but I think they only carry them during back to school season.)
Procedure:
- If desired, read any of the information in the Kumon’s My First Book of Cutting and then rip the cover off.
 - Neatly stack the torn out pages and store them in a file folder or box.
- Sit next to your tot and review your family’s rules regarding scissors.
- Help your tot hold the scissors properly if necessary and present them with the first cutting page.
- Allow your tot to cut along the lines as directed.
- Repeat with other pages as desired.
Observations: Sweet Pea loves to cut so this activity was a huge hit. It has kept her occupied for a very long time. I would definitely recommend this book for other tots.
However, the skill required gets increasingly complicated as work through the book. Near the middle , the pages got too difficult for Sweet Pea. She wasn’t really able to do them anymore, even though she certainly tried. My husband refers to a cat and bear she cut out as “Lucky” and “Stumpy” (because the things she cuts out become her new best friends and are carried about and played with for a while until I can bury them under the junk mail in the trashcan) . I am actually contemplating buying another book and letting her redo the first half again because she has had so much fun with it.

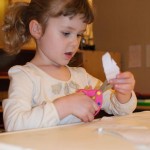
Sweet Pea was very proud and wanted me to take a picture of the line she had cut.

Notes from the Trenches: Scissors can cut things like clothes and hair. Obviously only allow your tot to use them under supervision.
I limit how many pages Sweet Pea is allowed to cut per day, but they still get used up quickly. And $6.95 seems a little pricey for a stack of paper that your tot will just be shredding. I think that the pictures of animals, trains, roads, etc in the Kumon book give a nice context to what your tot is supposed to cut out. However, if you want a more frugal option you could just print out these free cutting paper template from Montessori Materials.
Rating: 3 Stars * (Fun, Easy, Independent)
Sweet Pea is 34 months old.

From: I found this activity in MaryAnn Kohl‘s great book, Preschool Art.
Material:
- 1/3 cup sugar.
- 1 cup water.
- Whisk or spoon.
- Chalk (We had a great time with regular white chalk, but colored sidewalk chalk might be even more exciting).
- Bowl.
- Dark colored paper (black or red worked best for us).

Procedure:
- In a small bowl, mix 1/3 cup of sugar into 1 cup of water. Stir until the sugar is totally dissolved.
- Put the chalk into the sugar water and let it soak for several hours. (Overnight works best, but 3 days was too long.)
- Set the paper on a table in front of your tot. Remove the chalk from the sugar water and hand it to your tot.
- Allow your tot to draw on the paper.

Observations: I was crazy about this activity. The sugar water makes the chalk drawings so pretty. At first the markings looked mostly wet and dull, but they quickly turned bright white. I loved drawing with the sugar chalk and while Sweet Pea thought this activity was fun, I don’t think she appreciated it as much as I did.

The book also said that you can just dip chalk into sugar water and write with it. We tried this too and Sweet Pea loved the activity of dipping the chalk, but I didn’t think this worked as well as the longer soak.

After she made her drawing, Sweet Pea liked to pick up the paper and examine her work… which meant sugary chalk water ran down the front of the paper and all over the floor. 🙂

Notes from the Trenches: Clean up spilled drops of sugar water promptly because it will harden into a sticky glaze as it sits.
You won’t be able to write with the chalk eventually if you let it soak in the solution too long (several days). I’m sure there is a good science experiment lurking in that observation, but maybe we’ll wait till Sweet Pea is a little older to investigate it.
Rating: 4 Stars * (Fun, Easy, Independent, Frugal)
Carnivals: This post is linked at Child Centered Art Party #9 at Art for Little Hands.

Sweet Pea is 34 months old.

From: I saw these Crayola Stampers on sale at Target and thought they would be a lot of fun for Sweet Pea.

Observations: These are supposed to be like markers, but with a fun shape on the tip, so you can stamp a shape instead of drawing a line. I had visions of Sweet Pea’s excitement over being able to stamp out a smiley face or a heart. I thought they would work great for a pattern matching exercise too.
Unfortunately, I was very wrong about these being fun for Sweet Pea. For starters, the caps were on so tightly that and she couldn’t open them by herself.

She couldn’t make much more than a brightly colored smear on the paper no matter how many times I tried to help her push the stampers straight down. Any nice crisp shapes you see on the paper are from my demonstrations.

Pretty much, she was just mystified about why she couldn’t make the pretty shapes that I was making.

I would not recommend these for other tots.
On the plus side, I had a pretty good time with them and I do think an older child would enjoy them. I also think they would be good for stamping boxes in a homemade chore chart or something like that.
Notes from the Trenches: These stampers are messy and frustrating for a 2 year old. Don’t buy them for this age group.
Rating: 1 Stars * (Easy to set up, but not much else.)
|
Need Ideas? Do you need some inspiration for activities to do with your own tots? You are in the right place!
You can search by age or activity type using the menus at the top of the page, use the tags on the left, or just check out some of my most popular posts, listed below.
Also, you are encouraged to pin any of my photos to pinterest so long as you include a link back to my blog.
-Shannon
|


 "Pin It")

 "Pin It")

