|
|

Sweet Pea is 31 months old.

From: We got this set of 4 foam puzzles as a gift from Sweet Pea’s grandma.
Material:

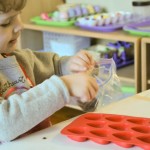
Observations: These foam puzzles are perfect for Sweet Pea. I’ve posted about having some trouble with puzzles before, so I was very happy to find some good puzzles for Sweet Pea. They are thick enough that the pieces fit into the puzzle with a satisfying “thunk”.

While she can definitely work these puzzles on her own, Sweet Pea enjoys taking them apart more than she likes putting them back together. Clean-up always takes me a bit, so I try to limit her to one puzzle at a time. I don’t want to force her to finish a puzzle at her age, so when she is done, I usually have her bring me the remaining pieces while I put them in. Sometimes I will ask her to pick up the letter “B” or number “3” too, so I think that helps with learning her numbers and letters.

We really love these puzzles. I would highly recommend some sort of foam puzzles for this age group.
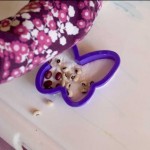
Notes from the Trenches: Sweet Pea really likes the feel of the foam between her teeth. Several times I have had to tell her, “Not in your mouth!” I worry that a tot could bite off a piece of the foam and choke on it.
Rating: 3 Stars * (Fun, Easy, Independent)
Sweet Pea is 31 months old.

From: I have seen similar ides is several places: Chasing Cheerios , Turning Ordinary Into Extraordinary and My Two Happy Homeschoolers.
Material:
- About 20 Popsicle craft sticks.
- Markers.
- Several sheets of paper.

Procedure:
- On three Popsicle sticks, write the word “TRIANGLE” in the middle and draw a small triangle near both ends.
- On four Popsicle sticks, write the word “SQUARE” in the middle and draw a small square near both ends.
- On six Popsicle sticks, write the word “RECTANGLE” in the middle and draw a small square near both ends.
- On four Popsicle sticks, write the word “DIAMOND” in the middle and draw a small diamond near both ends.
- (Depending on your toddler’s ability and your enthusiasm, you could create enough Popsicle stick pieces for any other shapes you want them to know (hexagon, rhombus, trapezoid, etc.)
- Set the TRIANGLE labeled Popsicle sticks on a sheet of paper in the shape of a triangle and draw an outline around each one so there a triangle shape on the paper. Repeat for the rest of your shapes.

- Sit next to your tot and tell them you are going to make some shapes. Set the 3 TRIANGLE labeled Popsicle sticks in front of you and then demonstrate laying them on the outline.
- Remove them from the outline and ask your tot to try it on their own.
- Repeat for the rest of the shapes.
Observations: Sweet Pea had a great time with this. It was a little harder than I expected for her to lay the Popsicle sticks on the outline, but it was a good challenge. After I had showed her each of the shapes, she was able to work independently.

After she would make a shape, Sweet Pea would jump up and down and clap for herself, saying, “Good Job!” It was so cute.
 
This was a great, quick activity for Sweet Pea and I would recommend it for other tots.
Notes from the Trenches: When I first tried this, I didn’t make an outline of the shapes. I figured that Sweet Pea would easily be able to put the Popsicle sticks into the correct shapes after she had seen me do it once, but I was wrong. She was totally lost until I drew the outlines. Melissa from Chasing Cheerios suggested gluing together model control shapes first so that your tot will have something to copy. I think that is a great idea and would have done it instead, but I was short on Popsicle sticks.

Rating: 4 Stars * (Fun, Easy, Independent, Frugal)

Sweet Pea is 30 months old.

From: When I was younger, I was crazy about Zoobooks, which is a high quality children’s magazine about animals. I thought I might subscribe, and happily discovered that the Zoobooks company now makes a magazine for younger kids called Zootles and one for toddlers called Zoobies. Our library carries Zoobooks, but unfortunantly not Zootles or Zoobies so I ordered a subscription.
Material:

Procedure:
- Sit on a comfy sofa next to your tot and look through your copy of Zoobies together. (Or hold them on your lap as you look through the online issue.)
- Read the words, discuss the pictures and pretend to walk like an animal.
- Repeat.
Observations: Both Sweet Pea and I are thrilled when our copy of Zoobies shows up in the mail.

I really love that Zoobies contains more in depth information about animals than most other toddler books. Usually books for tots have such a general overview of a broad subject. An issue of Zoobies usually has about 15 pages that deal with the same animal. One page might discuss the animal’s body parts (A bear’s big paw, for example) while another would show its habitat (a polar bear in a cave, for example) and what it eats (honey, fish and berries).

We have re-read each issue many, many times. I would definitely recommend Zoobies for younger tots.
Notes from the Trenches: Zoobies was age appropriate when I first ordered it, but I think it is just a touch too young for Sweet Pea now. I am soon going to switch our subscription to Zootles. If your tot is approaching 3 years old, I would probably start off with Zootles.
I think 6 issues of Zoobies runs about $24, which I find fairly expensive as far as a magazine subscription goes. However, the “magazine” is more like a child’s book. The pages are very sturdy, like slick card stock. Also, there is no advertising, which I love, but I’m sure drives up the price.
Rating: 4 Stars * (Fun, Easy, Independent, Frugal for the online copy or if your library carries them.)

Sweet Pea is 30 months old.

From: I read about a grid game on Amy’s great blog Teach Mama, where she stated that she originally got the idea from this Explorations blog. I modified her idea because I happened to have a jumbo sized die that I thought would make a fun addition to the game. Later my husband was watching Sweet Pea struggle with counting the dots on the die and brilliantly suggested having her actually place a Post-It Note on each dot before then moving it over to her game board.
Material:

Procedure:
- Print 2 identical game boards or make your own.
- Laminate the game boards if desired.
- Gather up your materials and sit next to your tot.
- Tell him or her that you are going to practice rolling the die. Demonstrate rolling the die and emphasize that the die must be left in the position it lands while you count the dots on top. Review your house rules regarding dice rolling (i.e. Not overhand and aimed at the dog) and let your tot practice several times before starting the game.
- Next say, “We are going to take turns rolling the die to figure out how many pictures we get to cover up on our game boards. I am going to go first and then you will get your turn.”
 - Roll the die and again remind your tot to leave it in the position where it landed. (You may have to be quick with these reminders.)
- Place one Post-It Note on each of the dots, counting as you go. (“One on this dot, Two… Three… Four. All the dots are covered so we have 4 dots!”)
 - Take one Post-It Note off of the die and place it over one of the pictures on your grid. Continue removing Post-It Notes from the die and placing them on your game board one at a time. Count each Post-It Note out-loud as you move it from the die to the grid. (“We get to cover up one of my suns, now two… Three… Four. We got to cover up four of my suns!”)
- Next let your tot take his or her turn. Have your tot roll the die and help them stick the correct number of Post-It Notes to it, counting as you go. Then, help them move the Post-It Notes to their game board as you count with them.
- Continue taking turns until one of your game boards is entirely covered by Post-It Notes.
- Celebrate!
Observations: Sweet Pea was not quite numerically ready for this game, but she had lots of fun and has requested to play it several times since I first showed it to her.

She also loved peeling the Post-It Notes off of the pad, which I believe is excellent pincer grasp practice.

Notes from the Trenches: I gathered up my materials the night before I wanted to play and told Dad about the “Number Game” we were going to play the next day. When Sweet Pea saw the jumbo die and heard me talking about a game she went a little out of her mind. She begged me to “play number game now” incessently. You have been warned.
I wish that I had used a die with less than three dots on each side because Sweet Pea didn’t have the patience for the larger numbers. The numbers five and six are beyond her reasoning right now and even with Dad’s Post-It Note transfer idea, I felt like she was a little lost. I often found myself thinking, “Doh! Not another six!”
Speaking of rolling dice, I was totally unprepared for how complicated a task this would be for Sweet Pea. Apparently dice rolling is not an innate skill. Sweet Pea had a terrible time with the concept that we wanted information from the top face of the die. At first, as soon we rolled the die, Sweet Pea would run after it and immediately roll it again. She liked rolling the die a lot more than figuring out what number we had rolled.
Rating: 3 Stars * (Fun, Easy, Frugal if you make your own dice.)

Sweet Pea is 30 months old.

From: I found this activity in the book Basic Montessori: Learning Activities for Under-Fives by David Gettman, Teach Me To Do It Myself by Maja Pitamic and also on the exceptional Wonder Years blog.
Material:
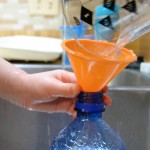
- 2 small, equally-sized measuring cups or other spouted containers.
- Enough beans to fill one of the cups about two-thirds full.
- A tray (optional, but highly recommended for containing spilled beans).

Procedure:
- Fill one of the cups with the beans.
- Arrange the two cups facing each other on the tray as show above. Put the cup with beans on the same side as your dominant hand.
- Sit next to your tot and tell them you are going to demonstrate pouring the beans and then you will let them try it.
- Place your non-dominant hand on the handle of the empty cup to stabilize it.
- Carefully wrap your fingers around the handle of the bean cup, making sure your thumb is on top and slowly lift it off of the table.
- Use an exaggerated slowness as you pour the beans into the empty cup.
- Gently set the now empty cup back down.
- Rotate the position of the cups so that the new cup with beans is near your dominant hand again.
- Repeat the demonstration.
- Let your tot have a turn.
 
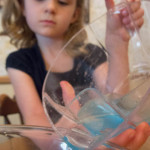
Observations: Most adults pour things multiple times a day without thinking much about it, but pouring makes an excellently challenging activity for tots. This was the perfect skill level for Sweet Pea. (It’s good to know that I can occasionally get one right.)

At first she went too fast and the beans would spill. I had to remind her to slow down, but she got better with practice. It required a lot of concentration, but she loved pouring the beans back and forth. She worked on this for quite some time. I would highly recommend this activity for other tots.
I am pretty sure Sweet Pea is right handed, but she frequently used her left hand to pour the beans back into the starting cup (instead of switching the cups around). I thought about correcting her, but decided not to say anything. I’d hate to think that she’s actually left handed and I’d forced her into using her right.

Notes from the Trenches: We used baby Lima beans because that’s what I had, but I think that smaller (navy beans or lentils) would have worked better.
Beans are obviously a choking hazard and they end up on the floor easily. Make sure you keep an eye on your tot and be careful about picking up all the dropped beans.
The book Basic Montessori: Learning Activities for Under-Fives suggests using your non-dominant hand to stabilize the cup as you pour. I tried this several times and thought it was terribly awkward. Since I couldn’t do it smoothly, I decided to just use one hand for pouring. Sweet Pea didn’t seem to have any trouble holding the cup steady in only one hand, but if your tot seems to be having difficulty, you might want to have them use both hands when pouring.
Rating: 4 Stars * (Fun, Easy, Independent, Frugal)

Sweet Pea is 30 months old.
 Sweet Pea demonstrates Downward Facing Dog.
From: Sweet Pea really likes joining me for WiiFit Yoga so when I read about a Yoga Kids dvd on The Adventures of Bear blog, I immediately ordered it from our library.
Material:
Procedure:
- Figure out how to work your dvd player. 😉
- Pop in a copy of Yoga Kids and start it playing.
- Help your tot with the poses.
 Sweet Pea does a Butterfly pose. Observations: Sweet Pea has always loved doing yoga with me. She was excited from the instant she saw the dvd and couldn’t wait to watch it. We don’t watch much tv around here, but I am always happy to introduce something that encourages physical activity (especially now that the weather has gotten cold and rainy around here).
I think this was the Volcano pose.
 |
 |
 |
On the first viewing, Sweet Pea needed a lot of help with almost all of the poses. However, by the second viewing, she was able to start doing quite a few of them on her own.
 Sweet Pea does a Lion pose. Sometime during the middle of the dvd, Sweet Pea ran and grabbed her bunny toy and started making him do the poses with her.

Notes from the Trenches: The first time we watched it, I felt like the time spent on each pose was a bit too brief. I understand that they need to keep things moving along to hold a child’s attention, but sometimes Sweet Pea hadn’t even figured out how to do a pose before they had moved on to the next one. The pace of the dvd is probably better suited for an older child.
The last pose is a headstand. Sweet Pea really wanted to try it and spent quite a while bent over while trying to kick her feet in the air. I kept imagining her little neck snapping and tried in vain to instruct her on good headstand technique, but the subtleties were lost on her. I didn’t want her to do it at all, but she was determined. We finally compromised and now our headstand pose basically involves me holding Sweet Pea up by her ankles.
Rating: 3 Stars * (Fun, Easy, Frugal – if you check it out from the library)
Sweet Pea is 29 months old.

Material:
- 6-12 pairs of matching picture cards. ( I found a cute little Nemo Matching Game in Target’s Dollar Spot, but obviously you could play this with any Memory card game set or even make your own.)
Procedure:
- Go through your cards and find 3 or 4 matching pairs. Set the rest aside.
- Mix up the 3 or 4 pairs of cards and lay them all FACE UP on the floor or a table.
- Tell your tot that you are going to play a game and that you are going to take turns finding matching pairs of cards.
- Have your tot sit near you. Pick up one card and describe the picture on it (i.e. “Oh, look this card shows a pink octopus named Pearl.”)
- Hold the card in one hand and then move it over all the other cards as you look for a match. Talk out loud as you compare each card. (i.e. “Hmm… This card is a yellow fish. It doesn’t match. No… that’s not an octopus either.”)
- When you finally get to the matching card, act excited and say something like, “Oh here it is! This is the matching pink octopus!”
- Pick up the matching card and set the pair of cards next to you. Say, “I found my pair of matching cards. I’ll put this pair right here. Now it is your turn to find a pair.”
- Tell your child to pick up one card. Ask them what is on the card. Help them to describe it if necessary.
- Next tell your tot to search through the remaining cards to find a match just like you did. Describe some of the cards that are on the ground until you get to the right one. You may have to actually find the match for them the first couple of times.

- Repeat until all of the cards have mates.
- When you are done, you can count the number of pairs that you each have.
- Show your tot how to mix the cards up and then play again.
- When your tot understands the concept of matching, start adding more pairs of cards back into to the game.

Observations: Every time Sweet Pea picked up a card, I found myself holding my breath while she searched for the match. It was always amazing to watch her find a matching pair on her own. 🙂 She likes this game a lot and we have played it many times now. Even Daddy has gotten in on the fun.
We are huge game players around here, so I was really excited by this activity. (Apparently it doesn’t take much.) I think this is the first real “game” that Sweet Pea has been able to play.

Notes from the Trenches: Note that the name of this activity is not called “Memory” or “Concentration”, which is what I originally tried to play with Sweet Pea. I put all the cards face down and proceeded to instruct her on flipping random cards over and memorizing where they were and then trying to use her memory to make a pair. She was totally lost and on the verge of a meltdown when it dawned on me that “Memory” was a much more complicated game than I actually had originally given it credit for. What was I thinking? We had already given up when I noticed a instruction card that came with the set. It explained that beginners should play the game with the cards face up. Ahhh.. Yes. That would help.
Sweet Pea also had trouble keeping her matched pairs separate from the rest of the cards on the floor. I think next time I might get a couple of little baskets for us to put our matches in.
Rating: 3 Stars * (Fun, Easy, Frugal – if you make your own cards.)
Sweet Pea is 29 months old.

From: This was recommended by my friend Lori. It is similar to the Magic Paint Bag activity in the book First Art by MaryAnn F. Kohl, although I think this version works better.
Material:
Procedure:
- Lay an 18 inch sheet of Press’n Seal on the counter.
- Spread about 1/4 cup of craft paint onto the Press’n Seal.

- Lay another 18 inch sheet of Press’n Seal directly on top of the paint.
- Press the outside edges of the sheets together to create a “bag”.
- Fold 1 inch of the bag’s edge over onto itself. Repeat for the 3 other edges..

- Securely tape all 4 edges down.
- Flip the Magic Paint Bag over and use your hand to spread the paint evenly inside the entire “bag”.
- Sit next to your tot and demonstrate how to drag your finger across the “bag” to create a mark.
- Next show your tot how to erase the mark by gently dragging your entire hand across the “bag”.
- Let your tot try.
Observations: I tried making a Magic Paint Bag 3 times before I ended up with one that worked the way I wanted. The activity described in the First Art book suggests just putting a few tablespoons of paint in a Ziploc bag and then taping that to something sturdy. I had a couple of problems when I tried that. The first time, I used powdered tempura paint which left little dry bits behind when I tried to make a mark. I tried again with regular craft paint, but I noticed that the writing on the ZipLoc bag really interfered with being able to see the marks in the paint. Also, the paint marks made in Ziploc bag don’t last very long. The paint would just spread out again very quickly.
Not easily deterred, I took a suggestion from my friend Lori and used the Press’n Seal method with regular craft paint. This worked much better on all counts.
Sweet Pea was fascinated as I assembled the “bag” and couldn’t wait to play with it. When I put it down in front of her and showed her how to make a mark, she was very excited.

She sat down and made several marks before grabbing the bag and running into the kitchen. She yelled, “Done! Put on fridge!” as she searched frantically for a magnet strong enough to hold up a quarter cup of paint. I quickly calculated how much effort I had put into making this paint bag and weighed it against the certain hysteria that was sure to follow any demonstration on the concept of re-using it.
You will not be surprised to learn that I decided to wait to destroy her precious creation. I removed the bag at nap time and erased her work. I presented it again the next day but, of course, I got the exact same reaction. Sweet Pea refused to use the bag more than once and again insisted that we hang her painting on the fridge.
I had planned to use this to show her how to draw different letters, but for obvious reasons, that didn’t work out.
Notes from the Trenches: I had a serious lapse in judgment and didn’t think about taping the edges down before I decided to test my creation. I firmly pressed my index finger to the bag and started pulling it towards myself. Satisfied by how clearly I was making a mark, I quickly pulled my finger all the way to the edge of the bag where quite a large dollop squirted out, across the table and all over my shirt. Oops.
Also, my friend Lori warns that the bag will burst eventually and that it should not be used unattended or over carpet or in nice clothes, etc.
Rating: 4 Stars * (Fun, Easy, Independent, Frugal)

Sweet Pea is 29 months old.

From: I had a comment from Barkey’s Mommy on my Kumon Let’s Color post recommending something like this. I also saw this entry describing how to create re-usable workbooks at Teaching My Little Bookworm.
Material:

Procedure:
- Carefully rip out several pages from the workbook.
- Put each page in a sheet protector.
- Put the sheet protectors in the 3-ring binder.

- Follow the instructions on the workbook page and show your tot how to draw on the page using the dry-erase markers.
- After allowing your tot to draw on several pages, show them how to use the felt to erase their marks.
- Re-use the new workbook until you are too bored to continue your child has gained a new skill.
Observations: The Kumon Tracing workbook is very high quality. The paper is thick and the pictures are all bright and interesting, but Sweet Pea can fly through the pages. Also, she is not even close to ready for the pages in the middle of the book yet, so I was very excited to find a way to let her re-use the pages that are an appropriate challenge for her. However, I really wish I would have done this before we had already used the the first 6 pages in the workbook. It gets more complicated rather quickly, so it would have been good to be able to do those first few pages again.
Sweet Pea loved using the dry-erase markers, but loved actually erasing them even more.

Notes from the Trenches: Sweet Pea was obsessed with the cute little pictures on each page. At first, she was a little confused about the totally arbitrary instruction to draw a line between two pictures (from paintbrush to a paint bucket, for example) and instead just wanted to scribble over the pictures. It took some persuading to get her to actually draw the lines and I never got the feeling that she knew quite why she was doing it. Luckily, we can now repeat the pages until she figures it out. 🙂
Rating: 3 Stars * (Fun, Easy, Independent)
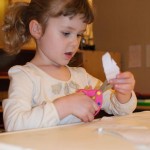
Sweet Pea is 29 months old.

From: This activity was from the book First Art by MaryAnn F. Kohl.
Material:
- Plastic safety scissors or training scissors. (I found our training scissors in the “Back-to-School” section at Target, but I don’t think they carry them during the rest of the year.)
- Play-doh (or make your own).

Procedure:
The instructions in the book for this activity were surprisingly relaxed. Ms. Kohl suggested that I let Sweet Pea “explore” the scissors by holding them anyway she wanted, and that I allow her to poke, prod, cut and stab the Play-doh. I am a bit too high-strung to follow such a lackadaisical approach when it involves my darling baby and objects containing blades, so my procedure is a little more structured than hers.
- Roll out several Play-doh snakes about 1/4 inch in diameter.
- Instruct your tot on the scissor safety rules for your house. (i.e. Scissors aren’t toys, are only to be used with your supervision, while seated, etc.)
- Demonstrate how to hold the scissors with your thumb in the top loop and your pointer and other fingers in the bottom loop.
- With your other hand, hold the Play-doh snake steady.
- Use the scissors to cut the Play-doh snake into many pieces.
- Help your tot hold the scissors and cut a snake into pieces.
Observations:
Using the scissors was a challenge for Sweet Pea. She kept turning her hand over and she had a really hard time keeping her thumb on top while cutting, but got better the more we practiced.

I don’t know if I have ever seen Sweet Pea so occupied by any other activity. She was amazed by her ability to cut the Play-doh “worms” into multiple pieces. I would highly recommend this activity for other tots.

Sweet Pea was truly enthralled, but alas all good things must end. Eventually, I had to force her to stop. I am fairly sure there were some tears when I took the scissors away. We will definitely be doing this again soon though.
Notes from the Trenches: I really hope it isn’t necessary to remind you keep both of your eyes on your 2-year-old as they play with scissors.
Rating: 2 Stars * (Fun, Easy)
|
Need Ideas? Do you need some inspiration for activities to do with your own tots? You are in the right place!
You can search by age or activity type using the menus at the top of the page, use the tags on the left, or just check out some of my most popular posts, listed below.
Also, you are encouraged to pin any of my photos to pinterest so long as you include a link back to my blog.
-Shannon
|


 "Pin It")

 "Pin It")

