|
|

Sweet Pea is 4 years old.

From: Initially I thought this cute heart picture from I Really Should Be Sleeping was made from fingerprints. I quickly realized that her version was made of out buttons, but decided that a heart made from fingerprints would be fun for Sweet Pea to make.
Material:
- A sheet of sturdy paper or card stock.
- Re-positionable laminating sheets or an 8 1/2 x 11 inch piece of removable contact paper. (You must use something that will peel back off without tearing the paper.)
- Scissors.
- Several colors of washable stamp pads. (Most of ours came from the Klutz Fingerprint book. I also found this set of washable mini stamp pads online, but I have not used them.)
- Apron or smock for your tot.

Procedure:
- Fold the contact paper sheet in half and cut out a “half heart” shape. Unfold the contact paper.
- You should now have a heart and a sheet of contact paper that contains a heart-shaped hole. Set the heart aside.

- Remove the backing from the laminating sheet that contains a heart-shaped hole.
- Stick the sheet of contact paper to a piece of sturdy paper.

- Show your tot how to press his finger onto the ink pad and then press it onto the paper to leave a fingerprint.
- Instruct your tot to put his fingerprints all over the paper.

- Repeat with other colors of ink until the entire heart has been covered.
- Remove the contact sheet from the paper and admire your tot’s heart.
Observations: Sweet Pea loves making fingerprints and hand prints so this was a big hit.

While Sweet Pea had a lot of fun, it did take longer to fill-in the entire heart than I expected. Sweet Pea worked diligently at it, but if your child has a short attention span, you might want to break this activity into 2 or 3 sessions.
Several months ago, when we made finger print animals, Sweet Pea had a difficult time putting her fingerprints exactly where they needed to go. This activity seemed much easier than that one because she could put the prints wherever she wanted.
We had a lot of fun and ended up with a lovely picture that made a nice gift for Sweet Pea’s grandmother.
I would recommend this activity for older tots (about age 3 and up).
Notes from the Trenches: Pay particular attention to the edges of the heart.Sweet Pea tried to put her fingerprints entirely inside the heart, so I had to encourage her to put her prints on the contact paper too. It will look better if some of the finger prints are cut off at the edge. (Half of the print should be on the plain paper, while the other half is on the laminating sheet.)

Rating: 3 Stars * (Fun, Easy, Frugal)

My access to the internet has been very limited so I have not been able to post as regularly as usual. Things should hopefully be back to normal next week.
Sweet Pea is 47 months old.

From: I was trying to think of a way for Sweet Pea to put her name on the back of a bunch of cards for her class, when I remembered this cute name stamp idea from Fun With Mama (via Teach Preschool’s Tumblr blog).
Material:
- 1 or 2 Craft Sticks.
- Foam Letters. (It works better if they are not self-adhesive.)
- Glue. (I love Glue Dots.)
- Jumbo washable stamp pad. (It needs as big as the craft stick.)
- Paper.

Procedure:
- Select the letters that are in your tot’s name and then flip the letters over so they are upside down. Glue the upside down letters to the craft stick. (This part is critical to prevent the letters from reading backwards when you stamp the paper.)
The letters right side up:

Upside down and glued to the craft stick:

- Show your tot how to press the craft stick firmly on the stamp pad and then press it on the paper.

- Allow your tot to admire his or her stamped name.
Observations: Sweet Pea was thrilled to be able to stamp her own name on the cards. This was a lot of fun for her and she stamped all 24 of the cards without a break.

Sweet Pea can recognize her name, but not quite write it yet, so she was very excited to be able to put her name on the card. This project required a bit of set up and was messy, but I would recommend it for preschoolers who are starting to recognize what their name looks like in print.
Notes from the Trenches: I had to break the ends off of my craft stick stamper because the stamp pad I bought wasn’t large enough. My craft stick wouldn’t fit in the plastic holder. I did see another set of big stamp pads at Oriental Trading Company, but they only come in a set of 6. I don’t know if they are large enough.
I will repeat that this activity is very messy. Sweet Pea got ink all over herself so make sure the stamp pad is the “washable” kind for kids.

Rating: 2 Stars * (Fun, Easy)

Sweet Pea is 47 months old.

From: I kept seeing the Mighty Mind product pop up on my Amazon recommendations and decided to try it. (Apparently Amazon thinks I am a 4 year-old child. All my recommendations are decidedly geared towards the preschool set. You think I might enjoy reading the new Jean Auel’s book? No, no. Amazon thinks I might need some work on my uppercase letters.)
Procedure: The set comes with a variety of small colorful plastic shapes and a stack of numbered cards. The idea is for your tot to use the small plastic shapes to create a larger picture on the card. The cards are supposed to be presented in order, as they get increasingly more complicated.
Shown below is one of the easiest cards. It has a red and green triangle at the top and a light gray diamond shape at the bottom. First, your tot selects the triangles and places them on the card.

Next your tot uses the plastic triangles to create the diamond shape that is printed on the bottom of the card.

The cards get more complicated until eventually they just show an outline of a large shape with no hints for how to build it.
Observations: Sweet Pea enjoyed playing with Mighty Mind.

The first few cards were too easy for Sweet Pea, but the next several were just the right level of challenge. About halfway through the deck, Sweet Pea ran into a card that was too difficult for her to complete on her own.
The progressive difficulty was a refreshing change for a puzzle game. I have often noticed that the playable life of a puzzle is very short in our house. A puzzle will sit on the shelf for months because it is too difficult. One day Sweet Pea will suddenly be able to put it together and she will work on it a couple of times. By the next week, the puzzle is too easy and she never touches it again. I have a feeling that Sweet Pea will be able to keep returning to this activity.

I did not need to give Sweet Pea much help, although she did want me to sit by her the entire time. I think many preschoolers would be able to use this game independently, but Sweet Pea and I had fun picking out the pieces together and talking about the picture we were creating.
Sweet Pea did about 10 cards before she decided to move on to something else. The box’s claim that this product will “keep them busy for hours!” was a bit of an exaggeration, but Sweet Pea has gone back and worked on more cards several times.

I would have preferred wooden pieces to the cheap plastic ones that were included, but overall I liked the concept behind the product. An industrious parent might be able to create something similar, but for the price ($18.95 as I write this post), I didn’t think it would be worth my time to come up with 30 cards.
Mighty Mind kept Sweet Pea engaged and she has chosen to work on it several times. I would recommend this product for preschoolers.
Notes from the Trenches: The set comes with a weird flimsy plastic tray for storing the pieces. Your tot is supposed to keep the pieces in the tray while they work, but it was almost impossible for Sweet Pea to pry them out each time she needed one.

One one hand, the tray was nice because it kept the pieces neat and Sweet Pea could view them all at the same time. On the other hand, it was just too awkward to use. Unfortunately, since we started out using the tray, Sweet Pea refused to do it any other way. If I had it to do over, I would just spread the pieces out in the lid of the set and let her select them from there.
Rating: 3 Stars * (Fun, Easy, Independent)
Sweet Pea is 47 months old.
")
NOTE: Are you looking for an edible version of this activity that can be used with real eggs? Read my Beautiful EDIBLE Marble Egg post!
From: I love the look of marbled Easter eggs and decided to try our marbled paper technique to create them.
Material:
- Wooden eggs. (We got our wooden ones from Hobby Lobby, but I couldn’t find a link to the exact ones we used. Oriental Trading Company also sells something similar.) [UPDATE: I do NOT recommend eating real eggs that have been dyed with shaving cream and liquid water colors. Eggs shells are permeable! Please read my updated Beautiful EDIBLE Marble Egg post for how to do this with real eggs.]
- Shaving cream.
- 3 or 4 Different colors of liquid water colors (or food coloring).
- Jelly roll pan or disposable baking tray.
- A paintbrush, un-sharpened pencil or something similar to swirl the colors.
- Tongs or a large serving spoon.
- Cookie cooling rack.
- Cookie sheet or something to go under the cooling rack and catch paint drips.
- Paper towels.
- A towel to clean up messes.
- A smock or bib for your tot.
- Sealing Spray (Optional)

Procedure:
- Set your cooling rack on top of your cookie sheet.
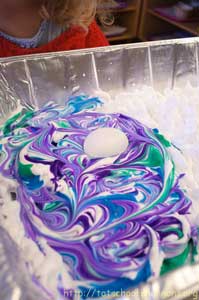
- Fill the bottom of the baking tray with shaving cream.
- Sprinkle several drops of each color of liquid water colors on the shaving cream.

- Let your tot use the end of the paintbrush to gently swirl the colors together. Don’t swirl too much or the colors will not be as bright.
")
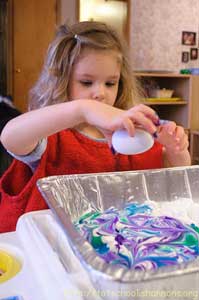
- When the colors are swirled, have your tot place an egg in the pan.
- Let your tot roll the egg around until it is entirely coated with colored shaving cream.

- Use the tongs or serving spoon to remove the egg to a cooling rack.
- To color the next eggs, make sure to roll them in an unused section of the swirled water colors. If there is no unused section, add more water colors and swirl them again before dropping in the next egg. If the water colors are too mixed into the shaving cream, they will turn out very dull on your egg. Fresh coloring equals more vibrant eggs.
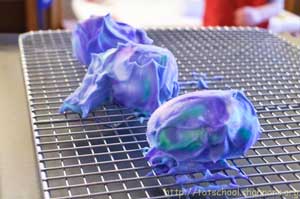
- Allow the eggs to dry overnight. The shaving cream with partially disolve, leaving an odd shaggy mess.

- Use a paper towel to rub the dried shaving cream from each egg
- Admire your fine marbled eggs. 🙂

- Spray the eggs with a glossy sealing spray to water proof them.
Observations: Sweet Pea loved making these eggs. She especially enjoyed dropping the eggs into the shaving cream mixture. She complained loudly when we were out of eggs.
We had lots of fun with this and I adore the beautiful results.
This activity is highly recommended for anyone who can handle a messy craft.
Notes from the Trenches: These eggs are not colorfast. Since my liquid water colors were “washable”, getting the eggs wet caused the brilliant color to run off of them. I suspect that using food coloring might solve this problem, but I didn’t have any. If you try this with food coloring, please let me know it is colorfast. [UPDATE: I had reports that food coloring rubbed off the eggs too, but Aleacia from Dilly-Dali Art says that spraying the eggs with a glossy sealing spray will make them waterproof. When I bring the eggs out for Easter this year, I will definitely coat them to finish them.

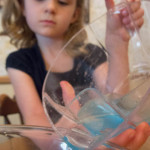
As I mentioned, this was a fairly messy activity. Sweet Pea got a lot of color all over her fingers because she kept forgetting to use the tongs. She would just reach in and try to turn the eggs with her hands. You can see what a lovely shade of purple the tips of her fingers are in the picture below.

If you’ve tried my method, please leave a comment letting me know how it turned out!
Rating: 2 Stars * (Fun, Easy)
Carnivals: This post is linked up It’s Playtime at hands on : as we grow.
Sweet Pea is 48 months old.

I am always running out of audio books for Sweet Pea. We have listened to the entire Little House series, Anne of Green Gables, all of Ramona, Henry and Ribsy, Winnie the Pooh, a few Magic Treehouses and as much of Junie B. Jones as I could stand. (Which was exactly 1 book. Seriously, does Junie use any adjective other than the word “stupid”?)
Recently, a friend of mine (Thanks Danielle!) suggested I look up storynory.org and I loved it so much that I wanted to share it with you.
Storynory has so many great stories and they are all FREE! I was skeptical at first, because I didn’t think free audio recordings would be of very high quality, but I am so glad I tried it. Everything we have listened to so far has been fantastic. You can download all the audio stories from their site, subscribe by podcast, or even just read them as text. I subscribed to the podcast this week and we love it!
There are all sorts of stories, including fairy tales, classic authors and even some original content. Most of the stories are short, probably around 15 minutes. My favorites so far have been Swan Lake and The Tortoise and the Geese.
Here is a funny anecdote about our first experience listening to Storynory. The stories are beautifully read by Natasha or Elizabeth, both of whom have British accents. When we listened to our first story, Sweet Pea immediately interrupted, saying, “Stop! Stop! What is wrong with her voice?” I did not understand Sweet Pea’s confusion at first, but quickly realized that she hadn’t heard someone speak with an accent before. It was very cute, but I had to answer seemingly endless questions about accents before we could return to our story. 🙂

Storynory is a great site and highly recommended for all ages. We have only run into 1 story that I thought was too old for Sweet Pea (from “The 1001 Arabian Nights”), but the story was introduced with a warning so I was easily able to skip it.
If you are searching for good audio books for your family, give Storynory a try!
Rating: 4 Stars * (Fun, Easy, Independent, Frugal)

Sweet Pea is 47 months old.

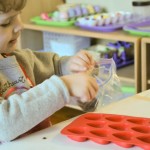
From: This is another activity suggested in John Bowman’s new book Montessori at Home (I am giving away a copy here.)
Material:
- Tweezers (I used rounded-tip beading tweezers).
- A bowl of pony beads in 4 different colors
- 4 Small bowls.

Procedure:
- Sit near your tot and say, “I am going to use these tweezers to sort the beads.”
- Pick up the tweezers and demonstrate holding them between your thumb and forefinger.
- Slowly open and close the tweezers a few times so your tot can observe how they work.
- Using the tweezers, pick up a pony bead from the large bowl and then drop it into one of the small bowls.
- Pick up a bead of another color and drop into a different bowl.
- Continue sorting the beads by color until there is 1 or 2 beads in each small bowl.
- Help your tot hold the tweezers correctly.
- Allow your tot to sort the rest of the beads.

- When all of the beads are sorted, extend the activity by inviting your tot to use the tweezers to move all of the beads back into the large bowl.
Observations: I was so surprised by how much Sweet Pea loved this simple activity. I put it together quickly and did not anticipate her spending much time on it. But boy, was I wrong. She did the entire activity twice in-a-row when I showed it to her. Usually she will only do something once before moving to something else.

Another thing that surprised me was how she sorted the beads. Sweet Pea picked all of one color out of the large bowl and filled 1 small bowl completely with them, before she moved on to the next color. I had expected her to randomly pick up beads from the big bowl, but she selected all of the blue ones first, then the purple, then orange and then yellow.

At first, Sweet Pea found it easier to just put the pony bead on the tweezers with her other hand, although as she got used to the tweezers she did this much less often. 🙂

Sweet Pea has chosen to work on this activity almost every day since I first introduced her to it. She absolutely loved it.

We have done other sorting activities in the past that didn’t go as well. I think the added challenge of using the tweezers was critical to this one’s success, otherwise Sweet Pea would not have been as engaged. I think it is important (and difficult) to find activities that are appropriately challenging for your tot. This was a huge hit for us and I would recommend it for older tots with good fine motor control. If the tweezers are too difficult for your tot, you could try allowing them to move the beads with their fingers. An younger tot would probably just enjoy using a spoon to transfer the beads from one container to another.
Notes from the Trenches: The hardest part of this activity was getting Sweet Pea to hold the tweezers correctly. I had to demonstrate the correct grip more than once, but as soon as she figured that out, she didn’t need any more help.
The beads could be a choking hazard. The tweezers could poke an eye, etc. Supervise your tot accordingly.
Rating: 4 Stars * (Fun, Easy, Independent, Frugal)
Sweet Pea is 46 months old.

From: This activity was in John Bowman’s book Montessori at Home.
Material:
- Ruler.
- Table knife.
- 1 can of Play-Doh (You can also make your own, but a Play-Doh is very cheap so I don’t think it is worth the trouble.)

Procedure:
- Start by explaining to your tot that a knife is a tool and needs to be respected. Explain any house rules you may have involving knives.
- Tell your tot that you want them to roll out a piece of Play-Doh that is 1-foot long. Show them that the ruler is exactly 1-foot long.
- Allow your tot to create the Play-Doh snake, helping if necessary.

- Periodically invite your tot compare her snake to the ruler to see if it is long enough yet.

- When the snake the correct length, demonstrate lining up the end of it with the left side edge of the ruler.
- Carefully pick up the knife and say, “I’m going to cut 1-inch pieces.”
- Slowly move your knife to the 1-inch mark and press down to cut the Play-Doh.
- Set the 1-inch piece aside and slide the cut edge of the snake so it lines up with the left side of the ruler again.
- Invite your tot to try.

Observations: Sweet Pea was totally engrossed in this activity and cut the entire snake into 1-inch pieces. However, when I suggested we try 2-inch pieces, she refused. She wanted to use a rolling pin to roll out the pieces she had just cut into “cookies” and I said that was fine. I might try the 2-inch pieces next time.

Sweet Pea needed quite a bit of direction at first regarding where to cut, but quickly got the hang of it. She had not cut with a knife or used a ruler before this activity and was quite enthusiastic about the experience.
I would highly recommend this activity for older tots that have good fine motor control.
Notes from the Trenches: During this activity, be especially aware that your tot is closely observing you. Make sure that everything you do with the knife is deliberate. If your tot watches you wave the knife around or pry the lid of the Play-Doh off with it, then he or she will likely try to do the same thing.
Sweet Pea had some trouble creating the Play-Doh snake because she wasn’t pressing down hard enough. When I encouraged her to press harder, she did so with too much force and the snake got too thin in just one place. It took a loooong time for her to make a snake that was the same length as the ruler. If I had it to do over, I might just make up the snake myself before starting the activity.
Rating: 3 Stars * (Fun, Easy, Frugal)
Carnivals: This post is linked up at Homeschool Creation’s Preschool Corner. Visit her site to see some other great ideas for your preschooler.
Sweet Pea is 45 months old.

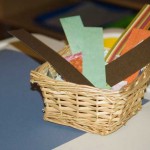
From: The Activity Mom blogged about these cute foam shape puzzles and Walking by the Way did a slightly easier version of them.
Material:
- Self-adhesive foam shapes (or non-adhesive shapes and glue).
- 2 or 3 sheets of card stock or heavy paper.
- Scissors.
- Sharpie.
- Basket or bowl to contain the shapes.

Procedure:
- Cut each sheet of card stock into 4 rectangles.
- Draw a line down the center of each rectangle with the Sharpie.

- Separate the foam shapes into 2 matching piles.

- Select a few of the shapes from one pile and use them to create a picture. Remove the backing and stick the shapes down on the left side of one of your paper rectangles. Remove the exact same shapes from the matching pile and place them in the basket for your tot to use later.
- Repeat with the remaining shapes and paper to make several puzzle cards with a different picture on each one.

- Show your tot the puzzle cards and the basket of foam shapes.
- Allow your tot to choose a puzzle card and inform her that you are going to examine the picture on the left and then try to recreate it on the right side of the paper.
- Say something like, “What shapes are used to make this picture? I think I need a yellow rectangle.” Invite your tot to find the correct shape in the basket. Continue looking for shapes until you have selected all of them that your tot will need to create the picture.
- Allow your tot to try to build the picture.

- Repeat with the remaining cards.
Observations: This went over better than our foam shape patterns activity. Sweet Pea did 1 of the cards right away and has chosen to work on them a few times since then. Oddly, she has only been interested in doing 1 at a time before moving on to something else. I had expected her to do them all at once.

Sweet Pea seemed to enjoy this activity, but I was surprised by how much trouble she has had with some of the puzzles. I thought these would be a little too easy for her, but I ended up wishing I would have created some simpler cards. I think the 3-dimensional aspect of the puzzle (i.e. having to stack some of the shapes on top of other ones) provided more of a challenge than I anticipated.

I really like that this activity can be changed to suit your tot’s age and ability. It is easy to put together and a good exercise in logical thinking. I would recommend it for other tots.
Notes from the Trenches: The puzzle cards can be reused if you prevent your tot from sticking the foam shapes down. Alas, Sweet Pea loves stickers so if we want to do more, I’ll have to make them.
Rating: 3 Stars * (Fun, Easy, Independent)
Foam Shape Patterns
Sweet Pea is 45 months old.

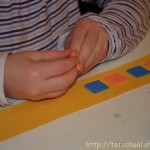
From: I was inspired by pictures of Foam Shape Puzzles and a Mystery Pattern Blocks game in Erica’s Logical Thinking post at ABC and 123. I thought that the cheap foam shapes would be perfect for a patterning activity.
Material:

Procedure:
- Cut each piece of paper into 4 strips.
- Take several handfuls of shapes and separate them by color and/or shape.

- Lay foam shapes across one of the paper strips in a pattern. Make sure you have enough shapes to cover the entire strip of paper.
- Stick the first half of the foam shapes to the strip. Remove the remaining foam shapes to a basket.
- Repeat with the remaining foam shapes and paper strips. Use a variety of patterns (ABAB, AABAAB, ABCABC, etc) depending on your tot’s age.

- Present your tot with one of the pattern strips and the basket of foam shapes.
- Explain that you want your tot to complete the pattern. Say something like, “This pattern has an orange square, then a blue square, then orange, then blue. What do you think comes next?”
- When your tot gives the correct answer, invite her to search the basket for the correct shape and allow her to place it in the correct place on the strip.

- When your tot reaches the end of the strip, congratulate her on finishing and ask if she would like to choose the next pattern.
- Repeat until your tot is ready to quit or you run out of strips.
Observations: I had high hopes for this activity, and it started well, but Sweet Pea quickly grew tired of it. She did 2 strips with an ABAB pattern without help and then said she was done. She had more fun trying to wear the strips than creating them.

I thought maybe the ABAB patterns were just too easy for her, so I asked her if she wanted to try a harder one. I showed her the most complicated pattern I had created, but it seemed to be _too_ hard. She only finished it by asking me, “Which piece goes next?” a couple of times. After we were done, she announced that she wanted to do something else.

I wouldn’t call this a disaster, but it certainly didn’t hold her attention for more than a few minutes. I can’t figure out why this activity didn’t go well for us. Maybe I will try the more complicated strips again in a few weeks.
I would recommend this activity if you have a bunch of extra foam shapes around or if your tot is especially interested in patterning.
Notes from the Trenches: Creating the pattern strips was much harder than I thought it would be. The tub of shapes I bought seemed to be full of yellow squares and rectangles, but not much else. I had trouble finding enough different shapes and colors to start my pattern while reserving enough for her to complete it. Make sure you have all the shapes you need to do an entire strip before you actually start sticking the pieces down!
I tried to set this activity up so that it could be reused. I stuck half the foam shapes down and Sweet Pea was supposed to just place the rest of the foam pieces along the strip in the correct place. However, as soon as she realized that the first few shapes were stuck to the paper, she wanted to know how she could get her shapes to stick too. I told her that they were not sticky and she was just supposed to lay them on the paper. She contemplated the problem briefly and then said, “I need glue.” I gave up on trying to dissuade her and just showed her how to peel off the backing. At least that is good fine motor control, right?

Rating: 1 Stars * (Independent)
Carnivals: This post is linked to Delicious Ambiguity’s Tot Tuesday #40 and One Hook Wonder’s Montessori Monday. Visit these site to see some other great ideas for your tots.
Related Posts:
The tiny little elves that live inside my computer think you also might be interested in the following:
|
Sweet Pea is 45 months old.

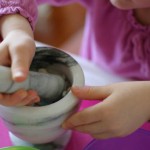
From: I found this cute little cinnamon and sugar grinder at the grocery store and thought it would be a great practical life activity for Sweet Pea.
Material:
- Spice grinder.
- Thinly sliced apples.
Procedure:
- Show your tot how to hold the grinder upside down over the apples.
- Demonstrate holding the bottom portion steady while twisting the top portion to grind the cinnamon.
- Let your tot try.

Observations:
Sweet Pea really enjoys using this grinder. Since I introduced it , she has been frequently requested sliced apples, and I am not going to complain about anything that gets her to request fruit for a snack.

Sweet Pea isn’t able to get too much out, but she works hard at it. Twisting in the correct direction takes quite a bit of hand strength, so this would only be suitable for an older tot who has good fine motor control.
I love quick little activities like this. It is a great example of something that an adult would take for granted, but most tots would find fascinating.
Notes from the Trenches: Cinnamon can be a bit caustic, so be careful about allowing your tot to handle cinnamon if he or she has sensitive skin.
I have learned that if the grinder gets wet, a moist cinnamon paste will gunk up the cheap plastic parts and you will need a toothpick to pick all the gooey cinnamon bits back out the mechanism before the grinder works again. I wish I could tell you that I know this because I accidentally dropped the grinder in the sink, but I’ll just warn you that you should explain to your tot that he or she is not allowed to lick the top of the grinder under any circumstances.
Rating: 2 Stars * (Easy, Independent)

Sweet Pea is 45 months old.

From: Have you heard of Twig? Sweet Pea has recently outgrown a lot of her toddler things so I have been looking for some new preschool toys. I had seen a lot of great reviews for Twig, a unique building block set, so I was thrilled when I spotted it at our local toy store. I thought this toy would be perfect for Sweet Pea.

Observations: Twig is a set of 72 brightly colored wooden cubes and rods. The pieces are sanded smooth and precision-cut so they easily fit together in an variety of interesting ways. They seem like a great idea for an open ended building toy.

I had not read even one bad review of this toy, so I was really excited to give them to Sweet Pea. People raved about this set so much that I had visions of her playing alone with it for hours while I cleaned the house and cooked dinner. I wondered if I might even have time to sit on the couch with my feet up and read a great book while she played on the floor next to me…
It was not to be. To say these were “not a hit” is an understatement. Of course, Sweet Pea was incredibly excited to open the box, but as soon as we had taken all of the pieces out, she played with them for less than 3 minutes before she asked, “What else?” and wandered away.

In fact, I’m pretty sure that I enjoyed Twig more than Sweet Pea. Later that evening, I played with them for about an hour while my husband and I watched an episode of House. It was fun to see how high of a tower I could create and just generally fiddle with them. If I have any complaints, it is that there are far to many plain rods and not enough “holed” cubes.
I actually left them out on the coffee table for a few days with the hope that they would attract Sweet Pea’s interest, but they sat untouched. Eventually I put them on a shelf where they have remained for over 3 weeks and she hasn’t so much as looked at them again.

I was hoping that Sweet Pea was too young for Twig, but after looking at the Fat Brain toy age / usage chart (scroll to the the middle of the page) I think I’m wrong. There is a significant decline in interest for most children after the age of 3. Since Sweet Pea will be turning 4 in April, I am afraid she is actually too old for them. I wish I would have given these to her sooner (or at this price, not bought them at all). Looks like one of my lucky friend’s kids will be inheriting this expensive pile of wood.
Has anyone else had any experience with Twig? Do you have any suggestions for a better open ended toy for a 4-year old?
Rating: 2 Stars * (Easy, Independent)
|
Need Ideas? Do you need some inspiration for activities to do with your own tots? You are in the right place!
You can search by age or activity type using the menus at the top of the page, use the tags on the left, or just check out some of my most popular posts, listed below.
Also, you are encouraged to pin any of my photos to pinterest so long as you include a link back to my blog.
-Shannon
|


 "Pin It")

 "Pin It")


This summer I bought two large containers of various shapes and this gives me one more way to use them. Thanks!
Thanks for the heads up about checking to see how many of each shape is available. I wouldn’t have thought about it.
“I need glue” LOL Thanks for sharing and linking to Montessori Monday.