|
|

Sweet Pea is 25 months old.

From: I am not exactly sure where this idea came from, but I think I saw a picture of something similar at 1+1+1=1.
Materials:
- Penne pasta.
- A salad dressing mixer (works great because you can remove the lid to get the pasta back out) or other container with a very narrow spout. (Tupperware sells a quick shake container, but I am pretty sure that Target has something similar.)
- A sturdy bowl.
Procedure:
- Put the pasta in the bowl.
- Present the bowl of pasta and the mixer container to your tot.
- Show them how to pick up one piece of pasta, turn it vertically and drop it into the container.
- Let them have a turn.
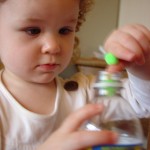
Observations: Sweet Pea really loved this activity. At first she tried to put handfuls of pasta into the container, but she quickly learned to just do 1 or 2 at a time. She spent a long time dropping the pasta into the container and then would ask me to take off the lid and dump the pasta back into the bowl and start all over. I would highly recommend this activity for other tots.
 
Notes from the Trenches: There is always the fact that our dog tries to eat the raw pasta, but other than that this went very smoothly.
Rating: 4 Stars * (Fun, Easy, Independent, Frugal)

Sweet Pea is 25 months old.

From: Sweet Pea’s chunky 4 and 5 piece puzzles were getting too easy for her so I picked up this letter puzzle from Target for about $10.

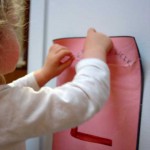
Observations: This puzzle was much harder for Sweet Pea than I thought it was going to be. I wrongly assumed that it would be more of a letter matching exercise. Instead, the space under each letter shows an object that starts with that letter. For example under the “M” is a picture of the moon. Also, the pictures under the letters are not the same color as their corresponding letter. Worse, the spaces under the letters don’t exactly match the shape of the letters. (See the “M” moon spot in the picture above for an example.) Sweet Pea had a tough time, but still enjoyed it. I had to help her quite a bit, but she actually did understand the concept that “D” made the noise “duh” and went with the “Duck” picture. I credit the fantastic Leap Frog Letter Factory dvd with her understanding of letter sounds.

Notes from the Trenches: I think Sweet Pea is just a bit too young for this puzzle, but for all the reasons explained above, I think I would buy a different letter puzzle if I had it to do over again. Any suggestions?
Rating: 2 Stars * (Easy, Fun)

Sweet Pea is 25 months old.

From: I saw a picture of some cut up sponges and a garlic press on the really fantastic The Wonder Years blog and thought it looked like a great idea.
Materials:
- 1 sponges cut into 1″ cubes.
- 1 sponge for cleaning up water. I cut a regular sponge in half so it would be easier for Sweet Pea to handle.
- A garlic press.
- 3 bowls.
- Water.

Procedure:
- Soak the sponge cubes in water and then put in 1 bowl.
- Arrange all 3 bowls and the garlic press on a tray.
- Sit next to your tot and show them the tray.
- Show them how to take 1 sponge cube out of the first bowl and load it into the garlic press.
- Demonstrate carefully holding the garlic press over the second bowl and squeezing the water out of it.
- Show them how to open the press and remove the now dry sponge. Place the dry sponge into the 3rd bowl.
- Repeat the demonstration if needed and then let your tot try.
- If When your tot spills water on the tray, show him or her how to use the regular sponge to wipe it up.
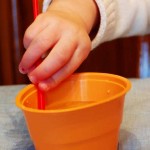
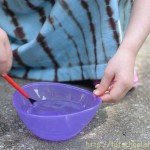
Observations: Sweet Pea really liked playing with the sponges and water, although she never quite got the hang of how to squeeze the garlic press.

She definitely wasn’t able to control it enough to squeeze it over the second bowl of water.

She mostly loved playing with the big sponge. She spent a lot of time wiping up excess water.

Eventually the whole thing deteriorated into dipping the big sponge in the water and watching it soak up liquid and then squeezing it back out. She had a grand time with this. We’ll probably try the garlic press portion of the activity again in 5-6 months.

Notes from the Trenches: This is another “only a bib and a diaper” activity. It was really messy. We got water everywhere. You are advised to keep a couple of towels within arms reach at all times.
Rating: 4 Stars * (Easy, Fun, Independent, Frugal)


Observations: Paint with water is our new favorite activity. I first talked about the paint with water book we received from Sweet Pea’s Great Aunt Jackie here. Since then, I have been on a constant look out for more of them and have discovered a few things that I wanted to share.
We found our second paint with water book, Strawberry Shortcake’s Happy Splash of Color, at in the kid’s activity book section in Target. I immediately noticed that the dyes in this book had a much more saturated color than in the Spot book. I assumed this deeper color would make for more satisfying painting, but that turned out not to be the case. Once Sweet Pea wet the page, the color just didn’t spread very much. The colors didn’t blend and the colored dots and stripes didn’t dissolve at all. One family member remarked that Strawberry Shortcake looked like she had the measles. Worse, the dye stained Sweet Pea’s hands and clothes a lot more than in the Spot book.

Not to be deterred so easily from such an engaging activity for Sweet Pea, our next book (also found at Target) was Disney’s Mickey Mouse Club House Paint With Water. I bought this specifically because the dye on the pages looked much duller than the Strawberry Shortcake book. This book was a huge success not just for painting, but also from a marketing standpoint for Disney. Only 4 painted pages later and Sweet Pea can identify a 1-inch square Mickey Mouse sticker from 30 yards away.

In any case, I love these books. I know this is sort of contrary to the Tot School spirit, but after dinner I give her 3-4 pages in a row and am rewarded with at least 10 more minutes of peace to enjoy my dinner.
Notes from the Trenches: I have a lot of notes today. First, know that if you let your tot paint on some sort of a non-solid surface (such as the table in the picture below), the wet paper will develop grid shaped holes. This may make your tot quite upset and lead to a lot of questions such as, “Where mouse go?”

Second, make sure you put a plastic tablecloth or mat under the pages (and this goes for the less saturated dye too). The color soaks through the paper and will stain whatever is below it. The stain is pretty hard to remove remove. I finally had success with a Mr. Clean Magic Eraser to remove the leaked-through color from Sweet Pea’s little plastic play table.
Also, the smaller paintbrushes that come with the books will keep the time/page ratio up (which at the cost of about $0.13/page can be an issue) , but will lead to more holes in the paper since it is difficult for your tot to regulate how hard they press. Sweet Pea had a lot more luck with a larger paintbrush, but sped through the pages that way.
Rating: 3 Stars * (Fun, Independent, Easy)
Sweet Pea is 25 months.

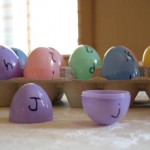
From: I think this was just an idea I had at Easter when I saw this pair of cute little egg dipper tongs at Micheals. It turns out that Sweet Pea couldn’t use the dippers at all yet. However, she had such a great time transferring plastic eggs into the egg carton, I thought I would post about it.
Materials:
- Empty egg carton with the top cover removed.
- Plastic Easter eggs.
- Tub or basket to hold the eggs.
- Egg dipper tongs (Not recommended).
Procedure: This procedure involves what I would do (ie w/o the tongs) if I did it over again.
- Put the eggs in the basket.
- Present the egg carton, basket of eggs to your tot.
- Demonstrate moving one egg from the basket to the egg carton.
- Discuss how one egg fits in each hole in the carton.
- Let them have at it.
Observations: Sweet Pea tried valiently to use the tongs, but alas, it was not to be. I continue to be astounded by my complete lack of ability to predict what is too hard or easy for her. Frankly, they were a little hard for me to manage. To be fair, I couldn’t tell that until after I got them home and tried to use them though.

She actually tried to use the tongs for a really long time, and amazingly didn’t break down in tears because she couldn’t do it. She eventually just gave up on the tongs and started moving the eggs by hand. This activity without the tongs was really fun for her and I would recomend it for other tots. I thought it might be too easy for her, but she seemed to really enjoy it. We talked about the colors of the eggs a little bit and tried counting them as she moved them, but mostly she just liked how they fit into the egg carton.

I might try the tongs again in a year. Sweet Pea was still very interested in what might be in the eggs. I think I might try to think up an activity (w/o breadcrumbs) that lets her try to open them and discover something inside.

Notes from the Trenches: Well… don’t try to make a just-turned-2-year-old try to use plastic egg tongs that are way beyond their ability. However, there wasn’t really anything tricky about the activity once we got rid of the tongs.
Rating (w/o tongs): 3 Stars * (Fun, Easy, Independent)
Sweet Pea is 25 months.

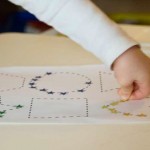
From: This from Carissa’s Learning Wheel idea at 1+1+1=1.
Materials:
- 1 piece of heavy white paper or cardstock.
- 6 different colors (red, blue, yellow, purple, green, orange) of cardstock or construction paper.
- A laminator or press and seal lamination pockets. (Optional, but good if you want to do this activity multiple times).
- Glue.
- Sharpie or other Marker (optional).
- Scissors.
- Tape.
- A basket or non-breakable bowl.
Procedure:
- Cut the heavy white paper into a square or circle. Make sure it will fit into your lamination pouch.
- Cut 2 1-inch squares from each color of cardstock.
- Glue 1 square of each color in a circle around the outside edge of the white paper. (I stuck with the traditional color wheel order of Blue, Green, Yellow, Orange, Red, Purple and Blue.)
- Write the word “Colors” in the center of the white paper.
- Laminate the color wheel and the remaining individual colored squares.
- Cut out the color wheel and each of the colored squares. Make sure there are no sharp edges.
- Make a loop of tape and put it on the back of each colored square and put the squares into a small basket.
- Introduce your tot to the color wheel by demonstrating how to stick a couple of the colored squares onto the appropriate colors.
- Name each of the colors as you match the correct pieces.
- When your tot has the idea, hand them the color wheel and pieces to try on their own.

Observations: Sweet Pea was 23 months the first time I introduced this activity (when these pictrues were taken). She did the entire wheel a couple of times, but it didn’t hold her interest as long as I thought it would. She has used the color wheel a few times since then, but never for more than a few minutes. I think that this specific activity might be too easy for her since she doesn’t actually have to know the names of the color and just has to match the same exact squares together. In fact, the fun part for her seemed to be playing with the taped pieces by taking them off and getting the squares lined up in the exact right position.

I sort of wish I would have introduced this at an earlier age to see if she liked it more then. However, I think with some modifications, this activity might work out now. I am planning on printing out the color words written in the appropriate colors and see if she can match those (RED, BLUE, PURPLE, etc). I also think I might print out some pictures of pretty colored birds (Blue Jay, Cardinal, American Gold Finch) and see if she can match those to the right colored square on the wheel. Anyone know of a mostly purple colored bird?

Notes from the Trenches: This isn’t hard to put together, but you probably won’t be able to do it with your tot sitting on your lap trying to grab the scissors. Also laminated corners can be very sharp. It is really important to round off the pointy corners before giving it to your tot.
Rating: 2 Stars * (Independent, Frugal if you own a laminater or don’t use one.)

From: I first posted about this Kumon Let’s Sticker and Paste book here. In the meantime, I received a great comment from Julie at The Adventures of Bear about how to make sticker work easier for tots. She suggested that I peel the excess sticker material off of the sheet, leaving only the stickers on the backing before I give it to Sweet Pea.
Materials:
Procedure:
- Tear out page from the book and then cut out only the corresponding stickers.
- Peel the excess sticker paper from around the stickers. Leave only the stickers on the backing.

- If your tot hasn’t worked with stickers before, show him or her how to peel off the stickers and apply them to a page, otherwise just hand the stickers and the appropriate page to your child.
- You may need to point to the area where they should apply the stickers.
Observations: Sweet Pea has always had trouble getting little stickers off of the sheet and often asked for help getting them started whenever she worked with them. What a super idea Julie gave us about removing the extra sticker material! This little change has made it so much easier for Sweet Pea to get the stickers off on her own.

The Let’s Sticker book is a great. Sweet Pea loves it, but I try to limit her to only about 4 pages at a time so she is always engaged when I bring it out. She especially had fun with this picture that let her put winter clothes on a little boy. It made me think that she would like some sort of paper dolls.

From the Trenches: The stickers are somewhat removable (by a careful adult) from the page if they get stuck in the wrong spot. However, the stickers are impossible to remove from each other if they get stuck together. This characteristic has been know to cause uncontrollable crying.
Rating: 3 Stars * (Fun, Easy, Independent)
Sweet Pea is 24 months old.

From: This simple idea was inspired by the excellent book Teach Me To Do It Myself by Maja Pitamic. I found a slightly more detailed explanation at Shu-Chen Yen’s On-Line Monntessori Albums. I decided that having Sweet Pea clip the clothespins to the basket was too difficult, so I set up the activity so she was only removing them.
Materials:
- A small basket or bowl with a rim that is thin enough to a clip clothespin to.
- 5 or 10 easy-to-open clothespins. Open and close them several times to weaken the springs if needed.
Procedure:
- Clip the clothes pins to the rim of the basket.
- Show your tot the basket and explain that they will need to be careful with the clothes pins and only use them on the basket.

- Slowly demonstrate pinching a clothespin at the top, pulling it straight up and then setting it into the basket. Repeat a couple of times, exaggerating the action of pulling the clothes pin straight up.
- Give your child the basket and let them try.
Observations: Sweet Pea didn’t like this activity very much. She had a really hard time lifting the clothespin vertically of off the basket. She kept trying to pull it sideways, without really pinching it open and she didn’t seem have enough finger strength to keep the clothespin pinched for very long. I had to keep reminding her to pinch and lift directly up to remove it from the basket.

After she understood what she was supposed to do, she was able to pinch a clothespin so it would open, and pull it off of the basket. However more often than not, it would twist out of her fingers and snap closed as soon as it was off of the basket. A couple of times the clothes pin scraped her fingers as it snapped closed and she said, “hurt”.

Before she had even finished with all 10 clothes pins she looked up at me with an anxious expression, gave me the baby sign for finished and said, “Done! Done! Done!” At that point, I quickly put everything away. In retrospect, I maybe should have shut this activity down as soon as she indicated that she was getting hurt, but I was a little blinded by the goal of getting all 10 of the clothespins off of the basket. Luckily Sweet Pea had enough insight to realize that she was way out of her depth.
Despite the fact that this was a complete disaster, I will maybe try again in another couple of months… maybe I should only use 5 clothespins next time. 🙂
Notes from the Trenches: You know your child’s strength and dexterity best, but I wouldn’t recomend this activity for a tot that is 2 years or younger. I noticed another Montessori page recommended it for 2.5 years and up.
Always pay attention to what your tot is telling you, especially about getting injured. 🙂 If this activity is too hard for them, move on to something else before anyone gets hurt.
Rating: 2 stars (Easy, Frugal) * (Somehow 2 stars seems too high. Does it really matter how easy or frugal an activity is, if it is totally inappropriate for my tot?)
Sweet Pea is 24 months old.

From: My mom suggested this. She says that she used to do this with me when I was a tot. 🙂
Materials:
- Sink.
- Sturdy chair or step stool.
- Sponge, measuring cups, old produce (like a carrot or piece of lettuce), dish wand or other interesting kitchen items.
- A large plastic bib (optional).
Procedure:
- Assemble your items near the sink and turn the faucet onto a cool and very low stream.
- Put a bib on your tot and put them on a sturdy chair or stepstool in front of the sink.
- Check to make sure the water temperature is still cool.
- Show your tot how to stick objects under the stream and watch the various effects.

Observations: Sweet Pea went crazy for this activity. She could play at the sink for hours if I let her. She liked just putting her hands in the water, filling and dumping the measuring cups, and pretending to clean the lettuce and dishes too. The sponge was an especially big hit.

While writting this post, I found an article from suite101.com about the same activity which suggested using (mild, non-toxic) soap and a whisk to show your tot how to create bubbles and I will probably do that at a future date. I know that the Montessori method recommends an activity for teaching preschoolers how to wash dishes with care but I felt like Sweet Pea was not quite ready for that yet.
This activity is so occupying for Sweet Pea that I have started cooking dinner while letting her play at the sink. Preparing dinner with Sweet Pea underfoot has always a big problem for me. My husband and I joke that Sweet Pea can sense when I have raw meat on my hands because she instantly starts crying and insisting that I pick her up. I try really hard to limit Sweet Pea’s TV time, but frequently I will just turn on Barney before I start cooking. So far, I can stand right next to her and prepare dinner without her so much as looking at me.

Notes from the Trenches: Your child will be playing with water so supervision is critical. Your tot could fall, drown, get burned, etc, etc. Obviously, it is also very wet. Sweet Pea had to be told to keep the items in the sink several times before she understood not to squeeze the sponge out over the kitchen carpet. Also, despite the bib plastic bib, water ran down her front, got all over her clothes and dripped onto the wooden chair. I might suggest only having your tot wear the bib and a diaper.
Rating: 4 stars (Fun, Easy, Independent, Frugal) *
Sweet Pea is 24 months old.

From: I think I have seen this in several places, but the most recent was an article at wonderbrains.com. That article even described how you could dye the pasta first, but we didn’t mess with that this time.
Materials:
Procedure:
- Put 5 or 10 pieces of pasta in the metal bowl.
- Cut off a piece of gimp about 2 feet long.
- Tie one of the pieces of penne to the bottom of the gimp so the pasta won’t fall off the end when your tot strings it.

- Sit next to your tot and carefully hold a couple inches of the loose end of the gimp so that it sticks straight out horizontally.
- While your tot watches, carefully slide a piece of pasta onto the gimp. Move the pasta all the way down the gimp to until it bumps into the tied piece.
- Repeat with another couple pieces of pasta before handing the gimp over to your tot.

Observations: Sweet Pea had a more difficult time with this at first than I expected. It requires a lot of fine motor control for a toddler. I had to help with the stringing quite a few times, but eventually Sweet Pea got the idea and was able to do it on her own. It took a lot of concentration for her to string the pasta without help from me, but she seemed to like doing it pretty well. You have to make sure that your tot pushes the pasta all the way down to the end of the gimp or the pasta will easily fall back off of the end.

Notes from the Trenches: Again, this seems like a simple skill, but Sweet Pea had trouble with it. I suggest demonstrating very slowly before just giving the gimp and pasta to your toddler or they might end up really frustrated. Rigatoni was too large and broke easily. I thought the penne was a better size for stringing. Also, apparently dogs will eat raw pasta. 🙂 Shortly after we did this activity, we found the dogs trying to choke down wet, half-chewed pieces of pasta under the kitchen table.
Rating: 3 Stars (Fun, Easy, Independent – after some initial help) *
|
Need Ideas? Do you need some inspiration for activities to do with your own tots? You are in the right place!
You can search by age or activity type using the menus at the top of the page, use the tags on the left, or just check out some of my most popular posts, listed below.
Also, you are encouraged to pin any of my photos to pinterest so long as you include a link back to my blog.
-Shannon
|


 "Pin It")

 "Pin It")

