|
|

Sweet Pea is 27 months old.

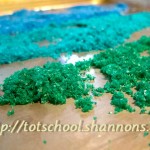
From: A traditional Montessori lesson involves showing children how to draw letters in a tray of salt. I saw this activity using sand instead of salt at Chasing Cheerios.
Material:
- Strong shallow box or a jelly roll pan.
- Non-toxic sand or salt to cover the bottom of the box.
Procedure:
- Pour the sand into the box.
- Demonstrate drawing in the sand with your finger.
- Let your tot try.
- Thoroughly wash your tot’s hands afterward to prevent sand from getting in their eyes.

Observations: Sweet Pea had a wonderful time with this. She was fascinated as soon as she saw the jar of sand and couldn’t wait to get her hands into it. She loved watching me draw the letter “O” and then trying to trace it.

She also just loved picking up a handful of sand and letting it run through her fingers. I tried to show her how to gently shake the tray to erase the drawing, but she never mastered that. I think she will have the control to do it with a little more practice though.

Notes from the Trenches: As I was pouring the bottle of sand into the tray and noticed the blue dust that was billowing upwards, I wondered if the sand was non-toxic. It had the words ASTM d-4236 on the front and I assumed that meant it was okay. After doing another craft with the sand, I got around to looking up ASTM- d-4236 on the internet. I discovered that this only means the product is labeled correctly. It is nothing to do with how toxic a product is. I also read something that made me think it is difficult to find any safe kid’s sand. Sadly, I decided to throw out the pretty blue sand. We will try doing this with plain salt next time.
Also, I really wish I would have put some newspaper down under our table. There was sand everywhere. I had to bring out the vacuum to pick it all up.
Rating: 3 Stars * (Fun, Easy, Frugal if you use salt in a jelly roll pan.)
http://totschool.shannons.org/?p=808
![]()
Sweet Pea is 27 months old.

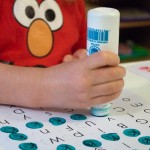
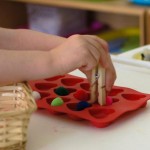
From: I found these Bottle Cap Letters on Carissa’s Tools for Tot’s page. I got the idea to use Mod Podge on them from this post at Heather’s Eager Little Mind blog.
Materials:
Procedure:
- Create the nameplates.
- Cut the nameplates into individual rectangular strips. Note that name “Big Bird” should all be on one strip.
- Apply a sticker or glue a picture of each Sesame Street character to the left hand side of the correct nameplate.
- Laminate and cut out each nameplate. Round off the corners of the laminated nameplates if they are sharp.

- Decoupage the letters to the milk caps.
- Cut out the letters you wish to use from the letter template sheet. You don’t need to do all of the letters, just the ones you will be using on the nameplates you create.
- Paint a thin layer of Mod Podge on the top of one milk cap and set aside.
- Paint a thin layer of Mod Podge on the back of one of the letters.
- Stick the letter to the top of the milk cap and paint a thin layer of Mod Podge over the top.
- Let the letters dry overnight and then put them in a basket.

- Present the activity to your tot.
- Select which nameplate you are going to use first and find all of the milk cap letters that will be used with it. Leave the rest of the letters in the basket.
- Put the selected nameplate in front of your tot.
- Randomly put the milk cap letters that go with that nameplate on the table within your tot’s reach.
- Point to the first letter on the nameplate (“E” in ELMO for example) and say, “We need to find the “E” that goes here.
- Carefully search through the possible letters, saying each letter as you move your finger over it. “M… no not that one. E.. That’s right!”
- Pick up the correct letter and put it on the nameplate.
- If your tot needs extra help, ask them to find the next letter (“Can you find an L?”) and so on until they understand the game.
Observations: Sweet Pea was, of course, thrilled to do anything that involved her beloved Elmo. However she only briefly played with this the first time I introduced it. She was very interested in the Sesame Street characters, but didn’t really want me to show her what to do with the letters. We have played with these a few times since then and she has started to enjoy matching up the letters. She spends longer with them each time and I think really likes them now.

We also made personalized nameplates for Sweet Pea and some of her family members. Sweet Pea loves seeing photos of people she knows so this was a big hit too. The blogs I linked at the beginning of this post have more of an explanation on how to make your own customized ones if you are interested in that.

Notes from the Trenches: Some people have been having trouble with the milk cap letters sticking together. Someone told me that the Hardcoat Mod Podge doesn’t have that problem, but I haven’t tested it. You can also spray the letters with a a clear acrylic sealer on top of the Modge Podge if you are having a problem with stickiness.
I’ve been making the milk cap letters in batches. I did about 8 letters to start for ELMO and ABBY and then made up another set of letters after I had saved up enough to complete a couple more nameplates.
I recommend making duplicate letters if you will be using them for more than one nameplate. For example, you should make 2 of the letter E if you have created both the ELMO and COOKIE nameplates. Sweet Pea preferred insisted on keeping all the milk cap letters on every nameplates. I couldn’t get her to remove the E from ELMO to use on COOKIE.
At the begining I tried just using a basket of all the letters and letting Sweet Pea search through them to match up with the selected nameplate, but this was too hard for her. When first starting out, I suggest only presenting the letters that can go on a particular nameplate.
As usual, this activity had an unexpected ending. After playing with the nameplates for a bit, Sweet Pea then grabbed the letter “D”, jumped up and started chasing our dog around the room with it. She kept repeating “D” “Duh Duh” Dog” as she attempted stick the letter onto our poor collie. I snapped this photo shortly before I had to intervene.

Rating: 2 Stars * (Fun, Independent)

Sweet Pea is 26 months old.

From: At my sister-in-law’s suggestion, we made hand prints for a Father’s Day gift and Sweet Pea has been crazed about making “Han- Pits” ever since.
Materials:
- A large stack of card stock or construction paper. (We went through about 5 times the amount of paper I thought we would.)
- Washable (child-safe) ink pad and/or washable paint poured onto a large plate.

- A damp towel or sponge for clean up.
Procedure: (Steps 2-7 are only necessary if you actually want a nice looking set of your child’s hand prints for posterity).

- Make sure that you have the ink or paint, paper and damp towel within arms reach.
- Practice with your toddler without the ink or paint first. Tell them and show them how you are going to ink or dip their hand in paint. Show them how to spread their fingers apart. Next practice putting their hand (with spread apart fingers) on the paper in the location you want. Practice having them lift their hand vertically off of the paper without sliding it sideways.
- Use one hand at a time. First ink or dip your tot’s right hand in paint and then place it on the paper. Press down gently on their hand and then lift it it straight back up.
- Repeat a bazillion times on new sheets of paper until you get several nice right hand prints.
- Use the damp towel to wipe off your tot’s right hand, then take them to a sink to finish cleaning up before trying to make a left hand print.
- Use the paper that has some clear righthand prints on it and repeat the process with the left hand to get a paper with both hand prints on it.
- After you have a few nice sets of hand prints, set them on a high shelf to dry.
- Let your tot make hand prints however they want on the remaining paper.
- Clean up.
 
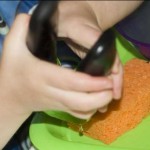
Observations: Sweet Pea loved this a whole lot more than I did. It took a lot of effort to get a good hand print with the paint. After I had gotten a few that were reasonable, I just let her play on her own. I think she could of made hand prints until we ran out of all paper in the house if I would have let her.

It was really hard for Sweet Pea to hold her fingers apart. She also had trouble pressing down on the paper without sliding her hand around in the paint. She had so much fun with the paint, but I got much better results for the actual hand prints when we switched to an ink pad.

Notes from the Trenches: Do you ever think, “Oh, this will be a quick little craft to do?” And then 2 hours later you think that perhaps getting this started 15 minutes before bedtime was a huge mistake? This was one of those crafts.
Obviously this is a mess.

Rating: 3 Stars * (Fun, Easy, Independent – if you don’t care about final product)
Sweet Pea is 26 months old.

From: I have been looking for some good puzzles / toys for Sweet Pea and I just loved this fun Melissa & Doug Bear Family Dress Up Puzzle that I saw at The Learning Tree.

Observations: There are 3 bears and 5 different puzzle pieces for each of 3 spots on a bear (faces, tops and bottoms), so there are 45 puzzle pieces total. This was a lot of puzzle pieces for a Sweet Pea. She needed significant help at first. It was pretty hard to tell which piece went to which bear. I ended up sorting all of the pieces according to which bear they were for and put them into 3 separate baskets. After I had them sorted, I set 2 of the baskets aside and we were more easily able to just work on 1 bear at a time.

Despite the complexity of the puzzle, we had a great time with it. We talked about making the bears go to sleep and Sweet Pea searched through the puzzle pieces to find the “sleep clothes” for each bear. I would say something like, “His pajamas are blue. Can you find the blue pajama shirt?” Then she could search through the basket to find the correct item.

After we talked about the bear family going to sleep, we made up a story about them waking up in the morning and changed the bear faces and clothes to “awake” items. I loved the storytelling aspect of this toy. Sweet Pea loves teddy bears in general and making up stories about this little bear family was so much fun. A lot of the Tot School things we do are very logic oriented, so I was really happy to have a toy that could be used in a more creative way.

From the Trenches: 26 months is maybe a bit young for this puzzle. Sweet Pea would occasionally get stuck putting in a puzzle piece and say “Doesn’t fit!” even though it did. I’d have to jiggle it for her and tell her to push it in. Another minor problem with the puzzle is that the bottom pieces looked a lot like upside down top pieces. Several times Sweet Pea searched in vein for any bottom even though there were 5 options right in front of her. However, we have played with this puzzle 3 or 4 more times since we first bought it and Sweet Pea has gotten much better at it. She can now find the correct pieces without me separating them by bear type first.

Rating: 2 and 1/2 Stars * (Fun, Easy, Independent after quite a bit of initial help.)

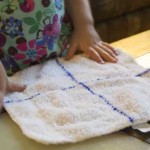
Sweet Pea is 26 months old.

From: This was another activity from the book Teach Me To Do It Myself by Maja Pitamic. Sweet Pea likes to unfold everything help me fold the laundry so when I saw this activity I thought it would be great for her.
Materials:
- Sharpie Pen
- 3 Washcloths
- Basket
Procedure
- Use the sharpie to draw a line all the way across the center of one washcloth. Turn the washcloth 90-degrees and draw another line so it has a big plus sign across it. Turn the washcloth over and draw another large plus sign on the back. Repeat with the remaining washcloths.
- Put the washcloths in the basket and sit down next to your tot.
- Tell your tot that you are going to fold washclothes and pick a wash cloth out of the basket.
- Lay the washcloth square in front of you.

- Use both of your hands to pick up the 2 corners closest to you and fold along the horizontal line as you bring them to meet the top 2 corners. Say, “I am matching up the corners.”

- Next turn the washcloth so the fold is on your left. Say, “Turn the washcloth.”
- Again, use both of your hands to pick up the 2 corners closest to you and fold along the drawn line as you bring them up to meet the top 2 corners. Say, “I am matching up these corners.”
- Carefully pat the washcloth smooth and then pick it up and place it to your right, a little out of the way.
- Ask your tot if they want to try with the next cloth. Give them a chance, and repeat the lesson if necessary.
Observations: The first time I tried this activity, I didn’t draw the lines on the washcloth and Sweet Pea had a much harder time with it. She really had no idea what I wanted her to do despite showing her several times.

Drawing the lines on the washcloth really is key (although it did cause Sweet Pea to want me to draw on all of the laundry. She keeps saying, “Mommy draw on it!” now.)
Sweet Pea’s first attempt:

Eventually, Sweet Pea got a little better at it. She never really got the second fold down though. And I wouldn’t say that this activity held her attention very long… I think it was just a tad too difficult. I will probably try it again soon, though. (I am never short of laundry to fold.)

In the end Sweet Pea had more fun taking the things I had folded from the living room and running them piece by piece to the room where they went. I would say, “Take these socks to mommy’s bedroom,” and off she would go.
From the Trenches: I should mention that I found quite a bit of clean, semi-folded laundry in my hamper before I went to bed that night.
And this in no way helped me get the laundry folded any faster.
Also, we almost had a meltdown.

I tried to help her too much and she wanted to do things on her own. It’s hard to be 2-years-old. 🙂
Rating: 2 Stars * (Easy, Frugal)
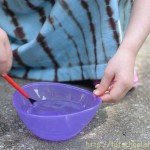
Sweet Pea is 26 months.

From: One of my friends suggested this activity.
Materials:
- Chalkboard. (See the Notes from the Trenches.)
- Paint brush.
- Small bowl of water.
- Towel for drying the chalkboard.
- Sponge to wipe up spills.
Procedure:
- Show your tot how to dip the paint brush in the water and use it to paint on the chalkboard.
- Let your tot paint.
- When the chalkboard is saturated, show your tot how to use a towel to dry it off. You should be able to dry it off fairly quickly and your tot can paint with water on it again.

Observations: Sweet Pea had a grand time with this and worked on it for a very long time. She wanted me to paint letters on chalkboard for her and then she seemed to like painting over them. She also had a wonderful time using the towel to dry the chalkboard and start over again. I would recommend this for other tots.

Notes from the Trenches: This activity was very wet. After painting for a while, Sweet Pea wanted to start pouring the water back and forth between bowls. Make sure you have an extra towel nearby.
Also, this activity was actually supposed to be something else, but it didn’t quite work out that way. I bought a $1.99 double-sided craft chalkboard from Micheal’s, intending to do a “Draw on a Chalkboard” activity. However the chalkboard was so low quality that Sweet Pea couldn’t make any marks on it with the chalk. I tried to draw on it myself, but it didn’t work very well even when I pressed down hard. Sweet Pea did love erasing my marks, but they didn’t actually come off very well either. Since using chalk on the chalkboard didn’t work out, I remembered that one of my friends had suggested painting with water on a chalkboard and decided to try that. If I had it to do over again, I would probably buy a much higher quality chalk board from Office Depot. I hate bad chalkboards!


Rating: 3 Stars * (Fun, Easy, Independent)
Sweet Pea is 26 months old.

From: This was an activity created out of desperation because Sweet Pea wanted to be so involved every morning when I unloaded the dishwasher. She liked to roll the racks in and out, hunt for sharp objects such as knives and vegetable peelers among the utensils and upturn the plastic cups that had flipped and filled with water during the previous run.
Materials:
- A dishwasher containing recently cleaned toddler cups, plates and utensils.
- A drawer and/or counter top that your tot can easily use to store his or her cups, plates and utensils.
Procedure:
- Remove the utensil basket, cheese grater or any other sharp objects from the dishwasher before including your tot in the activity.
- Ask your tot if he or she would like to help you unload the dishwasher.
- Point out one of your tot’s plates or cups and show them how to use both hands to remove it.
- Carefully carry the plate over to your tot’s drawer or shelf and gently set it where it goes.
- Point out another plate or cup and invite them to pick it up themselves and put it away.
- Continue until all of your toddler’s items have been unloaded.

Observations: Sweet Pea has a great time unloading the dishwasher now. It is a little hard to keep her focused on her own items, but mommy’s frustration has been reduced quite a bit. It is much better for her to have this “job” than to be climbing onto the open dishwasher door.
Sometimes Sweet Pea is interested in this and other times she isn’t. I don’t push it, but if she starts playing with the dishwasher I can now redirect her with “Do you remember where your bowl goes? Will you go put that away, please?”
We also have a basket that I keep her utensils, sippy lids and valves in. She loves opening the basket and unloading the whole thing by herself.
 
I think this works best if you have about 3 types of items which each go in different locations. This way your tot has to move around the kitchen and can’t just dump everything in one drawer. I use a drawer for plates and utensils, a tabletop for sippy valves and a counter top for cups. After she has finished unloading her items, I move the sippy valves and cups to their correct location in the cupboard.
Notes from the Trenches: I have to work to unload the dishwasher quickly. If I’m not done before Sweet Pea has put away her own things, she wants to take out regular plates and hand them to me. I let her do this, but obviously you may not feel the same way about the possibility of your dinner plates getting broken.
Rating: 4 Stars * (Fun, Easy, Independent, Frugal)
Sweet Pea is 26 months.

Materials:
Procedure: The book itself and each page contains instructions for presentation.
Observations: The book has a lot of instructions for a coloring book, which I liked. The first page discusses how children progress in coloring skills and how to guide them to hold a crayon correctly. The instructions are pretty relaxed and the tone stresses allowing your child to enjoy coloring without pressure to pick the right color or stay in the lines. The start of the book contains pages that your tot can complete with scribbles (for example, drawing rain in front of a landscape or spaghetti on a plate). Later the pages get more complicated with the child being required to fill in missing spots of color on an object (for example, coloring a white circle on a tomato red). Each page has a paragraph describing the best way to present each page to your child. These instructions alternate between useful (“Don’t be concerned about your child running off the edges. Line your table with scrap paper so that you can let your child scribble freely without worrying about getting any marks on the table” ) and mildly condescending (“When you child has finished coloring, say “tomato” aloud while pointing to the word.”)
Sweet Pea really liked these pages. She was particularly interested in the piggy (which I think may have actually been a bear) on this one.

After each picture Sweet Pea would run in to the kitchen and hang the finished artwork up on the fridge. She was very proud of herself.

The real question is: Do I think it’s worth it to spend $6 on a coloring book for a toddler? I felt like this activity was soooo easy, that I would say I do recomend it. I liked how I didn’t even have to think and could whip out a page from the book and read 2 sentance about what to say to my tot. We had a great time coloring as instructed on the front of each page and then turning the pages over and scribbling on the back. A blank pad of paper would have worked fine for introducing coloring, but something about seeing a strawberry on the page and showing Sweet Pea how to put ‘seeds’ on it was really fun.
From the Trenches: I highly recommend the Crayola Twistables Crayons. The first box of crayons we bought was Crayola Beginnings Washable Crayons, but we had a couple of problems with them. I think they are supposed to clean up especially easily and maybe this led to them being too soft. They broke easily. The crayons came out of the wrapper and then the color would smear all over everything. The color would leak onto our hands, the box, and even the table they were just laying on. Granted, it was a cinch to wipe the color up with just water and a cloth, but I’d rather not have it be a problem in the first place.

Rating: 3 Stars * (Fun, Easy, Independent)

Sweet Pea is 26 months old.

From: I saw this on The Wonder Years blog.
Materials:
Procedure:
- Use the butter knife to pry one of the bell’s corners up enough to remove the metal piece from inside. Then use the flat of the knife to push the corner back down.
- Repeat on 4 more bells so you have 5 “silent” bells.
- Put all 10 of the bells in 1 basket.
- Put the bell basket and 2 empty baskets on a tray.
- Sit next to your tot and show him or her the tray.
 - Pick up one of the bells and shake it next to your ear. If it makes a noise say, “Oh, we can hear this bell.” Then drop the bell into the empty basket on the right. If the bell does not make a noise say, “We can’t hear anything. This one is silent.” Then drop the silent bell into the basket on the left.
- Repeat several times until you have demonstrated both silent and noisy bells.
- Invite your tot to take a turn.
- When all of the bells have been sorted, mix them back up in the original basket.
Observations: I tried this activity twice, a couple of months apart. The first time Sweet Pea was very interested in getting her hands on the bells. She could hardly sit still for the demonstration. However as soon as I let her try the activity, she quickly grew bored. She only handled them for about 30 seconds before asking to play with the counting teddies instead.

The second time she worked on it for a bit longer, but she never actually figured out how to sort the bells. The only thing she really enjoyed was pouring the bells back and forth into another container.

I wouldn’t call this a disaster, but Sweet Pea just didn’t seem interested. I don’t know exactly where I went wrong with this. I thought she’d love it. Maybe she was just too young. I will try it again in another couple of months.
Notes from the Trenches: It is surprisingly easy to remove the noisemaker from inside the bell. I found the butter knife worked better than pliers because it didn’t warp the metal when I tried to push the corner flap back down.
Rating: 1 Stars * (Easy)
Sweet Pea is 25 months old.
 
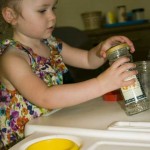
From: This was another activity from by the book Teach Me To Do It Myself by Maja Pitamic.
Materials:
- 5 jars with matching lids. (I just saved up different jars with lids for a month.)

Procedure:
- Remove the lids from the jars.
- Set the jars out in a line.
- Shuffle the lids and set them out in a second line in front of the jars.
- Sit down beside your tot and show him or her the jars and lids. Tell your tot that these jars are fragile and that they need to be careful with them. You may also want to explain that aren’t allowed to play with any glass jars without your permission.
- Pick up the first lid and hold it up next to the first jar. Make a production of seeing if it is too big or small. If it doesn’t fit, move on to the next jar saying, “Oh, this lid doesn’t fit this jar.” Continue down the line of jars, “testing” each one against this first lid until you get to the matching jar.
- When you get to the matching jar say, “Oh, this is the lid that fits this jar.” Slowly demonstrate screwing the lid onto the jar. Be very slow and exaggerated about this action.
- Pick up the second lid and repeat the exercise.
- If you think your tot has the idea, pick up the third lid, hand it to your tot and ask them to try to find the right jar.
- Let your tot finish all 5 lids
Observations: I tried this activity twice about 3 weeks apart. The second time went much better than the first, probably because I followed the directions for presenting it instead of just handing Sweet Pea a basket of jars and lids.
The first time I just showed Sweet Pea the basket of lids and jars and demonstrated screwing the lids on. I didn’t line them up or make a production out of testing to see if each jar worked with the lid I was holding. Sweet Pea did enjoy matching up which lid went with which jar. However, she almost didn’t seem to understand that she was supposed to screw the lids on the jars. I demonstrated a couple of times and even held her hands to show her, but she just had a really hard time doing with the turning action with her wrist.

The second time went smoother. I don’t know if it was the extra 3 weeks (which is quite a long time if you are only 2 y/o) or if my slower presentation made a difference, but she was able to actually screw on a couple of the lids by herself.

Notes from the Trenches: Sweet Pea dropped the jars a couple of times (despite the fact that she kept repeating to herself “Be Careful. Glass. Be Careful.”) I would recommend doing this activity over carpet. Obviously don’t use anything fragile. We used bean dip and jam jars which were very sturdy.
Make sure you have removed all of the label and glue from the outside of the jars. The first time I used a jar that still had some residual glue left on the outside. Sweet Pea was really concerned about and had trouble focusing on anything else. She kept going back to the somewhat sticky jar and saying, “Dirty jar.”
Also, the Gerber baby food jars don’t work very well. The lids don’t screw on very tightly. They sort of half pop-on instead.

Rating: 3 Stars * (Fun, Easy, Frugal)
|
Need Ideas? Do you need some inspiration for activities to do with your own tots? You are in the right place!
You can search by age or activity type using the menus at the top of the page, use the tags on the left, or just check out some of my most popular posts, listed below.
Also, you are encouraged to pin any of my photos to pinterest so long as you include a link back to my blog.
-Shannon
|


 "Pin It")

 "Pin It")

