|
|

I always get asked for Christmas gift ideas so I’ve updated last year’s list to include some of the our favorite toys from this year. Since Sweet Pea has outgrown some of her old toys and discovered new ones, I’ve also put down a suggested age range next to each item. All of my toy ideas listed below were purchased by us or received as gifts from friends and family. They are the toys that Sweet Pea uses and likes the most. I hope this helps you!

Games
- Haba – My First Orchard – (3 to 6 years old)
My husband and I love board games. Orchard was one of Sweet Pea’s first games. It is better than Candyland, but is still easy enough to be played by preschoolers.
 
- Gamewright Hisss Card Game – (3 to 6 years old)
Another fun one is Hiss, which is very simple and involves matching up the correct colors to build a snake. Also the game “cards” are made from very thick cardboard. They are much sturdier than the usual cards you find in a typical game.
 
- Perplexus – (5 years and up)
I actually bought this for my husband last year, but lately Sweet Pea has started playing with it too. We all enjoy trying to move the little ball through the tricky maze.

- Dixit – (5 years and up)
This is a bluffing game and is a little bit like Balderdash (or The Dictionary Game) except instead of words, you play with beautifully imagined picture cards. This game says it is for 8 and up, but since it doesn’t require any reading, Sweet Pea was able to play it with us with very little extra help. We always buy a game for the entire family every Christmas and if you do something similar, I would highly recommend this one. From 5 to 65, all of the people in my family loved this game.
Pretend Play
- Thomas And Friends Wooden Railway – Water Tower Figure 8 Set
 – (2 to 5+ years) – (2 to 5+ years)
The all time best toy we have ever given to Sweet Pea is a Thomas the Train Wooden Railway set. She played with it almost every day for 3 years. We bought Sweet Pea a Figure 8 Set and then slowly expanded our collection with gifts from relatives and via Craig’s List. I strongly prefer the “Wooden Railway” pieces over the other sets.

- Thomas And Friends Wooden Railway – Wooden Playtable and Island Adventure Playboard – (2 to 5+ years)
If you have a train set, I recommend also getting a sturdy train table. Originally I made the mistake of thinking that she could just play on the floor, but that didn’t work very well. The pieces ended up all over the place and Sweet Pea often would want to leave her track set up just when I was ready to pick up. We bought an old train table from Craig’s list, but this official “Thomas” one has great reviews. Note that you have to buy the table and the play board separately.
   
- Playhut Thomas the Tank Pop Up Toy – (3 to 5+ years)
Sweet Pea has spent many happy hours running up and down our hallway in this pop-up Thomas. She loves it and my only complaint is that it takes up quite a bit of room. If we had a large basement play room, it would be perfect. It does fold up flat for storage though, so we usually keep it stored that way and just bring it out when she asks for it.


- Play Kitchen – (3 to 5 years)
Sweet Pea _loves_ her play kitchen. She’s had it since she turned 3 and still plays with it. The problem with play kitchens is that they take up a lot of room. I saw this one that folds away, which might be nice. I also couldn’t find the exact playset that we have so I just linked to a highly rated one, but I think almost any pretend kitchen would do the job.
- Melissa & Doug Shopping Cart and Pretend Food Basket (3 to 5 years)
In addition to a play kitchen, Sweet Pea has a shopping cart and a basket of pretend food that she loves. She often goes shopping and then uses the pretend food to cook in her kitchen.
 
- Little Adventures Cinderella Princess Dress Up Costume and a Fullness Slip for Little Dress Up Shop Dresses – (3 to 5 years)
Sweet Pea received a Little Adventures Cinderella Dress (along with this half slip to add “pouf” to the dress) from Santa last year and still puts it on almost weekly. We have been very happy with it and it has held up much better than many of her other dress up clothes. I’ve even washed it in my washing machine and it came out fine.

- Melissa & Doug Doctor Role Play Costume Set – (3 to 5+ years)
We also have a pretend doctor kit, which has been fantastic for Sweet Pea. I can’t locate the exact one we bought anymore, but the best part of it the white doctor coat. A lot of the kits just seem to have a box of plastic instruments, but Sweet Pea really likes to dress up in the coat. This Melissa and Doug version got good reviews, although it isn’t the one that we have.
 
- Discovery Kids™ Indoor/Outdoor Princess Tent – (3 to 5+ years)
Sweet Pea received this castle tent from her grandma last year for Christmas. It was easy to set up and has made a wonderful little reading nook for Sweet Pea.

- Primary Science Set (4 to 6+)
Sweet Pea has had a lot of fun with this lab set. It even comes with some nice cards that list easy-to-do science experiments on them. (My only real complaint is that the tweezers don’t fit in the test tube.)

Books
- Bear Stays Up for Christmas (3 to 6 years)
We love the whole Bear series by Karma Wilson, but we read this one every Christmas Eve. It’s perfect if you are looking for an easy-to-read Christmas picture book.
 
Art & Crafts
- AquaDoodle Mat – (2 to 4 years)
Sweet Pea spent hours drawing on an AquaDoodle Mat. It allows her to draw on a really big space and I love that there is no mess because the “ink” is just water.
 
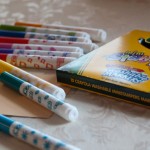
- Melissa & Doug Jumbo Coloring Books – (3 to 7+ years)
Sweet Pea loves these coloring books. The pages are are large (11″x14″), but not super sized and I like that they are only printed on one side. There are several different versions so you can find one that appeals most to your kiddo: Green (Animals), Pink (Flowers, Horses & Princesses), Blue (Dinosaurs, Sports & Vehicles), Purple (Fairies & Princesses)
- Melissa & Doug Easel & Easel Accessory Set – (3 to 7+ years)
Sweet Pea received this from her Aunt for Christmas last year and it has been a big hit. I love how sturdy and versatile it is. When she isn’t painting on the easel, she is using the dry erase or chalk board to play school. Our only problem with the easel is that it is tricky to pull the paper out of the paper holder so I usually have to do that for her.
- Crayola 25-count Washable Glitter Glue – (4 years and up)
Glitter glue is probably Sweet Pea’s all time favorite crafting material. The Crayola glitter glue is much less messy than regular glitter, but is still sparkly and exciting.
 
Technology
- Wii Console with Mario Kart Wii Bundle – White (4 years and up)
Sweet Pea has been playing our Wii for years. It is a great “active” video game system for kids. Sweet Pea loves playing Mario Cart with the rest of the family and can even navigate and play WiiFit totally on her own. Now I wouldn’t buy this just for a preschooler, but it would make a great gift for the whole family.

- Vtech Kidizoom Plus Digital Camera – (3 to 6 years)
We bought this Vtech Kidzoom Digital Camera for Sweet Pea 2 years ago and she still uses it. She often runs and grabs it to take pictures. The pictures are a little blurry, although before we bought this one, I did a lot of research and it seems that was a common complaint with all of the kid cameras.
 
Active
- Gerty Balls Nobbie Football – (3 to 6+ years)
This is the best “easy to catch” ball I’ve ever found. It’s soft, squishy and easy to hold. Great for toddlers.

- Strider PREbike Balance Running Bike – (2 to 4 years)
Sweet Pea got a Strider Running Bike from Santa when she was 2 and has used the heck out of it. She has used it for over 2 years and is just now getting too big for it (and she is very tall for her age). The reason I like it so much is because we take so many family walks and when Sweet Pea rides, she can keep up with us and doesn’t get too tired. I would highly recommend it for 2 or 3 year old tots, but I am fairly sure Sweet Pea will be too big for it by the time she turns 5 next spring.

- Stomp Rocket Jr. Glow Kit – (4 and up)
This is a super fun outdoor toy. We bring it to the lake with us and everyone (adults, too!) has a great time with it.


Sweet Pea is 5 years old.
")
From: A couple of years ago, we spent Thanksgiving at Grandma’s house, and she showed us how to make these adorable candy turkeys. I thought they were so cute!
Material:
- Reese’s Miniature Peanut Butter Cups. (You will need 1 for each turkey.)
- Ferrero Rocher chocolate candy. (You will need 1 for each turkey.)
- Glue.
- Red pipe cleaners. (Each pipe cleaner will make about 5 turkey “heads”.)
- Scissors.
- Cookie sheet or jelly roll pan. (Optional, but makes it easier to move the turkeys while the glue dries.)
")
Procedure:
- Have your tot turn all of the Reese’s Miniature Peanut Butter Cups upside down.
- Pick up one of the Ferrero Rocher candies and show your tot how to gently fold the brown paper cup backwards to make the tail feathers. (The cup already comes stuck to the candy with a bit of glue, so it will stay by itself once it is turned inside out.)
")
- Let your tot put a dime size circle of glue on the bottom of a peanut butter cup.
")
- Show your tot how to place the Ferrero Rocher candy on the peanut butter cup and press them together.
")
- Carefully move the turkey to the cookie sheet or an out of the way location.
- Have your tot create the rest of the turkey bodies with the remaining candy.
- Allow the turkey bodies to dry for several hours or overnight.
- Cut the pipe cleaners into 1.5 inch pieces.
- Curl one end of each pipe cleaner into a small circle and bend the rest of it so it will fit against the turkey body.
- Show your tot how to apply glue to the small oval label on the front of the Ferrero Rocher candy.
")
- Demonstrate firmly pressing one of the bent pipe cleaners to the glue.
- Set the completed turkey back on the jelly roll pan.
- Invite your tot to finish adding the rest of the pipe cleaner “heads” to the turkey bodies.
")
- Allow the turkeys to dry for several hours or overnight.
Observations: Sweet Pea is always excited to see me bring out a bag of candy, and this activity was no exception! We, of course, had to sample both a Ferrero Rocher and a Reese’s Peanut Butter Cup while we were creating our turkeys.
")
This is a pretty fun little craft, but Sweet Pea thought the best part was playing pretend with the little “turkeys”. She liked running them around the table and having them gobble at each other. 🙂
")
This is a very easy craft that makes an adorable Thanksgiving decoration. We put a candy turkey on each of the plates when we set our table for Thanksgiving and they were extremely popular with the guests. 🙂
While younger tots can help make these, I would mostly recommend this craft for older preschoolers and up since it takes some strength to squeeze the glue out of the bottle and a steady hand to stick the pieces together,
Notes from the Trenches: Be gentle when folding the brown paper cup away from the gold covered candy. The foil is delicate and tears easily. (“Oh well, I guess we’ll just have to eat that one!”)
")
An older tot might be able to cut the pipe cleaner on her own, but it was too difficult for Sweet Pea. She asked me to finish after she had only cut a couple of them.
")
Attaching the pipe cleaner “heads” to the candy “bodies” can be a bit messy for little fingers. Sweet Pea was not thrilled about her sticky hands.
")
Rating: 2 Stars * (Fun, Easy)
Sweet Pea is 5 years old.
")
From: I found these beautiful acorn cap jewels at Homemade Serenity.
Material:
- Acorn Caps. (Acorn caps by themselves should be fine, but immediately bake whole acorns for 1-2 hours in a 170 degree oven to kill any insects that are hiding inside!)
- Glue.
- Colored Markers.
- Dry rice or beans to hold the acorn caps upright as they dry.
- Bowls.
")
Procedure:
- Fill the bowl(s) with beans or rice.
- Invite your tot to color the inside of the acorns. (The acorn cap jewels will be more saturated if the inside is completely colored in.)
")
- Allow your tot to arrange the acorn caps upright in the bowls.
")
- Let your tot fill the acorn caps with glue, helping as necessary.
")
- Set the acorn caps in an out-of-the-way place and allow them to dry for several days.
")
- When your acorn caps are totally dry, the glue will form a thin shiny coat that lets the color of the markers show through.
")
- Let your tots play with the acorn cap jewels.
Observations: While these take a very long time to dry, they are quick and easy to prepare. Sweet Pea enjoyed making them and arranging them just so. However, the most fun part was probably checking them every day and seeing the colors slowly start showing through the glue as it dried.
")
We are going to put our acorn cap jewels in a fairy garden next spring, but I think that they would make a great toy for all types of imaginative play.
This activity requires strength to squeeze the glue and quite a bit of patience so I would only recommend it for mature preschoolers and older (who will not be tempted to stick their little fingers in the drying glue!)
Notes from the Trenches: The acorns could be a choking hazard and I have read they can be poisonous if eaten in large quantities. I can’t imagine a child being able to consume enough raw acorns (especially because they are so hard and supposidly taste very bitter) for it to cause a problem, but I thought I would mention it.
The finished yellow-colored one didn’t turn out very well. It is hard to see any color at all.
Squeezing the glue was still a challenge for Sweet Pea. I think a brand new full bottle of glue would have probably be easier for her to use.
")
Rating: 3 Stars * (Fun, Easy, Frugal)
Sweet Pea is 5 years old.
")
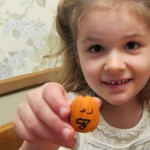
From: These adorable acorn pumpkins were featured in Family Fun Magazine last year.
Material:
- An oven. (Absolutely Critical!)
- Acorns (While you are at it, make sure collect some acorn caps for next week’s craft!)
- Orange and brown craft paint.
- Paint brush.
- A black fine point (but not ultra-fine) permanent marker. (I have discovered I like the BIC Mark-It much better than Sharpie.)
Procedure:
As soon as you collect the acorns, you must bake them in a 170 degree oven for 1.5 hours to kill any weevils that may be lurking inside!
- Rinse and dry the acorns.
- Put them on a cookie sheet and bake them in a 170 degree oven for 1.5 hours. Shake the pan every 20-30 minutes to keep the acorns from burning. (Do NOT be tempted to skip this step!)
")
- Allow the acorns to cool after removing them from the oven.
- Once they are cool, invite your tot to paint the acorns completely orange.
")
- Let the acorns dry. (Optionally allow your tot to paint a second coat of orange and let the acorns dry again.)
- Using the brown paint, show your tot how to paint just the very tiny bottom bump on the acorn to create a stem.
- Let the brown “stems” dry.
- Show your tot how to draw a pumpkin face using the permanent marker.
- Let your child draw faces on the remaining acorn pumpkins.
")
- Encourage your child to arrange the acorn pumpkins for display.
Observations: Sweet Pea was not very interested in painting the pumpkins orange. Usually she likes painting, but she surprised me by rushing through this step. In fact, her paint job was so inadequate, I invited her to do a second orange coat the next day, which she did, but still not with much enthusiasm.
She loved drawing the faces on the pumpkins though!
")
She drew faces on all of her acorn pumpkins and I think she would have done more if I’d have given her my share. Unfortunately, for her I was having a lot of fun too!
Sweet Pea was so proud of her pumpkins!
")
This is a really cute seasonal activity. However, drawing the faces requires really good fine motor control so I wouldn’t recommend it for children who are younger than Kindergarten.
Notes from the Trenches: As soon as you bring the acorns into the house, you must bake them! The original instructions from Family Fun magazine did not include this step and within a few days, I discovered dozens of wormy-looking little weevils crawling out of our acorns! Ick!!!! It still makes me shudder to recall it.
Note that this activity requires a permanent marker, so be sure to monitor your child as appropriate.
Sweet Pea loved drawing the faces, but it was tricky for her to control the pen on the rounded acorns. I think she was frustrated that my pumpkins looked more like jack-o’lanterns (with triangle eyes & nose) so on a few of them, she asked me to draw an outline for her to color in. If you notice that child has the same difficulty, you could suggest drawing an outline for her.
")
Rating: 2 Stars * (Fun, Frugal)

Sweet Pea is 5 years old.

From: Several people told me that “Bob Books” are fantastic for beginning readers, so when Sweet Pea started showing an interest in reading, I bought the first set for us to try.
Material:
Prerequisite:
- Before your child tries to read the Bob Books, he should be showing signs of reading readiness. For example, he should:
- Be able to handle a book correctly. He should know to hold the book upright and be able to turn the pages by himself.
- Enjoy listening to stories.
- Have an understanding that written words convey information.
- Know the letter sounds . Note that the name of the letter (“A”) is NOT the same thing as the phonemic letter sound (“ahhh”). (Tad from the wonderful Leapfrog Letter Factory dvd sings, “The letter “A” says “ahhh!”)
- Your child should be clearly interested learning to read. Most children in the USA start learning to read at about 5 years old, although some do it a little earlier or a little later. It is critical that you do not rush your child into reading. Especially in beginning, reading should be a fun and pleasant activity, not something that you have to force your child to do. As Maria Montessori said, “Follow the child.“
Procedure:
- Sit somewhere cozy next to your tot and show him the set of Bob Books.
- Take out the first book in the set. Before you start reading the book, review the first page that shows the letter sounds which appear in the book and ask your child to say them to you.
- Ask him if he can sound out the word on the first page. The first booklet is a very easy and your child may be able to read the entire thing without any help. If so, just let him read it.
- If your child can not sound out the words, then try using the “I Read / You Read” approach:
-
- Read the first page to your child. (“Mat”)
- Invite your child to re-read the first page back to you. (Say, “Now, do you want to read this page?” as you point to the word “Mat”.)
- Turn to the next page, read it, and then invite your tot to re-read it back to you.
- Repeat the “I Read / You Read” pattern for each page until you finish the book.

Observations: These books are perfect for a very beginning reader. Sweet Pea loved everything about them and we had a great time reading them together.

Sweet Pea was so proud to be able to read an entire book by herself!

I really liked the Bob Books, but I don’t think that these books work as an independent activity. If your reader is just starting out, then they will be unsure enough about some words that you will need to sit right by them and help them (which is fine!). But, if they already know how to read a little bit, then these books will be too easy. We found them exactly perfect for a very narrow, but critical, window when Sweet Pea was starting to learn to read.
I would highly recommend Bob Books, Set 1 for all very early beginning readers.
Notes from the Trenches: I think it helped to keep Sweet Pea excited to read the next book in the set because I limited her to 1 new book per day. I would highly recommend making your reading sessions short to keep your tot from growing board or anxious.
As I said earlier, Bob Books are for very very beginning readers. So if your child can already read, then I these books will clearly be too easy for him. I have read very few complaints about Bob Books, but the main one seems to be that the stories are too simple. We tried another set of beginning reader books, which did have better stories, but the words got too difficult very rapidly. So, the thing people tend to dislike about Bob Books, the simplicity, is the exact thing that makes them so great for beginning readers.
I thought the blog Teaching Reading with Bob Books looked very interesting. It was a bit too involved for our purposes, but you might want to check it out if you are interested in homeschooling / actually teaching your child to read.
Rating: 2 Stars * (Fun, Easy)
————————————-
The Giveaway is now closed. JenRay was the winner.
THE GIVEAWAY:
Since we are done with set 1 of the Bob Books, I thought I would give them away to my loyal readers.
How to Enter: Just submit a comment below telling me the title of your favorite children’s book.
The Fine Print: This giveaway is for one (slightly used) box of Bob Books, Set 1. You must leave a valid email when you submit your comment so that I can contact you in the event that you win the contest. I am using random.org to select the winning comment number from all of the valid entries. This contest is open to continental U.S. residents only. The deadline for entry is Sunday, October 21, 2012 at 11:59pm Central Standard Time. Winners will be contacted and announced shortly thereafter.

Sweet Pea is 5 years old.
")
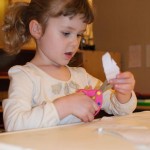
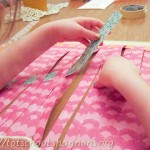
From: Lately, Sweet Pea has been very interested in braiding. There is a braiding board in her classroom at school that she often talks about which inspired me to create a version for her to use at home.
Material:
-
- Cardboard box.
- Duct Tape.
- 3 Different colors of ribbon or yarn, each cut to about 18 inches long.
- Scissors.
Procedure:
- Tie the 3 strands of ribbon together and knot them several times to create a large knot.
")
- Cut a small hole in the top of the cardboard box. The hole should be just big enough to fit the knot through.
")
- Push the knot into the box from the outside and use the duct tape to secure it in place.
")
- Put 4 pieces of duct tape all around the ribbon on the outside of the box to help strengthen it.
")
- Sit next to your tot and put the braiding box in front of you.
- Separate the 3 pieces of ribbon from each other and lay them out so there is clearly one on the left, in the middle and on the right.
- Show your tot how to take the piece of ribbon on the left and move it to the middle.
") = =
- Next take the piece of ribbon that is on the right and move it to the middle.
- Take the piece of ribbon that is now on the left and move it to the middle.
")
- As you continue to slowly demonstrate braiding, explain that a braid is created by just repeating the pattern of moving the ribbon on the left to the middle and then moving the ribbon on the right to the middle.
- When you come to the end of the braid, undo it and let your tot try.
")
Observations: Sweet Pea has chosen to work on the braiding box several times and is always very engaged when she practices with it. I am somewhat surprised by her continued interest, but it seems to be a really good challenge for her right now.
")
The braiding box was very easy to create and is excellent for hand eye coordination and fine motor control. I would recommend creating one for any kids who are starting to show an interest in learning to tie a bow or braid.
Notes from the Trenches: I only used 2 colors of ribbon when I created our box, but if your tot doesn’t know how to braid yet, I would highly encourage you to use 3 differently colored ones.
Our braiding box has lasted us a couple of weeks so far, but given the nature of cardboard, I don’t expect it to hold up indefinitely.
Rating: 4 Stars * (Fun, Easy, Independent, Frugal)
Sweet Pea is 5 years old.

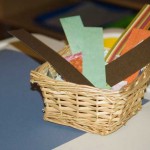
From: I loved this beautiful strawberry basket weaving with yarn at Paint Cut Paste, and decided to try let Sweet Pea try an easier version with ribbon.
Material:
- Berry basket.
- Ribbon.
- Scissors.

Procedure:
- Wrap a piece of ribbon around the basket 2 times to calculate the how much length will be needed for weaving. I found that 2 times around was just a little bit more than needed, but was the easiest length for Sweet Pea to work with.

- Cut the ribbon.
- Invite your tot to tie a knot around one corner at the top of the basket (or do it yourself). Leave just enough ribbon to tie a bow.
- Demonstrate weaving the ribbon through the the top row of plastic holes and then let your tot try.
- When the entire top row has been woven with ribbon, let your child tie a bow in the corner (or do it yourself for younger tots).

- If desired, trim the ends of the bow to an attractive length.
- Let your tot repeat with remaining ribbon until the entire basket is covered, working her way down the basket.

- Enjoy your tot’s fine creation.
")
Observations: Sweet Pea really loved this. It was exactly the right level of difficulty for her. She has been obsessed with tying bows lately, so this seemed to be an especially good project for her.

We both loved this activity and the basket turned out so cute. Sweet Pea was very excited with the look of the finished basket and insisted on giving it to her daddy as a gift.

This would make a fantastic gift for a Mother or Father’s Day or for a grandparent. (And would be even better if it was filled with a favorite candy!) I would highly recommend this activity for tots with good fine motor control or children kindergarten and up.
Notes from the Trenches: If the ribbon is wide enough to entirely fill one row of the plastic slats, it will probably look best. If the ribbon is too thin, your tot may be able to weave more than one strand through each row of plastic. I thought the double ribbon looked best, but it was difficult for Sweet Pea and after doing it that way for the first row, she only wanted to use 1 strand.
Rating: 4 Stars * (Fun, Easy, Independent – if your tot can tie a bow, Frugal)
Sweet Pea is 5 years old.

From: I first saw this easy painting activity at ECE Made Easy and kept it in the back of my mind. When I found myself with half a can of leftover condensed milk, I knew exactly what I wanted to do with it.
Material:
- Condensed milk
- 3 or 4 colors of liquid watercolor or food coloring.
- Small bowls for each color.
- Paintbrushes for each color.
- Thick paper or cardstock.
- Apron or smock for your tot.
- Sponge or wet rag for clean up.

Procedure:
- Divide the condensed milk evenly between the small bowls.
- Add a few drops of liquid watercolor and let your tot stir until the paint is a uniform color.
- Once all of the colors have been mixed, let your tot paint.

- When your tot is finished painting, wipe everyone and everything off with the wet rag.
- Set the pictures aside and let them dry for at least 24 hours. (If the paint is especially thick, it may take even longer.)
Observations: This was a very fun (albeit messy) activity. Sweet Pea had a good time and stayed interested long enough to make a couple of pictures.

We both loved letting the paint dribble off of the brush to create thick shiny drops of paint.

And I was very impressed with how the paintings maintained a shiny and raised finish even when dry.

These paintings were very similar to the corn syrup ones that we did last spring. I was surprised that this paint seemed to dry to a less tacky finish, although I did like the transparent look of the corn syrup better.
If you have an extra can of condensed milk, this a is a fun activity and I would recommend it for tots of all ages.
Notes from the Trenches: Condensed milk is oh, so very sticky. Your table and tot will need a good cleaning after this.
Don’t shove these paintings into the back of a cabinet and forgot about them! I have heard warnings that ants are attracted to the finished paintings, so these pictures shouldn’t be considered permanent.
Rating: 4 Stars * (Fun, Easy, Independent, Frugal)
Carnivals: This post is linked up to It’s Playtime @ Hands On We Grow.

Sweet Pea is 5 years old.
")
From: This came from Housing a Forest, but it did not go as planned. lol.
Material:
- Dice
- Paint
- Salt
- Paper
- Felt
- Paper Plate
Procedure:
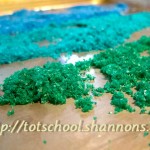
- Pour some craft paint on a plate and sprinkle on a little salt.
- Let your tot stir the paint and salt together with a spoon.
- Lay a piece of felt over the paint and salt and press down with the back of the spoon till the paint oozes through to the top of the felt.
- Allow your tot to press a die into the felted paint.
- Invite your tot to stamp the die onto a piece of paper.
- Realize that the die stamp only left an outline of paint around the edges and doesn’t show any dots.
- Tell your tot to wait.
- Pour straight paint onto the plate and press a new die into it.
- Try to stamp the “straight paint” die onto the paper.
- Realize that the die has left a full square with no dots showing.
- Tell your tot to wait.
- Go to your office and get out a real stamp pad.
- Tell your tot to wait.
- Press a new die into the stamp pad and try to stamp it on a piece of paper.
- Realize that the die has barely left any mark at all.
- Tell your tot to wait.
- Return the real stamp pad to the office.
- Hand the dice and paper plate with paint on it to your tot and let her try to unsuccessfully stamp the dice for approximately 30 seconds until she grows frustrated and asks, “What else?”
- Suggest that your tot make hand prints with the paints.
- Watch as your tot makes exactly 1 hand print and then asks, “What now?”
- Remember that you saw a way to “make your own stamps” on Pinterest out of foam shapes, a bottle cap and a pencil.
- Tell your tot to wait.
- Go to the office. Get foam shapes. Search for a pencil. Draw a cool flower onto the foam shape. Search for a bottle cap. Stick the foam shape to the bottle cap.
- Try stamping the flower your have drawn.
- Think that maybe you are finally on to something and ask your tot if she wants to try making foam shape stamps.
- Listen to her say, “No, I’m done with stamping.”
- Plop your tot on the couch, tune the T.V. to Barney and make yourself a cup a tea. 😉
Observations: If I could have made this work, I think Sweet Pea would have liked it. She did have a brief bit of fun trying to stamp the dice, but quickly grew board since she couldn’t really create many recognizable marks. The number 4 die was the only one that consistently worked for us. The rest of the numbers were mostly unidentifiable.
")
Obviously, I can’t really recommend this activity. lol. However, I hope someone else will try it and tell me if they ever got the dice to really stamp enough to create a math activity.
Notes from the Trenches: I think we might have had better luck with regular dice. Despite the fact that we literally own over 50 board games, the only dice I was comfortable using were an extra large set from a Math Dice game. If any of you try this with regular dice, please let me know how it works. Maybe I’ll buy a set and try again.
Rating: 0 Stars *
Sweet Pea is 5 years old.
")
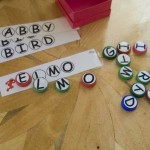
From: Ever since I posted a worksheet with my original upper case milk cap letters, people have been emailing me asking for a set of lower case letters too. I finally created a set of them and thought up this quick activity for introducing alphabetical order to go along with it.
Material:
")
")
Procedure:
- Lay the long strip of 26 circles on the floor and place the sheet with the printed alphabet on it nearby.
- Spread the milk cap letters out near the strip of 26 circles.
- Ask your tot what the first letter of the alphabet is. When he says, “A”, ask him to find the “A” milk cap letter and place it in the first circle.
- Continue asking him which letter comes next and invite him to find and place that letter on the appropriate circle.
- If he has difficulty remembering the next letter, suggest that he refer to the printed alphabet≥
- Let your tot continue working until all of the circles are filled with the correct letters.
Observations: Sweet Pea didn’t love this quite as much as she does most of our art activities, but she was interested and worked on it until she had placed all of the letters in the correct spots.
")
Sweet Pea was worried that there weren’t going to be enough circles to hold every letter. She insisted on checking to make sure there was a spot for each letter before we got started.
")
As it is, I would only recommend this for tots who are already very familiar with the alphabet (older preschool or kindergarten). If it is a bit too difficult for your tot, then you could write in letters on the strip of circles and just let your tot match the milk cap letters to them.
Notes from the Trenches: Make sure you have a printed alphabet available for your tot to use to check his work. You may be surprised at the difficulty your child has with this activity. Despite the fact that Sweet Pea can sing the alphabet song and knows the sounds of all of the letters, she had to refer to the printed alphabet several times.
Even with the printed alphabet, she got a bit confused about where to put the “S”.
")
However, getting the tape out of the dispenser may have been the most difficult part of the activity for Sweet Pea. 🙂 I think I could set up an activity with a tape dispenser just to work on fine motor control.
")
Creating the milk cap letters takes a bit of time, but I think it is worth it because of the increased durability and the fact that the milk caps have an interesting “feel” that draws a child’s interest. I decoupaged the letters while I was watching TV and it only took me about an hour.
Rating: 2 Stars * (Independent, Frugal)
|
Need Ideas? Do you need some inspiration for activities to do with your own tots? You are in the right place!
You can search by age or activity type using the menus at the top of the page, use the tags on the left, or just check out some of my most popular posts, listed below.
Also, you are encouraged to pin any of my photos to pinterest so long as you include a link back to my blog.
-Shannon
|


")
")
")
")
")
")
")
")
")
")
")
")
")
")


")
")
")
")
")
")
")
")
")
")
")
")
")
")
")
")


")
")
")
")
")
")
")
")


")
")
")
")
")
")
")
")
")
")
")
")


")


")
")
")
")
")
")
")
")


 "Pin It")

 "Pin It")

