|
|

Sweet Pea is 4 years old.

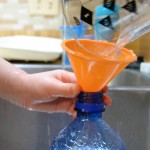
From: One day when I was cleaning the kitchen, Sweet Pea begged to help me. I found a spray bottle and a cloth and showed her how to wipe down the appliances.
Material:
- Cloth.
- Spray bottle of water.
Procedure:
- Show your tot how to aim the spray bottle at the refrigerator and squeeze the handle to spray it with water.
- Demonstrate wiping all of the water off with the cloth.
- Hand the spray bottle and cloth to your tot and set them to work. 🙂
Observations: This was a surprisingly big hit. Sweet Pea “cleaned” my stove, dishwasher, microwave and refrigerator. I think she would have kept going if I would have found more appliances for her.

Sweet Pea had lots of fun and believe it or not, my appliances were actually cleaner than when we started. 🙂

Sweet Pea was so proud of herself that she ran off and grabbed her camera (which she loves) to take a picture of her “super shiny fridge”

This was a great activity for us and I would highly recommend it for all tots.
Notes from the Trenches: Tots are fickle. The next week when I asked Sweet Pea if she was interested in scrubbing the appliances again, she said, “Mama, we just cleaned the kitchen last week! I don’t want to do it again.” I have to say that I agreed with her. 🙂
Rating: 4 Stars *(Fun, Easy, Independent, Frugal)

Sweet Pea is 4 years old.

From: Sweet Pea wanted to make a card for her grandpa one day and I had the idea to let her use flower shapes from a paper punch.
Material:
- A few different shapes of craft paper punches (We used a multi-flower punch.)
- Several colors of paper.
- Glue.
- Small cup or plate to hold the glue. (Optional)
- Paintbrush. (Optional)

Procedure:
- Use the paper punches to create several different shapes in a variety of colors.
- Squeeze out a bit of glue into a small cup or plate.
- Have your tot select one of the punched paper shapes.

- Show your tot how to dip the back end of a paint brush into the glue, rub it on a punched shape, and glue it to another piece of paper (or a blank card).

- Allow your tot to continue adding shapes until he is satisfied with his picture.
Observations: Sweet Pea likes any activity that involves glue.

She had a lot of fun stacking the flower pieces on top of each other, but I think any fun craft punch shapes would work for this activity.

This was quick to set up and Sweet Pea enjoyed it. I wouldn’t buy craft punches specifically for this, but if you have any around your house, you might want to try this.
Notes from the Trenches: Sweet Pea had a terrible time with the glue bottle. She wasn’t able to squeeze the bottle hard enough to get any out so I poured some glue into a cup and let her dab it on the paper with the end of the paintbrush.

Originally I though Sweet Pea would be able to operate the paper punch on her own, but it required too much strength and she couldn’t punch it down at all. An older child could probably operate it on his own, but I don’t think many 4 year-olds could work the one that we own.
Rating: 4 Stars * (Fun, Easy, Independent, Frugal if you have a few craft punches around.)
Sweet Pea is 4 years old.

From: Given the opportunity, I think I might be able to eat my weight in cherries. They happen to be in season around here right now so when I saw this cherry pitter at the grocery store, I thought cherry pitting would make a great activity for Sweet Pea.
Material:
- Cherries.
- Cherry Pitter (We like this Oxo model.)
Procedure:
- Explain to your tot that the cherry pitter is a tool and should be used with care.
- Show your tot how to pull the stem off a cherry, place it upright inside the pitter.
Next demonstrate putting the bottom of pitter against the table and squeezeing the handles together. *
- Remove the pitter from the table and make a show of checking to make sure the pit actually came out. (I don’t want any cracked baby teeth on a rogue cherry pit!)
- Let your tot try on her own.
Observations: Sweet Pea loves pitting (and eating) cherries. Since I’ve introduced the cherry pitter, she requests cherries for a snack anytime we have them in the fridge.

Sweet Pea had a little trouble at first, but quickly got the hang of it.

The cherry pitter does require some dexterity and hand strength, so this activity is only recommended for older preschoolers.
Notes from the Trenches: Cherry juice stains.
*Obviously your particular cherry pitter may not operate exactly like mine and you need to follow your specific cherry pitter’s instructions.
Rating: 4 Stars * (Fun, Easy, Independent, Frugal if you already have a cherry pitter)

Sweet Pea is 4 years old.

From: 3-part cards are another classic Montessori activity. I was excited when I found a free set of frog 3-part cards from the Montessori Print Shop and decided to try them right away.
Material:
Procedure:

- Separate the set into 3 piles: “Pictures with Labels”, “Pictures without the Labels”, and “Labels Only”. Shuffle the piles.
- Sit near your tot on the floor or at a table with quite a bit of room.
- Start with the “Pictures with Labels” pile. Select a card, read the label and then place it on the floor or table. Read the next card and hand it to your child. Invite them to place it on the floor next to the first card. Repeat with the remaining cards in the pile.

- After all of the “Pictures with Labels” are on the floor, start on the “Pictures without Labels” pile. Select the top card and say, “Hmm, where is the matching picture?” Search the “Picture without Label” cards until you find the matching “Picture with Label” card. Read the label again (“This is webbed feet.”) as you place one card below (or next to) its mate. Let your tot do the next card on his own. Repeat with the rest of the cards.

- Lastly, after all the “Pictures without Labels” cards have been correctly placed, start on the “Labels Only” pile. Select a label from the pile and search for the matching label on the “Pictures with Labels” cards. When you find it, read the label again (“Webbed Feet”) and place it below the correct “Picture without Label” card. Let your tot try the next one and repeat with the rest of the labels.

Observations: Wow! Sweet Pea loves these 3-part cards. We have done a lot of sets and she has started making special requests (“Can we do 3-part cards about the moon?”)

When I first read about 3-part cards, I thought they were a little too close to flash cards for my taste, but in practice they are much better than that. Sweet Pea loves searching for the matching cards. I think she considers it more of a game.

This has been one of Sweet Pea’s favorite activities lately and I would highly recommend 3-part cards for older preschoolers.
Notes from the Trenches:
- It is a good idea to only introduce 1 or 2 new words at a time. If a set contains many unfamiliar labels, remove a few of those cards before proceeding. Slowly add the new cards back in as your tot gains familiarity with the subject. For example, the tomato set had several labels that were new to me (endocarp, exocarp, mesocarp, funiculus, and placenta). Sweet Pea had a very difficult time remembering any of these names. I wish I had only thrown in a couple of these more difficult ones with the more familiar “leaves”, “seeds”, and “stem” cards.

- If only I had a color printer… Some of the cards (Flowers, Birds) are fine without color. However, in some of the sets it is very hard to distinguish one card from another when everything is in gray scale (Cars, Internal Organs). I used colored pencil to fill in the appropriate parts, but it was tedious.
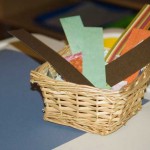
- We’ve gone a little crazy with 3-part cards around here. If you start printing a bunch of sets, you may want to check out this post on how to create cute little folders for them at Montessori Candy. Below is a picture of one of our folders.

Rating: 3 Stars * (Fun, Easy, Frugal)
THE GIVEAWAY: CLOSED
When I was preparing this post, I wrote to The Montessori Print Shop asking if they would be interested in giving away some free cards to my readers. They said that they would give both a reader and myself 5 sets of cards! I selected Flowers, The Sun, Internal Organs, Car Parts, and Birds. The winning reader gets to select any 5 sets of 3-part cards they want from the Montessori Print Shop.
How to Enter: Visit the nomenclature and/or the classified card section of the Montessori Print Shop and select 5 sets of 3-part cards that you find the most interesting. Leave a comment on this post letting me know which 5 sets you want to receive if you win.
The Fine Print: This giveaway is for 5 different 3-part card sets. The sets are in a .pdf format and will be emailed to the winner. This giveaway is for U.S. Residents only. You must leave a valid email when you submit your comment so I can contact you in the event that you win the contest. I am using random.org to select the winning comment number from all of the valid entries. The deadline for entry is Sunday, July 10, 2011 at 11:59pm Central Standard Time. Winners will be contacted and announced shortly thereafter.
Sweet Pea is 4 years old.

From: I first read about shoe polishing as a traditional Montessori activity in Maja Pitamic’s excellent book Teach Me To Do It Myself.
Material:

Procedure:
- Scrape a small amount (1 or 2 tsp) of polish into the little bowl.

- Show your tot how to put a bit of polish onto the cloth.

- Demonstrate rubbing the polish on the shoe.
- Let your tot try.
- When the polish has been applied to the entire shoe, show your tot how to use the other cloth to buff it off and then let him do it on his own. Your tot should continue buffing until the shoe no longer feels greasy.

- Make sure your tot washes his hands after polishing the shoes.
Observations: Sweet Pea adores polishing and cleaning, so I was not surprised that she loved polishing shoes. She polished 2 pairs before she tired of this activity, and then asked to do it again the next day.

Sweet Pea worked so intently on this. I love when I find an activity that is so engrossing for her. If only I found all household chores as interesting as she does!

When her shoes were finished she was so proud of them! She held them up so I could take a picture of her “shiny clean shoes”.

I would recommend this activity for older preschoolers.
Notes from the Trenches:
- All shoe polish says “Keep out of reach of children”. This activity should be closely supervised.
- When I first wanted to try this activity, I started with real shoe polish. As soon as I started to scrap it out of the container, I realized that Sweet Pea would have it all over everything and started searching for a less messy option.

- I found Sweet Pea always used the entire amount of polish on the one shoe that she was polishing. It is very important that you put a small amount of polish in a little bowl to prevent your tot from using the entire container on one shoe. Only give out a little bit at a time!
Rating: 3 Stars * (Fun, Easy, Independent)
Sweet Pea is 4 years old.

From: I was inspired by a PostSecret that said something like, “Even though I’m a millionaire, I make my own collar stays out of empty cereal boxes.”
Material:
- A collar stay taken from your shirt or my collar stay template.
 - Empty Kleenex Box or any type of thin cardboard.
- Crayons
- Scissors.
- Pen
- Laminator or press and seal lamination pouches. (Optional, but recommended.)

Procedure:
- Print and cut out my collar stay template.
- Cut off the sides of a Kleenex box so you have 2 pieces of cardboard.
- Put the collar stay template on 1 piece of card board and trace around it with the pen.
- Cut the collar stay shape out of the cardboard and then test it in the shirt collar.

- Trim the cut card board piece if necessary to make it fit the shirt.
- Use your tested cardboard template to drawn several more outlines on the second piece of cardboard.

- Let your tot color in the outlines.
- Laminate the cardboard.
- Cut out all of the color stays.

- For a nice gift, neatly stack the collar stays and tie them up with a pretty ribbon.
Observations: It took Sweet Pea about 45 seconds to finish coloring in all of the collar stay outlines. I couldn’t get her to do anything other than color them in with a solid color either. She just wasn’t very interested in this, but I think an older child could probably make a really nice design on them.
Despite Sweet Pea’s indifference, I was really happy with this activity. It is very quick and easy father’s day craft.
Notes from the Trenches: Originally I tried just using cardstock, but it wasn’t heavy enough. Also, even with the cardboard, I recommend laminating these. The cardboard by itself wasn’t quite stiff enough to make a good collar stay.
Take these out of your shirt collars before you launder them. I don’t think they would melt or anything, but I would hate to be responsible for a ruined shirt.
Rating: 2 Stars * ( Easy, Frugal)
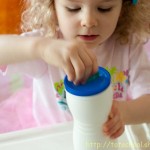
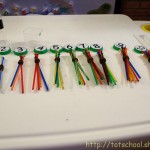
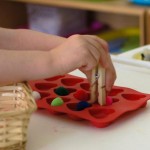
Animal Counting Cards for Milk Cap Numbers
Sweet Pea is 33 months old.

From: These are cards I developed to be used with milk cap numbers. (I promise this is the last one of these number cap activities for a while!)
Material:

Procedure:
- Print out the worksheets and cut each of them into quarters to make 4 cards.
- Optionally color and laminate the cards.
- Divide the cards by animal type into 7 piles (or in any other arrangement so that each pile contains a cards with 1, 2, 3 and 4 animals).
- Lay out each of the cards from the first pile in front of your tot. Place the 1,2,3 and 4 milk cap numbers next to the cards.

- Point to a card and have your tot help you count the animals on the card.
- Have your tot help you select the correct milk cap number and place it in the circle in the middle of the appropriate card.
- Point to another card and have your tot help you count the animals on that card and select the matching milk cap number.
- Continue until you have used all of the milk cap numbers, gradually letting your tot take over the work.
- Repeat for the remaining piles.
Observations: Sweet Pea insisted on having “Monk Monk” (a toy monkey that was given to our dog by Santa last Christmas, but which was quickly appropriated by Sweet Pea) do this entire activity.

MonkMonk was able to count each of the animals.


MonkMonk then placed each of the numbers on the correct card.

It was a very succesful activity for MonkMonk and I would recommend it for all other re-purposed dog toys.
Notes from the Trenches: I think it might be a good idea to write the correct number on the back of the cards so that your child can check his or her work.
Also, you have to watch out or your stuffed monkey will carelessly knock everything off of the table.
Rating: 3 Stars * (Fun, Independent, Frugal if you just cut the milk cap numbers out of paper and forgo the Mod Podge.)
Related Posts:
The tiny little elves that live inside my computer think you also might be interested in the following:
|
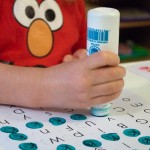
Sweet Pea is 4 years old.
")
From: I have finally finished the lowercase Do-A-Dot letters! A long time ago, I created a set of uppercase Do-A-Dot letters and since then, many people have asked me to also make a lowercase version. It took me much longer to make these than I expected, but here they are!
Material:
- Do-A-Dot Markers.
- Lowercase Do-A-Dot Worksheets.
- A plastic table cloth, tray or at least some extra papers (to prevent the Do-A-Dot ink from staining your table).
- A smock or bib (optional).
Procedure:
- Print of a few of the Lowercase Do-A-Dot Worksheets.
- For younger tots, you may have to remove the screw cap on the markers.
- If your tot has not worked with a Do-A-Dot marker before, select one sheet and show how him how to press straight down with the marker to make a colored dot inside one of the circles.
- Give your tot a few of the letter sheets and allow him to fill in the dots on his own.
Observations: Sweet Pea got so excited when she saw me printing out these new worksheets and begged me to let her do them right away. She was so happy to do this activity again. Children love trying fill in all of the circles and Sweet Pea was able to stamp them much more accurately this time.
")
Sweet Pea has loved the Do-A-Dot markers from the very first time I gave them to her, when she had just turned 2 years old. Do-A-Dot markers are a great activity for a wide range of ages and I highly recommended them.
")
Notes from the Trenches: About halfway through the alphabet, Sweet Pea grew a tired of stamping in the circles and started trying to smear the marker around to “trace” the letter. I think she wanted to “finish” all of them, but was getting tired. I put away the rest of them to do later. I suggest you only give out a few sheets at a time instead of the whole alphabet.
As I mentioned last time we used these, the Do-A-Dot markers do not clean up quite as quickly as washable Crayola markers.
Rating: 3 Stars * (Fun, Easy, Independent)
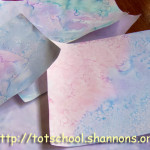
Sweet Pea is 4 years old.

From: The Crafty Crow (a wonderful collection of children’s art ideas) featured this fun idea from A Bit of This and A Bit of That.
Material:
- Half-sized sheets of dark colored paper or card stock.
- Glue.
- 2-3 Tablespoons of salt in a small bowl.
- 1 Extra sheet of paper, the larger the better.
- 3 or 4 colors of liquid watercolors, diluted if necessary (or a tablespoon of water with a few drops of food coloring added).
- Paintbrush.
- Smock or bib for your tot.

Procedure:
- Show your tot how to squeeze the glue bottle to draw on the sheet of dark paper.

- When your tot is happy with her drawing, help her carefully pour salt all over the glue.
- Hold the salted paper over the extra piece of paper to contain salt spills. Show your tot how to gently shake the dark paper so that every bit of glue gets covered with salt.

- Turn the salted paper vertically so that any excess salt falls onto the extra sheet of paper.
- Set the salted paper aside and gently bend the extra sheet of paper and pour the salt back into the bowl.
- Allow your tot to dip her paintbrush in the liquid water colors.
- Show her how to very gently just touch the tip of the paint brush to the salted paper. The color will immediately run off of the paintbrush and spread only onto the salted area. It is a very cool effect.

- Let your tot continue dipping the paintbrush into different colors, touching the salt and watching the colors spread.
Observations: As I expected, Sweet Pea loved this. She was completely engrossed in every aspect of it and used up all of the dark paper I provided. We both had lots of fun.

This project does require quite a bit of fine motor control so I would not try it with a toddler. However, I highly recommended this activity for preschoolers.
Notes from the Trenches: Make sure to put the salt in a small bowl. Letting your tot pour directly from the salt container will result in an avalanche of salt all over the place. Of course, the picture below was taken before I realized that I needed to give Sweet Pea a smaller quantity of salt to work with.

The salt creations are beautiful, but are not suitable for displaying. I let ours dry for over a week, but the salt never stopped falling off of them when I held the paper upright. You may want to explain to your tot from the start that this is “just for fun” and that you won’t be able to keep the pictures.
Also, I don’t know exactly why the water colors move only along the salt path. I thought it was capillary action, but my husband thinks it is something else. Any one else have an explanation?
Rating: 3 Stars * (Fun, Easy, Frugal)
Carnivals: This post is linked to Child Centered Art Party #7 at Art for Little Hands.

Sweet Pea is 4 years old.

From: When Sweet Pea began to tire of the Tape Maze, I extended it with this activity.
Material:
- Masking Tape.
- A handful of pom-poms or cotton balls
- Small bucket or bowl.
Procedure:
- Set up a tape maze as I described in the Tape Maze activity.
- Have your child stand at one corner of the tape maze.
- Give your child some pom-poms and instruct him to throw them onto the maze.

- Ask your tot walk along the maze and pick up the pom-poms without stepping off the tape lines.

Observations: Sweet Pea loved this activity and repeated it many times. It was very cute to watch her try to balance on the line and reach out to pick up the pom-poms.

She talked out loud to herself almost the entire time. I was surprised by how engaged she was with this game. This was so easy and fun for Sweet Pea.Also, on her own, she decided to line the pom-poms up along the tape and spent quite a big of time on that too. Just grab some masking tape and pom-poms and see what you and your tot come up with!

Rating: 4 Stars * (Fun, Easy, Independent, Frugal)
Sweet Pea is 4 years old.

From: This is a variation on the traditional Montessori “Walking on the Line” activity.
Material:

Procedure:
- Tape a very long piece of masking tape to the floor.
- Place several other long pieces of masking tape on the floor that cross with the first piece. Add more strips of tape that intersect each other so you have a sort of tape maze on your floor.

- Invite your tot to walk along the tape lines.
Observations: Sweet Pea begs to walk along the lines on a parking lot, on curbs, medians, fountain ledges and any other “balance beams” that she sees. I was not surprised that she loved this activity.

Sweet Pea liked walking the line just for the fun of it, but you could place a treat at the end of one of the lines or add an extra element of role playing by suggesting that your tot pretend she is a tight rope walker or crossing a rope bridge, etc. We even invented our own game with the tape maze which I will describe in my next post.
This is a nice physical activity that helps with coordination and balance. I have never seen a tot who didn’t enjoy trying to walk precisely along a line. This activity is very quick to set up and is highly recommended.

Notes from the Trenches: The masking tape easily pulled off our carpet when we were done, but you might want to test a small piece of tape on your own type of flooring.
Rating: 4 Stars * (Fun, Easy, Independent, Frugal)
|
Need Ideas? Do you need some inspiration for activities to do with your own tots? You are in the right place!
You can search by age or activity type using the menus at the top of the page, use the tags on the left, or just check out some of my most popular posts, listed below.
Also, you are encouraged to pin any of my photos to pinterest so long as you include a link back to my blog.
-Shannon
|


")
")
")


 "Pin It")

 "Pin It")


These are very neat. Thanks for sharing. I especially liked your post on how you made your milk cap numbers. I have both the modge pode and have enough milk caps saved!
Love all these, I’ve been waiting for you to do numbers!!
Great use of materials!!! I can’t wait to make a set for my 4 year old!
Thanks for sharing!
Thanks for sharing, this helped teach my pupils to know the number.