|
|

Sweet Pea is 5 years old.
")
From: I have seen variations on this in a few places: The Chocolate Muffin Tree, Play At Home Mom and Meaningful Mama.
Material:
-
- Glow Sticks. (I found a tube of 15 bracelets in the Target Dollar spot for only $1 and Micheal’s Craft Store sells them like that too.)
- Bath tub.
")
Procedure:
-
- Run the bath water.
- Bend the sticks to start them glowing.
- Scatter the sticks into the bath tub.
")
- Turn off the light and invite your tot into the room.
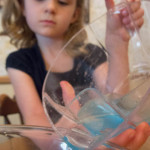
Observations: Sweet Pea was delighted by this and played for a _long_ time in the bathtub. Among other things, she pretended that the glow sticks were fairies.
")
This probably wasn’t very educational or interactive with me, but it was a lot of fun for Sweet Pea. It was also super easy to set up and kept Sweet Pea entertained for a long time. I was able to sit in the bathroom and browse the web on my phone for at least 20 minutes. I will definitively be keeping some glow sticks around for days when she is feeling a little stir-crazy or when I just need a break.
I would highly recommend this for preschoolers and up.
Notes from the Trenches: Obviously, do not leave your tot unsupervised in the bathtub.
Rating: 2 Stars * (Fun, Easy)
Carnivals: This post is linked up to It’s Playtime @ Messy Kids.

Sweet Pea is 5 years old.

From: I first saw this cool (ha!) and extremely healthy snack idea at The Kitchn.
Material:
- Very ripe bananas.
- Cutting Board.
- Table knife.
- Small ziplock baggie.
- Milk (optional).
- A food processor, blender, magic bullet, etc.
- Toppings & Mix-Ins: 1/4 tsp vanilla extract, 2 TBS chocolate chips, 1 TBS cocoa powder, etc. (Optional).
Procedure:
- Peel the banana.
- Sit near your tot and use the table knife to demonstrate how to carefully cut the banana into 1/2 inch slices.
- Let your tot cut up the rest of the banana.
- Have your tot put the slices of banana in a single layer inside a ziplock baggie.
- Place the baggie in the freezer and allow the banana slices to freeze for at least 2 hours.
")
- After the bananas are frozen, place them in the bowl of the food processor, blender, etc.
- If you are using a food processor or high quality blender, you may be able to blend the bananas by themselves. However, if you are using something with a little less power (ie. A Magic Bullet), you will also need to add about 1/4 – 1/2 cup of milk.
")
- Blend the bananas until they are the consistency of soft serve ice cream.
")
- Spoon the mixture into a bowl and let your tot enjoy!
")
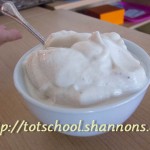
Observations: To say that Sweet Pea is crazy about banana ice cream is an understatement. She likes cutting up the banana, but especially eating the ice cream as an afternoon snack.
")
The first time I made this, it was just to use up some over-ripe bananas. They were starting to look a little black, and I remembered this recipe. I had Sweet Pea cut them up the bananas and stuck the pieces in the freezer. Now that Sweet Pea is addicted to banana ice cream, I never have over-ripe bananas anymore. If she sees a banana in the fruit basket, she asks to cut it up so she can have “ice cream” later.
Notes from the Trenches: Is it the texture of ice cream? Yes. Does it taste like ice cream? Almost, but it is clearly not the real deal. We do not eat a lot of junk food around here. I think a child who was more used to regular ice cream might not be quite so enamored with banana “ice cream”. At Sweet Pea’s request, I made a batch of this for her and a little neighbor friend one afternoon. Sweet Pea’s friend took one bite and looked up at me with a knowing expression and placed her spoon back down on the table. Unlike Sweet Pea, the neighbor friend did not finish eating her bowl of “ice cream”.
Rating: 3 Stars * (Fun, Easy, Frugal)
Carnivals: This post is linked up to It’s Playtime at Hands on As We Grow.

Sweet Pea is 5 years old.
")
From: A couple of years ago, I read about this project in one of MaryAnn Kohl’s fantastic art idea books (either First Art or Preschool Art). Almost immediately, I bought powdered tempura paint (which is a great low-cost paint option if your family does a lot of painting), but it took a long time for me to coordinate my desire to do this project with the weather required for it (light rain).
Material:
- A lightly raining day.
- Jelly roll tray.
- Several sheets of card stock or very thick paper.
- A few colors of powdered tempura paint. (The link is to Discount School Supply, but you can probably find it at a local craft store like Micheal’s or Hobby Lobby.)
- Small bowls to hold the powdered paint.
- A small spoon. (A baby spoon would probably work best.)
- A few rocks or paperweights.
Procedure:
- Wait for a rainy day.
- Place the paper in the jelly roll pan.
- Place a small amount of each color of powdered tempura paint in its own bowl.
- Demonstrate scooping a small amount of powder with a spoon and sprinkling it across the paper.
- Let your tot continue putting powder on the paper until most of it is covered.
")
- Carry the tray outside. (Don’t let your tot do this part unless you want powdered paint all over your floor.
- Let your tot place some rocks or paperweights on the paper.
- Wait until the rain has saturated all of the paint and then bring the jelly roll pans back indoors. (You may want to set a timer for 5-10 minutes. The exact time will depend on how hard it is raining, but if you wait too long and it starts pouring, the “paintings” can get destroyed.)
- Let the paper dry overnight and then and let your tot admire her artwork.
Observations: Sweet Pea had a fun time with this. She was incredibly eager to see what the rain would do to the paint.
")
My only reservation about this activity is that it did not take Sweet Pea very long to create her art work. She was so excited about getting the paper outside that she spooned on the powdered paint as quickly as possible and then begged to go outside immediately. Although, if we do this activity again, I think she might go slower with it and experiment a bit more.
")
The paintings turned out very pretty and it was a good opportunity to review color mixing.
I think this would be fun for any age from toddler on up (so long as your tot is old enough to not try to eat the paint).
Notes from the Trenches: This was a little bit messy, but the jelly roll pan helped keep the paint powder somewhat contained. However, I think an especially determined child could make quite a mess.
In retrospect, the paint looked better where the powder had been applied more thinly. The larger piles of paint powder did not totally dissolve and adhere to the paper. If we did this again, I would have Sweet Pea use a small baby spoon instead of a regular teaspoon.
It didn’t occur to me that we would need paperweights. As soon as we set the tray on the ground, the wind picked up one of the pieces of paper and almost flipped it over. I told Sweet Pea that we needed to get something to hold the paper down and Sweet Pea began a rock hunting expedition. I think our quest to find the perfect rocks (in the rain!) lasted longer than the painting portion of the activity.
")
Rating: 2 1/2 Stars * (Fun, Easy, Frugal – Powdered Tempera Paint is very inexpensive, but I am guessing most people don’t have it on hand.)
Sweet Pea is 5 years old.

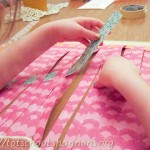
From: I am a bit of an origami nerd. I will often make an origami crane to amuse Sweet Pea and lately I have been showing her how to create her own animals.
Prerequisite: Your child must be able to fold a sheet of paper and make a crease in it, which is a surprisingly difficult skill for a small child. The Kumon Let’s Fold book is a good option for a younger tot to practice folding.
Material:
- A medium sized sheet of origami paper. (Origami paper is perfectly square and usually colored on only one side. You can find it at Micheal’s or another craft store, but you can also make your own out of wrapping paper.)
Procedure:
- This simple dog only requires a few folds, but practice the steps below a few times before trying to explain it to your child.
- After you are comfortable making origami dog by yourself, sit next to your child and show her how to do it.
Observations: Sweet Pea had some difficulty the first couple of times, and especially needed my help with the ears at first, but soon was able to do the entire thing by herself.

Sweet Pea has probably made at least 20 origami dogs since I showed her this. She especially likes to rope unsuspecting visitors into lengthy origami lessons show other people how to make them.

Origami is fantastic for developing fine motor control, spatial-relations skills and the ability to follow directions. I love origami and Sweet Pea has really taken to it, so I highly recommend this activity for any child in kindergarten or older.

Notes from the Trenches: It seems like all origami models have one step that requires special attention. I always refer to this as the “a miracle occurs step”. In the dog model, the tricky step is folding down the ears (box #4 in the picture above). Make sure that you fold them from the center of the upside down triangle and leave enough room between them to draw the dog’s face.
Rating: 4 Stars * (Fun, Easy, Independent, Frugal)

Sweet Pea is 5 years old.
")
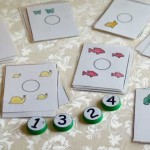
From: Sweet Pea is very interested in putting money into her piggy bank so I thought she would like to learn more about coins. I found this coin sorting activity at the Activity Mom.
Material:
- A variety of different coins.
- Coin cards. (I created my coin cards in the style of Montessori 3-part cards, in case you also want to use them as traditional nomenclature cards. All cards are in the single file.)
")
Procedure:
- Cut out the coin cards and spread out the ones you wish to use (or put them on separate trays).
- Place all of the coins in one pile.
- Sit next to your child and explain that you are going to sort the coins. Read the names of the coins as you point to the picture on each card. Comment on the pictures on each coin and its size.
- Pick up one coin from the pile and show your child how to decide which card to place it on. Model your thinking by talking out loud about where it should go. (“Does this coin go on this card? No… it isn’t a quarter. This coin is smaller than the one pictured on the quarter card.”)
")
- After you have placed at least 1 coin on each card, let your tot try.
")
- Invite your child to continue sorting through the pile of coins until she runs out of coins or grows tired of it.
Observations: Sorting activities don’t always keep Sweet Pea’s attention and I worried that this activity might be too easy for her, so I was hugely surprised by how much difficulty she had with it.
")
She struggled to figure out where each coin went and often asked me where it would go. I would try to direct her by asking questions such as, “Well, what size is it? Does it match the size of the other coins on that tray?” And I had to sit on my hands a few times to keep myself from correcting her when she chose incorrectly and put a coin on the wrong tray. I am fascinated when I discover something like this that an adult does everyday without even thinking about it, but is surprisingly confusing to learn.
")
This activity wasn’t exactly “fun” for Sweet Pea, but she was engaged for quite a while and did finish sorting almost all of the coins before she got tired of it.
")
I would only recommend it for kids (kindergarten and older) who are starting to show an interest in money.
Notes from the Trenches: When we did this activity, we used a version of the cards from Counting Coconuts, which were good because the coins are the correct color (instead of mine which are just black and white). However, the coins on her cards were much larger than actual size and I think that may have contributed to some of Sweet Pea’s difficulty. I tried to make the coins on my cards reflect the actual size of the coins.
Rating: 3 Stars * (Easy, Independent, Frugal)

Sweet Pea is 5 years old.

From: I got the idea for this fun activity from this picture on pinterest, but I can not find the original source. (If you know where it came from, let me know so I can give credit.)
Material:
- Yarn.
- Masking tape.
- A hallway or other long and narrow location in your house.
- An item of “value”. (Plastic ring, crown, sculpture, etc)

Procedure:
- Put the “item of value” at one end of the hallway
- Working from that location, start taping the yarn to the wall.
- Let the yarn out as you tape it to the wall at different levels. Move down the hallway (away from the object) to create the obstacle course.
- Keep in mind how your child will crawl through it to keep it at the right level of difficulty for them. Make sure there are some low spots to step over and some high spots to crawl under.
- After the course is set up, invite your child to move through the obstacle course without touching one of the yarn “lasers”, collect the valuable object and then return back through the course.
- Encourage them to “practice” several times before trying it for “real”.

Observations: Sweet Pea _loved_ this. She was so excited and happy moving through it.

She went through the course many times for “practice”, trying to make it through without touch a piece of yarn. She wanted me to join her in going through the course, which I was not really up for, but she probably played for about 30 minutes by herself before trying it for “real”. She had so much fun!
Also, I think many children would enjoy setting up their own obstacle course for themselves and I will probably encourage Sweet Pea to do that next time.

This activity was easy to set up, although taking the yard down neatly (so we could use it again next time) took a bit more effort. This was a really wonderful activity and I would highly recommend it for preschoolers and older children. It would be especially good on a rainy day if when your kids need to burn off some excess energy.
Notes from the Trenches:
Your child will probably be very impatient to get started. While I was setting it up, Sweet Pea asked many times, “Can I start, now?” lol.

When you are setting up, make sure that you are headed to a location where you you want to stay for a while before you trap yourself behind the obstacle course. As soon as I had put up the yarn and settled myself in my office chair, the laundry timer buzzed and I needed to get back down to the other side of the hallway. lol.
Rating: 4 Stars * (Fun, Easy, Independent, Frugal)
Carnivals: This post is linked up to It’s Playtime at Hands on As We Grow.
Sweet Pea is 5 years old.

From: I found this very kid friendly (and almost healthy) recipe in Family Fun Magazine. I have modified the recipe a bit for clarity and because I thought that original size of the peanut butter balls was too large.
Material:
- Peanut butter ball recipe. (Right click on link and select “Save Link As…” or “Save Target As…” to save the worksheet to your computer. This is a .pdf file and requires Foxit or Adobe Acrobat to view.)
 - 3 or 4 Graham crackers (or graham cracker crumbs).
- 1/2 cup Non-fat dry powdered milk.
- 1/2 packed cup Raisins.
- 1/4 cup Honey.
- 1 cup Peanut Butter
- French rolling pin, wooden mallet or something similar.
- Large plastic zip-lock bag.
- Large mixing bowl.
- Medium bowl to hold cracker crumbs.
- Wooden spoon.
- Spatula.
- Jelly roll pan.
- Plastic wrap.

Procedure:
- Put 3 or 4 graham crackers in the zip-lock bag and show your tot how to gently hit them with the rolling pin to create cracker crumbs.

- Pour the cracker crumbs into the medium bowl and set aside.
- Add the powdered milk, peanut butter, honey and raisins to the large mixing bowl and let your tot mix everything together.
- You may have to help your tot stir a bit to ensure that all the ingredients are uniformly incorporated.
- Use the spatula to divide the dough into 4 parts.
- Working with 1 part at a time and covering the remaining dough, divide that part into 12 equal pieces. Place the pieces on a plate.
- Allow your tot to help roll each piece into a ball shape.
- Place the ball shape in the bowl of cracker crumbs and roll gently until all sides are coated.

- Place the graham cracker covered peanut butter ball on a jelly roll pan. Repeat with the remaining 11 pieces, and then repeat with the other 3 sections of dough until you have 48 peanut butter balls. (The jelly roll pan shown below contains a double recipe.)
- Cover the balls with plastic wrap and refrigerate until you are ready to serve.
Observations: Sweet Pea loves cooking so I knew she would like these. As an added bonus she got to pound the heck out of some helpless crackers and rolling them is almost like playing with Play-doh. This was a super fun recipe to make with her.

We made them as birthday treats to bring to her preschool class and she told me that almost everyone liked them. I consider this a successful report about any food that doesn’t involve frosting.
I would highly recommend them for anyone who enjoys cooking and isn’t afraid of bringing their kids into the kitchen with them.
Notes from the Trenches: My first warning is that these are terrible to keep in the fridge if you are trying to count calories. They are not exactly unhealthy, but they are calorie dense (about 50 calories each, according to my own, very possibly incorrect, calculations) and I found myself eating 1 or 2 every time I wandered by the fridge.
I really wanted to make these with our usual natural-style peanut butter, but was afraid that they wouldn’t be firm enough. If anyone makes them with natural peanut butter, please let me know how they turn out!
Rating: 3 Stars * (Fun, Easy, Frugal)
Sweet Pea is 5 years old.

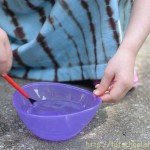
From: I have seen sidewalk paint recipes everywhere: Mom’s Crafty Space, Disney’s Family Fun magazine, river-girl, pink and green mama, and Meet the Dubiens.
Material:
- 1.25 cups Cornstarch (or even 1.5 cups. Most of the above recipes call for a 1:1 water and corn starch ratio, but we preferred river-girl’s suggestion to create slightly thicker paint. However, if it is too thick, it won’t be “paintable”, so you’ll just have to adjust it to your liking.)
- 1 cup Water.
- Whisk or spoon.
- Liquid water colors or food coloring.
- Liquid dish soap.
- Medium mixing bowl.
- Several small bowls for holding the paint.
- Paintbrush(es).

Procedure:
- Mix the cornstarch into the water in a medium bowl. Add more cornstarch or water as needed to create a slightly thick paint. Add a few drops of liquid dish soap and stir gently.
- Divide the cornstarch slurry into several smaller bowls.
- Add a few drops of liquid water colors to each of the smaller bowls and stir until all of the color is evenly distributed. Repeat with other colors in the remaining small bowls.
- Take all of the bowls of paint outside and set them on the driveway or sidewalk.

- Let your tot paint.
- (And paint and paint and paint.)
- Make more paint when your tot runs out. lol.
Observations: This activity was a huge success. Sweet Pea requests it all the time and I have set this up at least 3 times in the last month.

This is really fun stuff!

There is something really satisfying about this paint. It is just thick enough and the colors are bright so it shows up well against the concrete. It also dries quickly and has an interesting 3-D feel.

Sweet Pea likes painting, with it, but also flinging it off the end of her paintbrush to create “fireworks”.

I highly recommend this activity for all kids. It is excellent!

Notes from the Trenches: I can not remember where I saw the suggestion to add a few drops of dish soap, but I forgot to do it today and when I hosed off the driveway, I noticed that the blue paint had left behind a faint stain. It isn’t very noticeable and will probably fade if we get a couple of good storms, but I wanted to warn you. I don’t actually know if the dish soap prevents the staining, but I will probably add it from now on.
Here is my other warning: I can’t keep the neighborhood kids away when we are outside with this stuff. Seriously, it is like child-bait. I have gone through an entire large container of cornstarch from Sam’s club.
Rating: 4 Stars * (Fun, Easy, Independent, Frugal)
Carnivals: This post is linked up to It’s Playtime at Quirky Mama.

Sweet Pea is 4 years old.

From: Allison from No Time for Flash Cards shared this great way to teach your tot about rhyming words.
Material:
- A list of 5 simple words plus 4 or 5 words that rhyme with each of them. Here are some options:
- bug: hug, jug, mug, plug, rug, drug, slug, smug, tug
- cat: bat, chat, fat, flat, gnat, hat, mat, pat, rat, sat, scat, splat, that, vat
- dog: hog, log, bog, frog, jog, smog,
- pig: big, dig, fig, jig, sprig, swig, twig, wig
- sun: bun, done, fun, none, nun, one, pun, spun, stun
- About 25 craft sticks
- Thin lined permanent marker (I love the new Mark It ones from Bic. They come in lots of colors and write on almost everything.)
- 4-5 Small cups.
- Painter’s masking tape.
- Scissors.
- Basket or bowl to hold the rhyming flags.

Preparation:
- Place a piece of tape on each cup.
- Use the marker to write the first word in each rhyming set on it’s own cup.
- Lay out a long strip of masking tape, face up on a table.
- Place the craft sticks about 2 inches apart along the tape.
- Place a second piece of tape directly over the first piece, “sealing” the craft sticks between them.
- Cut the tape to separate the craft sticks and create a tape “flag” on each one.
- Clearly print one word on the front (and back) of each “flag”.
- Place all of the craft sticks in a basket.
Procedure:
- Remind your tot that rhyming words are words that have the same ending sound. Give a couple of examples (“cat” and “bat”) and encourage your tot to think of a word that rhymes with them (“I can think of something that rhymes with “cat”. You put it on your head…”)
- Explain that you are going to place the flag sticks in the cup that has the correct rhyming word.
- Read the word on each cup out loud.
- Invite your child to select a flag stick from the basket.
- Either have your child read the word on the flag, or read it for them.
- Ask you child to place the flag stick in the cup that contains the word that rhymes.
- If your tot needs more help, say the word on the flag and then repeat the words on each of the cups again. For example, if your tot selects a stick with the word “hog” on it, you could point to the first cup and say “This says “cat”. Does ‘hog -og -og -og’ have the same ending sound as ‘cat -at -at -at’ “?
- Repeat the procedure for all of the rest of the sticks in the basket.
Observations: Sweet Pea had a hard time at first and I had to help her a lot. She started catching on after 4 or 5 sticks and did seem to like it, but only placed about half of the flag sticks before getting silly.

I have noticed that Sweet Pea has a hard time coming up with rhyming words (one of the reasons that I introduced this activity) and I think this activity was just a tiny bit too difficult for her. We started off well, but it just didn’t quite hold Sweet Pea’s interest. I suspect that she will like it better in another few months.

I intentionally added some “tricky” rhyming words such as “none” to put in the “sun” cup and Sweet Pea found those impossible without my help. I think that would be a good idea for an older child who is a little more comfortable with rhyming, but I wish I wouldn’t have done it this time.

Notes from the Trenches:
We used small plastic Dixie cups which were okay, but they fell over a lot. Heavier cups would probably work better.

Rating: 3 Stars * (Easy, Independent, Frugal)
Sweet Pea is 4 years old.
")
From: Sweet Pea loves princesses and castles so when I saw Deep Space Sparkle’s Kinder Watercolor Castles, I knew Sweet Pea would be super excited to make one.
Material:
- Several small bowls of diluted liquid water colors (or food coloring).
- Oil pastels. (We used a box of my old Cray-Pas, but I read that Crayola brand pastels are designed for kids and not so messy. You might be able to use regular crayons, but I don’t think the “resist” effect would be so pronounced. Leave me a comment if you try it with crayon and let me know how it works.)
- Paint brush. (Paintbrushes from Crayola are my favorite for kids.)
- Drawing paper.
")
Procedure:
- It will be easiest if you draw a castle at the same time your tot draws his own separate one, so that he can copy each step as you show it to him.
- Using oil pastels, draw the castle one step at a time, allowing your tot to finish each step before moving on to the next one:
- Draw 3 lines, one along each side and one along bottom of the paper. The lines should be long, but not go all the way to the edges.
- Turn the 2 lines on the sides into “towers” by creating rectangles out of them.
- Connect the 2 towers with another line.
- Add a door, merlons, and turrets.
- Draw another line below the top one to create a walkway. Add detail to the door.
- Draw windows.
- Add brick detail.
- Add more design detail.
- Paint over the entire castle with liquid watercolors.
- The castle is easy to draw, but I found the written instructions at Deep Space Sparkle a little difficult to follow, so I took step-by-step photos so you can see how to do it.
")
Observations: Both Sweet Pea and I enjoyed this and I think our castles turned out so fun and colorful. (Just in case you are wondering what is on her head, Sweet Pea was wearing a slip as a “princess veil”. She came up with that idea all on her own. lol.)
")
This technique is very forgiving. I think both of our castles turned out great.
")
I liked that this activity allowed Sweet Pea to work on following directions, but still left enough room for her to be creative.
It requires quite a bit of parental involvement, but it is a good art lesson for preschoolers and up.
Notes from the Trenches:
The oil pastels smudge and generally get all over hands, arms and unprotected clothing.
")
Also, our pastels are got colored grease on the paint brushes which was very hard to wash out. I had to use soap and even then I don’t think I got it all out.
Rating: 3 Stars * (Fun, Easy, Frugal)
|
Need Ideas? Do you need some inspiration for activities to do with your own tots? You are in the right place!
You can search by age or activity type using the menus at the top of the page, use the tags on the left, or just check out some of my most popular posts, listed below.
Also, you are encouraged to pin any of my photos to pinterest so long as you include a link back to my blog.
-Shannon
|


")
")
")
")


")
")
")
")
")
")


")
")
")
")
")
")
")
")


")
")
")
")
")
")


")
")
")
")
")


 "Pin It")

 "Pin It")

