


Sweet Pea is 5 years old.

From: Many people have asked me if my original Marbled Easter Eggs are edible. I always respond by saying that I don’t recommend eating them. Since the egg shells are porous enough for dye to leak through and stain the egg whites, I imagine that the shaving cream seeps into them too.
However, a few months ago, someone named Vicki left me a comment suggesting that I should try cool whip instead of shaving cream. What a brilliant idea! I experimented a little bit and finally have a method for creating marbled eggs that can be eaten (after peeling them, of course)!
Material:
- Hard-Boiled Eggs
- White vinegar.
- Cool whip.
- Large moderately shallow container. (I used GladWare, but I think a plastic or foil 8×8 disposable baking pan would be perfect. Larger pans require too much Cool Whip.)
- 2-3 different colors of liquid or gel food coloring. (We used a “neon” color set. Several people have reported that the Wilton brand from a craft store creates deeper colors then regular ones from the grocery store.)
- Chopstick or paint brush end for swirling the colors.
- Large serving spoon.
- Spatula (optional).
- Paper plates.
- Enough space in the refrigerator to store the eggs for several hours.
- Paper towels.
- Smock or bib for your tot.
")
Procedure:
- Add a 2-3 TBS of white vinegar to the eggs, turning them to make sure that all sides get coated.
")
- Scoop enough Cool Whip into the container to coat the bottom by about 2-3 inches. You don’t want it too deep or it will dilute the dye. Smooth down the Cool Whip with a spatula or the serving spoon.
- Put about 10 drops of food coloring onto the Cool Whip. Repeat with 10 more drops of each remaining color.
")
- Let your tot use the end of a paint brush or chopstick to slowly swirl the colors together. (Generally the less swirling the better. If the dye becomes too incorporated into the Cool Whip, it will not be bright enough on the eggs.)
")
- Allow your tot to gently place an egg onto the top of the Cool Whip.
")
- Show your tot how to carefully roll the egg along the top of the Cool Whip with the large spoon until it is entirely coated with dye.
")
- Place the egg on a paper plate and set aside.
- Add a few more drops of food coloring to the Cool Whip and then repeat the procedure with the remaining eggs, adding more food coloring each time.
- Put the eggs in the fridge and allow them to sit undisturbed for about 8-12 hours. (You should not allow the eggs to sit at room temperature if you plan on eating them.) See “Notes from the Trenches” for more details on timing.
")
- After 8-12 hours, remove the eggs from the fridge and gently rub the Cool Whip off of the eggs with a paper towel. This part is very messy and also requires a delicate hand. Rub until the eggs are totally dry and free of Cool Whip, but do not press too hard on the eggs! I pressed too hard and broke a couple of the eggs this way. (Despite Play at Home Mom’s admonishments to say “yes” more often, all I could envision was a head-to-toe stained Sweet Pea, ruined clothing, and an entire dozen dropped and broken eggs. I just couldn’t bring myself to let Sweet Pea do this part, but she probably would have loved it.)
")
- Display your beautiful marbled eggs. (If you plan to eat them, remember that hard-boiled eggs should not be left out of the refrigerator for more than 2 hours.)
")
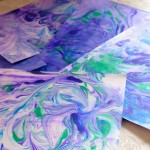
Observations: We had a lot of fun with this and we tried it several times to find the best method. We started out using tongs to turn the eggs, but that didn’t work nearly as well as a large serving spoon.
")
As I mentioned, this is very messy, but it was a lot of fun With modifications, I think it could be enjoyed by all ages. I recommend it for anyone looking for a new twist on the normal Easter Egg dying tradition.
")
Notes from the Trenches: We found that the green food coloring didn’t show up very well, but that might have been because we always added it after we’d already done several eggs with other colors first.
8-12 hours is the optimal amount of time to leave the eggs covered in the Cool Whip and dye. As you can see in the picture below, if you don’t leave the dye on the eggs for long enough, it doesn’t set.
")
Alternatively, if you leave the Cool Whip on the eggs for too long, it dries and becomes very difficult to remove. Note the gummy stain on the egg shown below.
")
The only way that I could get the dried Cool Whip off of the egg was to rub it with a damp cloth. However, this caused much of the dye to come off in those spots.
")
Along the same lines, please be aware that these eggs are not colorfast. Every time I handled the eggs, some (not a lot, but a bit) of food coloring would stain my finger tips if they were the slightest bit damp. I can imagine that taking the eggs from the fridge and leaving them out would cause some condensation and make the situation worse. I’ve had this happen with regular store-bought Paas egg dye kits too, but thought I should mention it. Be careful if you intend to hide these eggs because I definitely think they would stain fabric.
(04/01/15 Update: Some people have suggested rubbing a drop of vegetable oil onto the egg to set the dye. Someone else suggested re-dipping the eggs in vinegar. If anyone tries these things, please let me know and I will update the blog to reflect your suggestions. Thanks!)
Rating: 2 Stars * (Fun, Easy)
Carnivals: This post is linked up to It’s Playtime! @ Kid’s Activities Blog.


 "Pin It")

 "Pin It")


This sounds like alot of fun. Definately trying this with my 5 children. Thanks for the great idea!
If you are to leave them longer than 8 hours it might help to cover with saran wrap to keep them from drying out. I was thinking of doing them after dinner and then finishing them in the morning.
Amy, I really like this idea. I also felt that 8 hours was a very inconvenient time and wanted to be able to leave them over night. If you (or anyone else) tries this, please let me know how it works out and I’ll edit my post to reflect your results. Thanks!
I can’t wait to try this over the weekend with my 3 sisters and all of our kids! I’m so happy to see the cool whip worked and we can indulge in our creations Easter Morning 🙂
I tried this today with my classroom of two year olds it was fun and they turned out great the only thing is I used whipped cream instead of cool whip…. Do you think it won’t turn out cause I would feel really bad for them tomorrow at our egg hunt?
I think it should be fine, but please let me know how it worked out!
I was excited to see this post. I was going to try this tomorrow. My kids are still little and needed edible. I was going to try koolaid instead of food coloring though. Scented is always better. What do you think?
Try to koolaid and let me know what happens. I’ve had a couple of people suggest it!
Kool aid with 2/3 cup of water works great. Doesn’t stain like food coloring. I would not recommend grape though. It makes the eggs grey. We will have to try this when we are either 1:1or older. Impatient kids. Make food coloring a mess
Did you use the liquid Kool-Aid and added water or did you use the powder? I am having a hard time finding the powder.
I think perhaps you got to my site from a misleading link? I used liquid food coloring (usually sold in the baking aisle) and not kool aid.
We just used powdered kool aid yesterday to dye our eggs..I agree thst the grape eggs sre not the greatest color. Our eggs this year turned out better than ever though! Will definitely use this again!
Thanks so much for sharing this. We did it last night and my 3 year olds LOVED it! I plan on doing my own blog post on the success of this project. We didn’t have to add new dye each time we did a new egg. And we did put them in a covered container in the fridge overnight and it did not get gummy like you mentioned. I think mine were in the fridge for about 11 hours and the cool whip was easily removed. The color was amazing! Thanks again!
Thanks for the update. I’m glad to know that 11 hours still works. I just know that 24 is too long!
I am going to do this with my kids it seems pretty easy and funn live easy clean ups
Does it matter if the eggs are still warm from being hard boiled, or should they be totally cool?
Thanks so much!!
Wow. Great question and I don’t know the answer. I don’t think it should matter, but mine were totally cool. If someone tries it with warm eggs, I would like to know how it turns out.
I am so glad I saw this post. My kids are still little and so I like this edible version of this new way to dye eggs. I’ve got my eggs cooling now and can’t wait to try this. My girls are going to love this and it will smell much better then the shaving cream that I bought to use. We are going to try the kool aid method as well.
Let me know how the Kool Aid method works for you!
is it imperative that you use the vinegar…i forgot it!! ooops
Sorry! 🙁
If I use shaving cream instead would that make the eggs inedible or just the cream itself? I read the original post and didn’t realize it was wooden eggs 🙁
I would not eat any eggs that I had soaked in shaving cream. Sorry. 🙁
We did a similar process with the cool-aid. Cool-Aid makes a liquid!! Works just as well as food coloring!! In fact, we used the liquid Cool-Aid in water and worked even better then most manufactured dye kits and more edible too.
Thanks for the tip. I think I’m going to try it next year with Cool-Aid.
We did the Koolaid to dye our eggs. Gave the eggs a soft pastel color. We added a few affects and turned out very pretty. We will do again next year. Am getting ready to try the cool whip dye!
Thanks for the update on the Koolaid dye. I want to try that next.
I also forgot to use the vineger. Will it turn out at all? I guess I will leave my egg dye sit out in case I have to “redye” in the morning.
One other person said that they forgot the vinegar, but that it turned out okay and another said it didn’t work. I am guessing your colors won’t be as bright. Let us know how it works!
https://sphotos-a.xx.fbcdn.net/hphotos-ash3/31455_617808354900523_965067700_n.jpg
Thank you! Our eggs came out great!
So happy to hear it!
We tried this, our eggs turned out neat! I made some traditional color using Koolaid packets, vinegar and hot water. The colors were heavy duty! Just a few seconds and the eggs very colorful. Fruit punch was a pretty red/orange, but grape was more grayish. Fun and different. In the cold MN winters I fill buckets with water and add food coloring or koolaid packets. The koolaid get’s much deeper color and lasts longer in the sun. We stack them up and make ice castles.
Wow. What a fun idea for making ice castles! If we have a hard winter around here next year, I would love to do that!
This is probably a dumb question, but I wasn’t clear. Do I peel the eggs before marble covering them or will the dye seep through the eggshell?
We did this with eggs in the shell. We did not peel the eggs first. I can not remember now if the food coloring seeped through to the unpeeled egg underneath or not. I am not sure if it would work with already peeled eggs.
Do you think this version would work with wooden eggs as well? I work with 3-5 year olds and I worry about them eating the shaving cream, but also worry about them having real eggs lol!
I think it should… I don’t think there is anything in cool whip that would spoil. lol. 🙂
It doesn’t specify. Should I wipe the vinegar off the eggs before transferring to the cool whip? Or is it ok to leave them wet with the vinegar?
I do know if it matters. I did not dry the eggs off, but I did hold them up and shake them a little bit so they were not sopping wet. I hope that makes sense.
This sounds like so much fun. I am going to be trying this deffinately. But to ease everyone’s mind of food coloring. Food coloring is totally and perfectly safe. Believe it or not but we eat food coloring every day.
Yes, egg shells are porous but not as porous as you may think. I have put food coloring straight from the bottle onto the shell and is did not penetrate through. Usually the only way the food coloring seeps through is if there is a crack in the shell unseen by the eye before and or after boiling. (egg is still safe to use/eat) and the coloring finds that crack. Its all good. You just end up with a colorful peeled egg to eat.
I quit using the PAAS egg coloring kits many many years ago. So much money saved over the years. Those kits are overrated (just my opinion)
But just wanted to ease the minds of concern for the seeping food colors. Its all good.
I agree that food coloring is probably fine to eat. My original post used liquid water colors which, I’m sure you will agree, is not edible. 🙂
hey is there a reason why i cant print out this page with the directions? do you have a printable page i can print out that has the directions on it? thanks im going to do this with my girls and they are excited. awesome cool idea.
I like your idea of creating a printable page for this activity. I’m sorry that I don’t have one for you at this time.
Excellent project. And so simple. We went with food handling gloves to minimize the finger coloring. I don’t blog, but am sharing your blog on my timeline. Thanks.
What a nice idea to use food handling gloves! I wonder if they make them in children’s sizes… 🙂
I did the cool whip version usung neon food coloring. My 5 and 9 yr old grandchildren had a blast. Bright colors. Made great photos too.
Didn’t have cool whip in my house & it was too cold to go get some. So I tried flour, vinegar, & water to make a thick paste. It worked pretty well. I don’t suggest putting them in the fridge though because the paste dries out fast & is then hard to get off. I had the best results with letting them sit for about 15-20 minutes, which my impatient little ones appreciated!
Oh, thanks for the interesting idea. I like your ingenuity! 🙂
I did this with third and fourth graders. We had some problems and didn’t have cool whip so we supplemented with oil. Great fun! They turned out well. Big mess but I had a teachers aid.
Oh wow, I think oil would be sooo messy! But I’m glad you were able to improvise and that it turned out!
I just did this with my daughter we had fun doing it but I forgot to put vinegar on the eggs. Will it make a difference??
If you forget the vinegar, I think the colors will be much more muted. Let me know how they turn out, though!
I don’t know if it works or not- but I noticed when using gel food coloring that they don’t stain your hands. I don’t know if gel food coloring would work or not- but it might be worth a try for people with little ones.
Thanks for the tip! We might try that and see how it turns out.
I think that this really cool and fun to make and eat
Will make a post about this, this is a great and amazing decorative yumminess for my sun.
Hi, I checked out your project for dying Easter eggs with my grandkids, but since you mentioned using wooden eggs, I wonder if it would work with my hard shell gourds. I’ve been wanting to marble them for a long time, but couldn’t figure out how. I think I’ll try and will let you know.
Thanks for the idea!
I am so interested to hear if this worked! Very cool idea to use the gourds. 🙂
I remember when I was a kid my Mom would rub a little cooking oil on the eggs after we colored them. This set the dye so it didn’t rub off on your fingers.
Thanks for the tip!
after cleaning off the cool whip, have you tried redipping them in vinegar to set the dye to keep it from coming off on little hands?
No. I haven’t tried that. If you do it, please let me know if it works and I will add a note to the blog post about it! Thanks!
I did this last year with the shaving cream and it was so cool and turned out great.Now I will try the cool whip this year. I’m always up for some thing different.
Happy Easter eveyone
Are the eggs peeled while doing this or do they still have the shell???
Leave them in the shells. 🙂
Am I assuming correctly that you are dyeing the eggs after you have boiled them AND peeled them? Or they are being dyed with the shell on? I love Cool Whip and would hate to dye in that and then have to wash all of that away then peel off shell when ready to eat.
Leave the shell on! (The reason these are called “Edible” is because my other recipe used shaving cream. Many people wanted to eat the eggs after dying them in shaving cream which wasn’t a good idea.)
Just another tid bit when it comes to making hard boiled eggs and there’s always the question of being cooked to much or not enough…or making deviled eggs…how do the shells come off perfectly?
It is done with the Tupperware steamer! 12 eggs for 12 minutes – perfect every time! I love showing this at parties along with all the other great money and time saving ideas. At Easter or any other time it works great…I say “bee” aware of Tupperware.
Blessed Easter to All!
My son and I just finished our eggs. They are in the fridge now. We can’t wait to see How they turn out.
Please let me know how they turn out! 🙂
I was wondering if there is a way I can follow your blog without having to go through Pinterest?
If you look on the left hand side of my blog, there should be a rectangular box that says “Subscribe by email”. If you click on that you can subscribe to my blog. (That being said, I do not post very often anymore, but that could change.)
Have you ever thought of blowing out the shells so that the shells can be used year after year for an Easter Egg tree?
This is an interesting thought. We enjoy the process of making the Easter Eggs every year, but if you only wanted to do it once, this would be a good idea. Thanks for the tip!
Loved making cool whip dyed eggs for family.. left for about 4 and 1/2 hours.. turned out awesome.. reminded me of the solar system..
These came out great. We did the coloring yesterday before dinner. I put them in a seal-able Tupperware container over night (was about 16 hours in total) The coolwhip didn’t dry out at all and the colors came out nice and vibrant. Getting the coolwhip off was definitely time consuming and messy, but it was definitely a fun activity and one we’ll most likely do again. Only downside was my 5 year old kept wanting to lick the coolwhip off her fingers yesterday… the vinegar flavored coolwhip lol.
I can not even imagine what vinegar coolwhip would taste like. 🙂 Yuck! lol.
I tried this and it workd Great! I put the eggs in a plastic bowl and covered with plastic wrap overnight and they were Easy to wash off in the morning. I will be doing this one again!
I whipped up this cool idea…Thanks gor sharing….
[…] Are you looking for an edible version to use with real eggs? Read my Beautiful EDIBLE Marble Egg post! […]
[…] Note: If you want to make edible eggs you can try this Cool Whip Easter egg recipe! […]
[…] These Marbled Eggs from Tot School are so cool! […]
[…] their kid who is going to leave sharpie on the dining room table). Both the Easy Marble Egg Dye (link) and Volcano Egg Dye (link) are popular at the moment, have a big wow factor, and can keep kids […]
[…] found this *awesome* recipe on pintrest that allows you color easter eggs with EDIBLE egg coloring!!! You mix some cool whip […]
[…] Cool Whip Decorated Easter Eggs from Tot School […]
[…] with help of my 3 year old, we created some Edible Marbled Easter Eggs (Toddler approved and […]
[…] Edible marbled Easter eggs (Cool Whip eggs) from Tot School […]