


Sweet Pea is 5 years old.
")
From: I found this cool idea on Mommy Labs.
Material:
- A bottle of white school glue.
- One color of Liquid watercolor or food coloring.
- A chopstick or thin paintbrush handle to stir the glue.
- Paper or card stock.
")
- Chalk Pastels
")
- Damp cloth for wiping off dirty fingers. (Optional)
- Smock or bib. (Optional)
Procedure:
- Remove the cap from the glue bottle and add about 10 drops of the liquid watercolor. The exact number of drops will change depending on how saturated you want the color of the glue paint to be.
- Use the chopstick to stir the color into the glue. It will take quite a bit of stirring to create a uniform color.
- If you want the glue paint to be darker, add more liquid water color and stir again.
")
- Once you are happy with the color, recap the glue bottle.
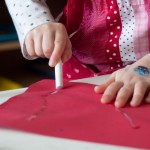
- Allow your tot to draw shapes on a piece of paper with the colored glue. (Even though the photo below shows Sweet Pea drawing line segments, we later found the closed shapes worked better because they could be entirely colored-in with the pastels.)
")
- Set the paper aside to let the glue dry overnight
- When the glue is dry, let your tot use the chalk pastels to color in the shapes.
")
- Show your tot how to smudge the chalk pastels to create a more uniform color inside each of the shapes if she wants.
")
Observations: Sweet Pea likes almost all of our art projects and this was no exception. She liked squeezing the colored glue to make a drawing and she especially loved rubbing her fingers in the chalk pastels to smudge them.
")
When we first put the glue on the paper, it looked really puffy and 3-D.
")
I was surprised, and somewhat disappointing, to discover that the glue had flattened out after it dried overnight. However, it still held enough of a “ridge” to help contain the chalk pastels.
")
This was lots of fun. It was a great art project. My only reservation is that squeezing the glue paint out of the bottle requires some hand strength, so I would only recommend this for older preschoolers and up.
Notes from the Trenches: It was difficult to get the liquid water colors mixed into the glue. At first we tried shaking the glue, but when that didn’t work, we moved on to stirring with the chopstick.
")
I had a hard time finding chalk pastels, but eventually located them at Hobby Lobby. They are NOT the same thing as oil pastels. I don’t think oil pastels would work quite as well for this activity, but let me know how it turns out if you do end up using them.
")
Rating: 2 Stars * (Fun, Easy)


 "Pin It")

 "Pin It")


Love the idea of making color sheets with this! We add a bit of water to our glue to make it easier for little hands to squeeze, next time I’ll add color too!
What a good idea to add water to help make the glue bottles easier to squeeze!