


Sweet Pea is 28 months old.

From: The results of this water color resist project at 4 Crazy Kings looked so appealing that I just had to try it.
Material:
- Digital camera.
- Re-positionable laminating sheets or removable contact paper. (I preferred the laminating sheets. You can NOT use regular contact paper.)

- 3 or 4 different colors of non-toxic washable paint. Hide all of the other paint colors you own. (You will thank me for this.)
- Paintbrushes.
- 2 sheets of good paper for painting (plus more to keep your tot happy).
- Exacto Knife or Swivel Style Paper Cutting Tool (or Scissors if you are really good).
- Lightbox or a cutting board.
- Double-stick tape (or make several loops out of regular tape).
- Table cloth, large sheet of paper or other protective cover for your tot’s work area.
Procedure:
- Find a plain background and have your tot stand facing sideways in front of it.
- Take several photos of your tot with a digital camera. Upload them to your computer and select the one that has the best profile.

- Optionally, use a photo-editing program to increase the contrast in your photo so that your tot’s head stands out better against the background. This isn’t critical, but can make the next step easier.
- Chose one of the follow 2 options depending on how savvy you are with photo editing.
- Option 1: Print out your picture to the size you want and use a sharpie to draw a line around your tot’s silhouette.
- Option 2: Use a photo editing or paint program to draw a line around your tot’s silhouette (preferably on a new layer) and print the resulting outline to the size you want.

- Use the double-stick tape to secure the outline on top of a sheet a removable contact paper.
- Use the x-acto knife to cut out the profile of your tot.

- Separate the contact paper from your outline.
- You will now have 2 pieces of contact paper, one is the ‘inside profile’ section and the other one is the ‘outside profile’ section. Remove the backing from ‘inner profile’ contact paper and stick it to a piece of paper. Take care to center the profile in the middle of the paper. Repeat with the the ‘outside profile’ section.
- Stick the contact paper down very firmly. Use your fingers to press out any air bubbles and make sure that the contact paper is sealed tightly to the paper. If there are wrinkles, you may have to remove the paper until you get it exactly right. (The paint will run under the edges of the contact paper if there is even a hint of a wrinkle near an edge and ruin the painting.)
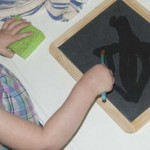
- Set up a space for your tot to paint. Cover a table with a protective cover if needed and set out the paints and paintbrush.
- Stick the piece of paper with the ‘inner profile’ on the front of it to the table with double-stick tape.
- Show your tot the paper and hand them a paintbrush. Encourage them to start painting.

- Look closely at the paper and make sure your tot has covered all of the edges of the contact paper with paint. If there is a blank space, the painting will look odd.
- After your tot is done, set the ‘inner profile’ paper aside to dry.
- Stick the ‘outer profile’ sheet to the table and let them paint it. Set it aside to dry after your tot has covered it entirely with paint.
- Allow your tot to keep painting on new sheets of paper until you are tired of watching them. (This will probably happen long before your tot tires of painting.)

- After your 2 pieces of paper dry (8-12 hours), gently find the edge of the contact paper and remove it from each of the sheets. It is somewhat hard to find because it is covered in paint. You may want to use tweezers or a thin bladed knife to get the contact paper started.
Observations: Sweet Pea was incredibly fastidious in her painting. I was surprised at how slowly and carefully she made each stroke. She was upset when she got any paint on the table or on her hands. I might have preferred a speedier approach, but it was not to be. I had to have a rag nearby to clean off her hands whenever she got them dirty before she would continue. She also wanted to use every color we had. She loved painting and did not want to stop. If you would like a really fun activity without all the hassle of this project, I suggested just letting your tot paint on a piece of paper. 🙂

This project involved a lot of work for me, but I thought the end result was pretty spectacular. It would make a great homemade gift for Father’s Day or Christmas. I matted and framed one of the pictures and gave it away to Sweet Pea’s aunt for her birthday. It was a big hit.
Notes from the Trenches: The more detailed you make your outline, the more difficult it will be to cut out. While Sweet Pea’s pretty curls look nice in the finished painting, I was wishing she had a buzz cut by the time I was done.
Note that the instructions on the removable contact paper said that it is removable at first, but becomes permanent after some time. Make sure that you let your tot do their painting soon after you attach the contact sheets to the paper AND that you remove it as soon as the paint is dry. The first time I tried this, I didn’t read that part and stuck down the contact paper several days before I let Sweet Pea paint it. When I finally pulled it off, the top of the paper got torn.
Rating: 1 Star * (Fun)


 "Pin It")

 "Pin It")


I think your resist silhouette turned out really nice. The description of Sweet Pea’s painting technique amused me. My daughter is a speedy painter, especially if I give her a sponge brush instead of a regular brush. I use sponge brushes when she needs to cover large surface, for example, for paper bag or paper plate projects.
This came out amazing!
WOW you are amazing!!!
It was great to see you today and have the kids play together so well!!!
I absolutely LOVE the way it turned out! That is truly a masterpiece. I’m a little intimidated by how much work it is, but my husband read through and said, “Oh, let’s do it this weekend.” Yay. 🙂 I’ll have to let you know how it turns out. These would make such great gifts/keepsakes!
I agree with Jill! This is an amazing project. I can’t wait to do this.
That looks great! I can’t wait to try this with Rose!
I remember doing this in first grade. In 1964 my teacher didn’t own a digital camera, but what she did was have each student take a turn sitting on a stool as she traced our shoulder and head silhouette on a white thick paper she had clipped on the wall. For those who don’t own a ditigal camera, The way my teacher did it was she turned off the lights in the area of the room she was doing the project at and used a lamp to project our silhouette on the wall which she traced on the white paper. We then cut it out and glued it on black construction paper. That was such a fun project I’ve always remembered. Thank You Miss. Smith from John Wash School “1964”
What a great teacher! 🙂