


Sweet Pea is 47 months old.
")
NOTE: Are you looking for an edible version of this activity that can be used with real eggs? Read my Beautiful EDIBLE Marble Egg post!
From: I love the look of marbled Easter eggs and decided to try our marbled paper technique to create them.
Material:
- Wooden eggs. (We got our wooden ones from Hobby Lobby, but I couldn’t find a link to the exact ones we used. Oriental Trading Company also sells something similar.) [UPDATE: I do NOT recommend eating real eggs that have been dyed with shaving cream and liquid water colors. Eggs shells are permeable! Please read my updated Beautiful EDIBLE Marble Egg post for how to do this with real eggs.]
- Shaving cream.
- 3 or 4 Different colors of liquid water colors (or food coloring).
- Jelly roll pan or disposable baking tray.
- A paintbrush, un-sharpened pencil or something similar to swirl the colors.
- Tongs or a large serving spoon.
- Cookie cooling rack.
- Cookie sheet or something to go under the cooling rack and catch paint drips.
- Paper towels.
- A towel to clean up messes.
- A smock or bib for your tot.
- Sealing Spray (Optional)

Procedure:
- Set your cooling rack on top of your cookie sheet.
- Fill the bottom of the baking tray with shaving cream.
- Sprinkle several drops of each color of liquid water colors on the shaving cream.

- Let your tot use the end of the paintbrush to gently swirl the colors together. Don’t swirl too much or the colors will not be as bright.
")
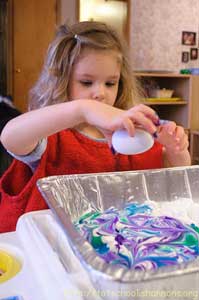
- When the colors are swirled, have your tot place an egg in the pan.
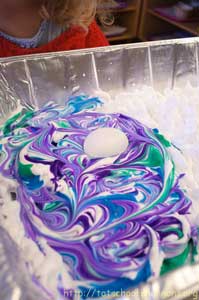
- Let your tot roll the egg around until it is entirely coated with colored shaving cream.

- Use the tongs or serving spoon to remove the egg to a cooling rack.
- To color the next eggs, make sure to roll them in an unused section of the swirled water colors. If there is no unused section, add more water colors and swirl them again before dropping in the next egg. If the water colors are too mixed into the shaving cream, they will turn out very dull on your egg. Fresh coloring equals more vibrant eggs.
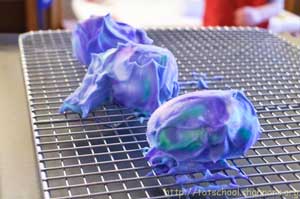
- Allow the eggs to dry overnight. The shaving cream with partially disolve, leaving an odd shaggy mess.

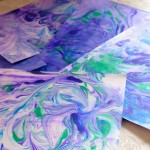
- Use a paper towel to rub the dried shaving cream from each egg
- Admire your fine marbled eggs. 🙂

- Spray the eggs with a glossy sealing spray to water proof them.
Observations: Sweet Pea loved making these eggs. She especially enjoyed dropping the eggs into the shaving cream mixture. She complained loudly when we were out of eggs.
We had lots of fun with this and I adore the beautiful results.
This activity is highly recommended for anyone who can handle a messy craft.
Notes from the Trenches: These eggs are not colorfast. Since my liquid water colors were “washable”, getting the eggs wet caused the brilliant color to run off of them. I suspect that using food coloring might solve this problem, but I didn’t have any. If you try this with food coloring, please let me know it is colorfast. [UPDATE: I had reports that food coloring rubbed off the eggs too, but Aleacia from Dilly-Dali Art says that spraying the eggs with a glossy sealing spray will make them waterproof. When I bring the eggs out for Easter this year, I will definitely coat them to finish them.

As I mentioned, this was a fairly messy activity. Sweet Pea got a lot of color all over her fingers because she kept forgetting to use the tongs. She would just reach in and try to turn the eggs with her hands. You can see what a lovely shade of purple the tips of her fingers are in the picture below.

If you’ve tried my method, please leave a comment letting me know how it turned out!
Rating: 2 Stars * (Fun, Easy)
Carnivals: This post is linked up It’s Playtime at hands on : as we grow.


 "Pin It")

 "Pin It")


can we eat the eggs after the shaving cream dries on the eggs.
Try using my Edible version: http://totschool.shannons.org/edible-marbled-easter-eggs/
did not work with real egg big fail on a scale of 1-10 1 being the worst and 10 being the best I would give it a 0 that is how bad it was once I finished with the eggs and took the shaving cream off the egg was white I think if it works with fake eggs it should work with real eggs.So at least I bought some die and after I took the eggs that were white and put them in the die it was already 7:00 and I started At about 5:00.After the eggs were done in the die and it was already 8:47.And it is the day before Easter and I had to get my kids to bed.We also had guest over that night to die Easter egg and everyone was disappointed especially the Kids 4 girls and one boy.
‘m sorry that it didn’t work for you. I can imagine that it must have been a hectic and frustrating Easter Eve!
When I read your post, I think you say that you wiped the eggs off after only 2 hours. You must have missed my instruction to leave the the eggs overnight or else it won’t set.
Oh, and I have another version of this activity specifically designed for real eggs here: http://totschool.shannons.org/edible-marbled-easter-eggs/ (Again, note that you must leave the eggs in the dye mixture for quite some time or it just rinses off.)
Hope that helps!
Hi,
What did you get the wooden holders for the eggs shown? Thanks.
The little wooden ring-style egg holders came in a William Sonoma Easter egg decorating kit. I’ve had them for quite a while, probably at least 10 years.
[…] Marbled Eggs […]
[…] Beautiful Marble Eggs […]